Temperature Controller Gets Open Source Firmware Upgrade

stc1000

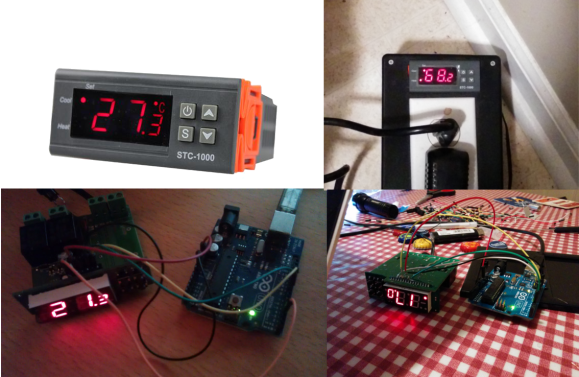
Beer lovers rejoice! [Mats] has reverse engineered a temperature controller and written new open source firmware for it. This effectively gives all us homebrewers a low cost, open source software driven controller. The STC-1000 is a cheap (under $20 USD) temperature controller mass-produced in the far east. The controllers do work, but have several limitations. The programming options are somewhat limited to basic set points for heat and cool. The controller also is only programmed for temperature display in Celsius, which is a bit of an annoyance for those of us who think in Fahrenheit. Under the hood, the STC-1000 utilizes a Microchip PIC16F1828 microcontroller. Unfortunately the PIC’s protection bits were set, so the original code would have been extremely difficult to extract. Not a problem, as [Mats] reverse engineered the hardware and wrote his own firmware. A 10k NTC thermister acts as the temperature probe. The probe is read by the PIC’s ADC. These probes are not very linear, so a look up table is used to convert from volts to degrees Celsius or Fahrenheit.

[Mats] new firmware allows for up to 6 profiles. Each profile has up to 10 set points and a time duration to hold each of the set points. Hysteresis and temperature offset values are also programmable via the front panel. PIC software is often written in C using Microchip’s MPLAB tool chain, and programmed with the PICkit 3 In Circuit Serial Programming (ICSP) tool. [Mats] decided to buck the system and wrote his C code using Small Device C Compiler. To keep things simple for homebrewers who may not have Microchip tools, [Mats] used an Arduino Uno for flashing duties. Thankfully the unholy matrimony of a PIC and an AVR has not yet caused a rift in time and space. The firmware is still very much in the beta stage, so if you want to help out, join the discussion on the homebrew talk forum. If you see [Mats] tell him we owe him a Haduino which he can use to almost open his beer.

[Thanks for the tip Parker!]

Can’t Stand Your Noisy Fan? Here’s A Plan, Man

[Brian] adores his GW Instek GPC-1850D power supply, but it’s annoyingly loud and disruptive to his audio projects. The thing works great, so he decided to regulate the fan’s speed based on usage level to save his sanity.
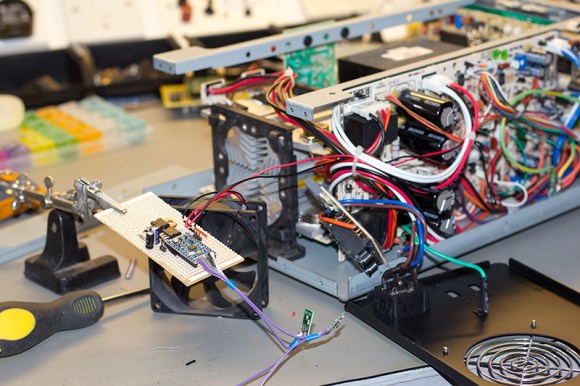
Once [Brian] got under the hood, he found that it actually has four separate heatsinks: one for the bridge rectifiers and one for each power transistor on the three output channels. The heatsinks are electrically and thermally isolated from each other and change temperature based on the channel being used.

[Brian] and his associates had several Microchip MCP9803 temperature sensors kicking around the lab from previous projects, so they put one on each heatsink. The great thing about these is their address selection pins which let all four of them sit together on the I²C bus to Arduinoville. Each sensor is insulated and clamped to its heatsink with a piece of meccano and a dab of thermal paste.

[Brian] used an Arduino Mini and built the circuit on stripboard. The fan runs at 24V, so he’s sharing that with the Arduino through a 7805. He controls the speed of the fan with PWM from the Arduino fed through a MOSFET. The Arduino reads from each sensor and determines which one is hottest. [Brian] wanted the fan to run at all times, so he set a base speed of 20%. When the heatsinks reach 30°C/86°F, the fan speed is increased to 40%. After that, the speed increases at 5°C/9°F intervals until it reaches max speed at 65°C/149°F.

You can grab the code and schematic from [Brian]’s repo. If you want to study your heatsinks, build this heatsink tester first.

Precise Temperature Control Of A Coffee Urn

coffee-urn-temperature-controller

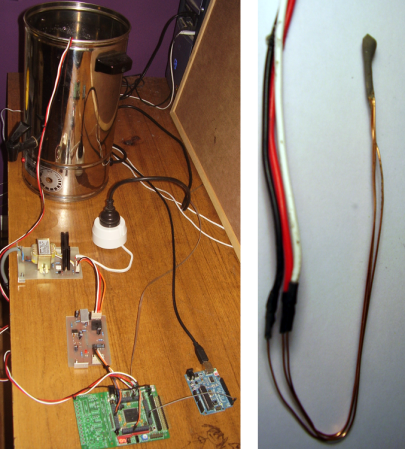
Hackaday Alum [Nick Schulze] decided to help out a friend who needed a controller to hold water at a precise temperature. Coffee guzzling hackers of the world should rejoice, as [Nick] targeted a coffee urn as the vessel for the project. What he came up with was a couple of custom boards and a roll-your-own temperature probe which does a fantastic job of regulating the temperature of the liquid.

Needing to switch the mains going to the heating element he immediately thought of an AC chopper circuit based on a Triac. What didn’t come to mind immediately was the need to detect the zero crossing. In the image above you can see nearest the urn his high voltage board. Below that is the zero crossing detector circuit. For feedback he created his own temperature probe using a TC1047 temperature sensor. After soldering on a filtering cap and the leads he dipped it in JB Weld to make it water tight. If you’re using this for coffee may we recommend seeking out a food safe probe.

After successful testing he added a user interface and buttoned it up in the enclosure seen in the video below.

Continue reading “Precise Temperature Control Of A Coffee Urn”

That’s Not Beer! A Biofuel Fermentation Controller Project

biofuel-fermentation-controller

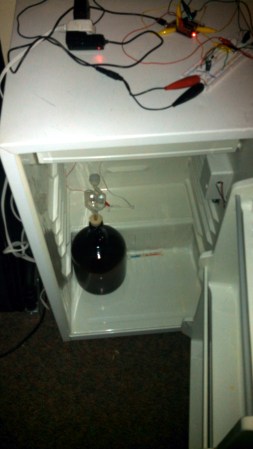
Any home brewer will recognize the setup pictured above as a temperature controlled fermentation chamber. They wouldn’t be wrong either. But you’re not going to drink what results. This project is aimed at providing a temperature controlled environment for fermenting biofuel.

[Benjamin Havey] and [Michael Abed] built the controller as their final project in his microprocessor class. The idea is to monitor and control the mini-refrigerator so that the strain of Saccharomyces Cerevisiae yeast produce as much ethanol as possible. An MSP430 microcontroller was used. It monitors a thermister with its analog to digital converter and drives a solid state relay to switch mains power to the fridge. At 41 degrees Fahrenheit this is down below what most lager yeasts want (which is usually in the low fifties). But the nice thing about using a microcontroller is you can set a schedule with different stages if you find a program that gives the yeast the best environment but requires more than one temperature level.

Who knew all that beer making was getting you ready to produce alternative fuels?

Espresso Upgrade Gives You More Data With Your Caffeine

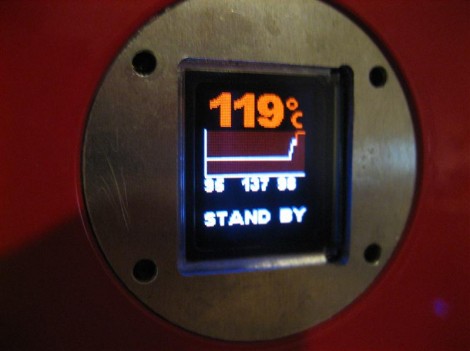
Whether you take it as a single shot or a double, a great Barista want’s to know the details on what’s happening with the espresso machine. [Tobi] was happily generating the morning cup when he realized that the needle-thermometer on his machine wasn’t working any longer. Instead of shelling out a lot of money for a direct replacement, he built his own display and controller for this espresso machine (translated).

He had a few goals with this hack. Obviously he needed to replace the temperature meter, but he also wanted a colorful display and some timing options. He was able to get his hands on a nice little OLED display that would fit in the vacated opening and it only cost a few bucks. He’s got his own mini-mill which came in handy when fabricating a board to host the ATmega16 which drives add-on, but he also used it to make a bracket for the screen replacement.

Now his machine is fixed, looks a bit more modern, and it has more features which are shown off in the video after the break. If you’re looking to add some custom circuitry to your coffee ritual you may also take some inspiration from this similar espresso machine hack. Continue reading “Espresso Upgrade Gives You More Data With Your Caffeine”

Beer Brewer’s Temperature Controller

freezer_temperature_controller

Steady fermentation temperatures, usually at about 65 degrees Fahrenheit, are an important part of brewing beer. Because of this, the wort (unfermented beer) is often temperature controlled during fermentation. [android] needed a temperature controller for fermenting beer in a chest freezer. Much like the energy efficient fridge hack from last month, the chest freezer is switched on and off to achieve the desired temperature. Instead of buying a controller, [android] built around an existing design. His project uses a solid state relay to switch an outlet on and off.

The temperature is controlled by a home thermostat. He removed the thermistor from the unit and extended it with 24 gauge wire so that it can go inside of the chest freezer. Utilizing a junction box, the freezer is plugged into one switched outlet and controlled by the thermostat via the relay. The other outlet is unswitched and provides DC power for the relay using a wall wort transformer. Although this thermostat cannot be set cold enough for lagering, it is perfect for keeping kegs at the correct beer serving temperatures when not being used for fermentation.