Building A Supersized Game Boy Advance

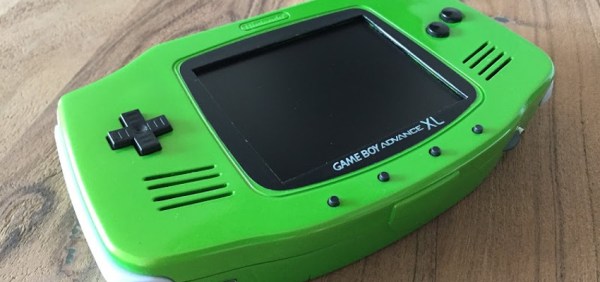
Unless you really look closely at the image above, you might not realize you aren’t looking at a normal Game Boy Advance; which is sort of the point. Even though it retains the looks of the iconic Nintendo handheld, this version built by [Akira] is supersized for adult hands. How big is it? To give you an idea, that screen is 5 inches, compared to the 2.9 inch screen the original sported.

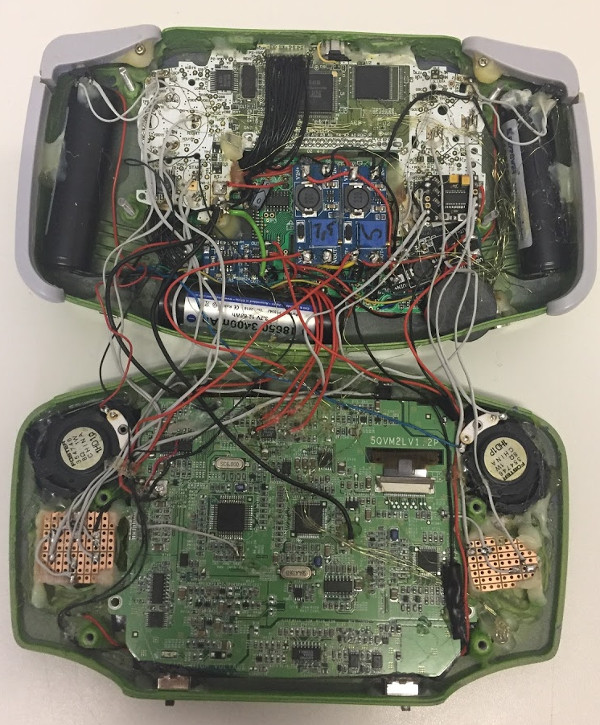
Unlike most of the portable gaming hacks we’ve covered recently, this big-boy GBA isn’t powered by a Raspberry Pi. Internally it’s packing a genuine GBA motherboard, which has been wired into a portable screen originally intended for the PlayStation.

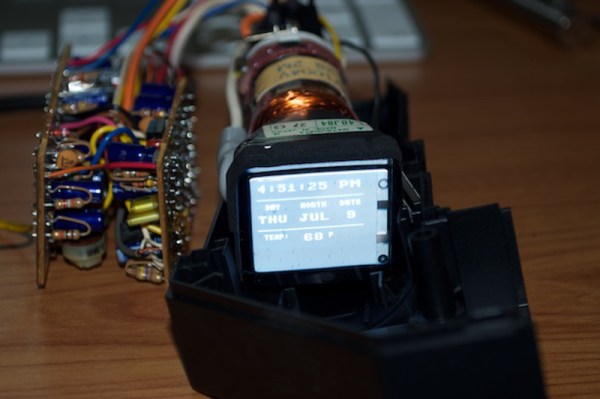
Though that may be understating things a bit, as getting the round PCB of the original screen into the rectangular shape of the GBA meant it had to be cut down and the traces recreated with jumper wires. The original CCFL backlight of the screen had to go in the name of battery life, and in its place is the backlight system pulled from a Nintendo DSi XL.

But where did [Akira] get a giant GBA case to begin with? No, it isn’t 3D printed. It’s actually a hard carrying case that was sold for the GBA. The carrying case obviously didn’t have a cartridge slot or openings for buttons, so those sections were grafted from a donor GBA case. So despite the system overall being so much bigger than the original, the D-Pad, face buttons, and cartridge slot on the back are at normal GBA scale.

The GBA XL is really a labor of love; browsing through the build log you can see that [Akira] actually started the project back in 2014, but it kept getting shelved until more research could be done on how to pack all the desired features into the final device.

While this may be the most historically accurate attempt at making a bigger Game Boy, it certainly isn’t the first. There seems to be a fascination with turning the quintessential pocket game system into something that’s quite the opposite.

Continue reading “Building A Supersized Game Boy Advance”

Adventures In Small Screen Video

[Kevin] wanted to make something using a small CRT, maybe an oscilloscope clock or something similar. He thought he scored big with a portable black and white TV that someone threw away, but it wouldn’t power on. Once opened, he thought he found the culprit—a couple of crusty, popped capacitors. [Kevin] ordered some new ones and played with the Arduino TVout code while he waited.

The caps arrived, but the little TV still wouldn’t chooch. Closer inspection revealed that someone had been there before him and ripped out some JST-connected components. Undaunted, [Kevin] went looking for a new CRT and found a vintage JVC camcorder viewfinder on the electronic bay with a 1-1/8″ screen.

At this point, he knew he wanted to display the time, date, and temperature. He figured out how the viewfinder CRT is wired, correctly assuming that the lone shielded wire is meant for composite video. It worked, but the image was backwards and off-center. No problem, just a matter of tracing out the horizontal and vertical deflection wires, swapping the horizontal ones, and nudging a few pixels in the code. Now he just has to spin a PCB, build an enclosure, and roll his own font.

[Kevin]’s CRT is pretty small, but it’s got to be easier on the eyes than the tiniest video game system.

Retro Hardware Mash-up Spouts Archaic Geekery

This delightful little box is something only a hacker could love. It uses some second-hand hardware to display random sayings attributed to [Buckminster Fuller]. The image above doesn’t do the display justice. There are other photos which show very crisp lettering which is easier to read.

[Autuin] always keeps his eyes open for cool gear at the end of its consumer life. The screen for this project is a CRT from a Coleman TV lantern (you know, for camping… bah!). It finds a home in the chassis of an old non-functional radio he had picked up a few years earlier. With those parts in hand the real adventure started: getting an Arduino to read in quotes and generate a TV out signal to display them.

We love the SD card holder which he fashioned from a card-edge connector he grabbed at the local electronics store. From there he scoured the Internet for help on where to patch into the TV signal. Once the right trace was discovered the Arduino TV out library does the heavy lifting.

Would You Like To Play A Game?

[Itay] dropped a link in our inbox about creating a simple video game system using Arduino. Yes we all know where that is going … the TV out library for Arduino. However this tutorial should still be mentioned because it pretty much covers everything someone new would need to quickly and easily hook one of these things up, along with wii Nunchuck usage, library basics and creating your first game.

Lots of large pictures, diagrams, and explanation of software is included. Yes we know we feature this little setup a lot, that is because its so darn fun. So if you ever wanted to make your own little video game system (without going crazy bit banging VGA out of a little micro in ASM) this guide will help you get started making that next arcade masterpiece.

Adding Video Out To The Open Pandora

There’s very few users out there who actually have their hands on an Open Pandora Console. But the ones who do might find this hack useful for getting TV out up and running. It’s actually not hard at all, but if you don’t want to alter the hardware on the device you’ll first have to find a cable plug that will fit the EXT jack. This proved more difficult than it needed to be, since TI carries the connector but only sells them in multiples of 2200. A group buy was organized and we’d bet you can still get in on that action.

The connector in question carries TVout1 and TVout2 conductors. These correspond to the Luminance and Chrominance signals needed for the S-video protocol. But [MarkoeZ] wanted to use a composite connection. Turns out that’s not hard either, he hooked up the ground from the plug to the ground of the RCA jack, then connected both video lines to the center conductor, making sure to add an inline 470pf capacitor on the Chrominance side. Check out the demo video embedded after the break to see the final product.

Continue reading “Adding Video Out To The Open Pandora”

Playstation 2 Controller To PSP Adapter

[TokyoDrift] built an adapter that allows you to connect a PlayStation 2 controller to a PlayStation Portable. It’s a bit different from similar hacks as this adapter doesn’t require any hardware alteration to the PSP or the controller. To do so, a plug-in is used on the PSP firmware side of things. The adapter then makes use of video out and PS2 controller extension cables, along with an ATmega8 microcontroller to handle the signals between the two devices. We posted a picture of the guts because we like that king of thing but the finished project is nicely housed inside of a project box. See for yourself in the video after the break.

If you liked this hack, check out [TokyoDrift’s] method of using a mouse with a PSP. Continue reading “Playstation 2 Controller To PSP Adapter”