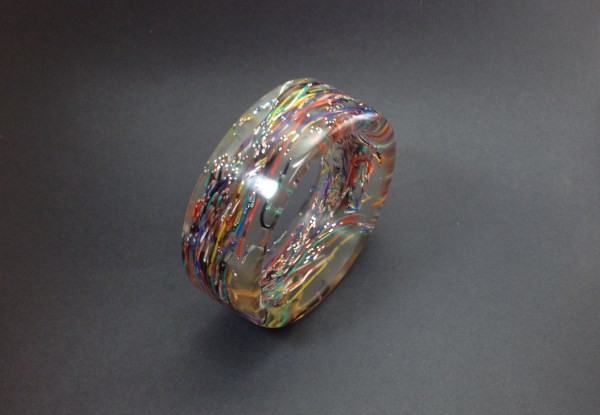
THP Semifinalist: OSHWatch

No, it’s not a finely crafted wrist accessory from Cupertino, but [Jared]’s OSHWatch, but you’re actually able to build this watch thanks to an open design and reasonable, hand-solderable layout.

Built around a case found on DealExtreme that looks suspiciously similar to enclosures meant to hold an iPod Nano, [Jared]’s smartwatch includes a 128×128 RGB OLED display, magnetometer, accelerometer, Bluetooth 4.0 transceiver, and a lithium-ion charger and regulator circuit. Everything is controlled with a PIC24, which should mean this watch has enough processing power to handle anything a watch should handle.

As for the UI and what this watch actually does [Jared] is repurposing a few Android graphics for this watch. Right now, the watch can display the time (natch), upcoming appointments on his schedule, accelerometer and magnetometer data, and debug data from the CPU. It’s very, very well put together, and repurposing an existing watch enclosure is a really slick idea. Videos below.


SpaceWrencherThe project featured in this post is a quarterfinalist in The Hackaday Prize.

Continue reading “THP Semifinalist: OSHWatch”

A collection of boards that make up the LED Jacket

A Very Bright LED Jacket

Last year, [Ytai] went to Burning Man for the first time. He was a bit inexperienced, and lacked the lumens to make him visible on the Playa. This year, he made up for it by building an extra bright LED Jacket.

The jacket consists of 48 LEDs, at 150 lumens each. Each RGB LED module was placed on its own PCB, and controlled by the tiny PIC12F1571 microcontroller. This microcontroller was a great fit since it has three PWM channels (one for each color) and costs 50 cents. Firmware on the PIC allows the boards to be daisy-chained together to reduce wiring. This was done by using a protocol similar to the popular WS2811 LEDs.

Assembling 50 of the boards presented a challenge. This was addressed by using surface mount components, a solder stencil from OSH Stencils, an electric skillet, and a good amount of patience. The final cost of each module was about $3.

With 50 of the boards assembled, a two layer jacket was sewn up. The electronics were sandwiched between these two fabric layers, which gave the jacket a clean look. A wrist mounted controller allows the wearer to select different patterns.

For a full rundown of the jacket, check out the video after the break.

Continue reading “A Very Bright LED Jacket”

THP Semifinalist: B10N1C Yourself

The Hackaday Prize has had a few medical devices make the semifinalist cut, and of course wearables are on the list. How about implantables? That’s what Bionic Yourself 2.0 (or B10N1C) is doing with an implantable microcontroller, battery, and sensor system.

The hardware in B10N1C includes a electromyography sensor for measuring muscle activity, an accelerometer, a vibration motor, RFID reader/writer, temperature sensor, and – get this – a LED bar graph that will shine a light through the skin. That’s something we’ve never seen before, and if you’re becoming a cyborg, it’s a nice feature to have.

As with anything you would implant in your body, safety is a prime consideration for Bionic.the Lithium battery can be overcharged (yes, through a wireless charging setup) to 10V without a risk of fire or explosion, can be hit with a hammer, and can even be punctured. The enclosure is medical grade silicone, the contacts are medical grade stainless steel, and there’s a humidity sensor inside that will radio a message saying its time to remove the device if the moisture level in the enclosure increases.

Because the device is implanted under the skin, being able to recharge and update the code without a physical connection is the name of the game. There’s a coil for wireless charging, and a lot of work is going into over the air firmware updating. It’s an astonishing project, and while most people probably won’t opt for a cyborg implant, it will look really cool.


SpaceWrencherThe project featured in this post is a quarterfinalist in The Hackaday Prize.

DEFCON Shenanigans: Hack The Hackaday Hat

We don’t want to call it a challenge because we fear the regulars at DEFCON can turn our piece of hardware into a smoking pile of slag, but we are planning to bring a bit of fun along with us. I’ll be wearing this classy headgear and I invite you to hack your way into the WiFi enabled Hackaday Hat.

I’ll be wearing the hat-of-many-scrolling-colors around all weekend for DEFCON 22, August 7-10th in Las Vegas. You may also find [Brian Benchoff] sporting the accessory at times. Either way, come up and say hello. We want to see any hardware you have to show us, and we’ll shower you with a bit of swag.

Don’t let it end there. Whip out your favorite pen-testing distro and hack into the hat’s access point. From there the router will serve up more information on how to hack into one of the shell accounts. Own an account and you can leave your alias for the scoreboard as well as push your own custom message to the hat’s 32×7 RGB LED marquee.

You can learn a bit more about the hat’s hardware on this project page. But as usual I’ve built this with a tight deadline and am still trying to populate all the details of the project.

Blinky LED Necklace That Actually Looks Chic

LED bib necklace by Agy

[Agy] a fabric hacker in Singapore has made a chic light sensitive LED necklace, and written up the tutorial on her blog  Green Issues by Agy. The lovely thing about this hack is that it doesn’t look like a breadboard round her neck, and most of the non-electronic components have been upcycled. [Agy] even used Swarovski crystals as LED diffusers for extra bling.

Using a LilyPad Arduino with a light sensor and a few LEDs, [Agy’s] circuit is not complicated. She seems to be just branching out in to wearable tech, so it is nice that she learnt to program different modes for bright and low light (see video below). Her background in sewing, refashioning and upcycling does show through in her crafty use of an old pair of jeans and lace scraps for this project.

We love tech focused jewelry like [TigerUp’s] LED matrix pendants or [Armilar’s] Nixie-ify Me Necklace, but they do scream Geek. DIY electronically enhanced accessories are becoming more commonplace with the variety of micro-controller platforms expanding rapidly. Low energy wearable boards like MetaWear are making it easy for the tech to be discreet and easily connected to your smartphone.  3D printing is enabling us to create durable enclosures, settings and diffusers like the ones used for LED Stegosaurus Spikes. With all these things, hobby wearable projects can not only be functional and durable, but can also look great too.

Do you think this necklace would look out of place in a non-geeky gathering? Have you got any helpful tips for [Agy’s] code? Have you tried using gems or crystals as diffusers and what were the results? Let us know in the comments below.

Continue reading “Blinky LED Necklace That Actually Looks Chic”

Wearable Flames With Fur And LED Strips

wearable-flames-with-fur-and-LED-strips

[Finchronicity] over on Hackaday Projects has made a pretty awesome furry LED Vest to keep him warm and well lit at this year’s Burning Man. He is using a Teensy 3.0 that drives strips of 470 WS2811 LEDs.

The vertically aligned strips run on a continuous sequence which reaches up to 31 frames per second using precompiled animations. The effects rendered in Processing or video mapped, are captured frame by frame and stored as raw color data to an SD card. Playback uses the NeoPixel library to control the strips. The high resolution LEDs, with the video mapped fire and the long pile fur, create one of the nicest flame effects we have seen on clothing.

We’ve also seen the Teensy 3.0 and WS2811 LEDs used as a popular combination for building huge displays, a 23ft tall pyramid, and more recently in the RFID jacket at Make Fashion 2014. Have you made or seen a great Teensy/WS2811 project you would like to share with us? If so, let us know the details in the comments below.

Continue reading “Wearable Flames With Fur And LED Strips”

Sewing Conductive Thread In Parallel Lines

[Cynthia] has shared a great video of  machine sewing parallel lines of conductive thread onto ribbon using a cording foot which usually comes standard with most machines. This technique could be particularly useful when using addressable LEDs like a NeoPixel to get the ground, data, and positive lined up fairly accurately. Sewing the conductive thread onto ribbon also makes it a hell of a lot easier to attach to many garments or textiles,  and also makes it easier to replace or reuse.

The method is pretty easy, essentially using the grooves in the cording foot to guide the conductive treads and ensuring even spacing. Two of the lines are sewn down approximately 3 mm apart using a zigzag stitch. The third line is sewn separately making sure the stitching doesn’t break the first two lines. In the video, a striped ribbon is used which has slight troughs that additionally helps the threads stay in place and the sewer to stay on target.

[Cynthia] of Cynthia Designs Studio has been experimenting with embedding electronics in textiles and has quite a few great videos that you can check out on the Cynthia Designs Studio YouTube channel.

We have seen a machine embroidered LED matrix and a hand sewn LED quilt here on Hackaday, but those who have tried know that conductive thread can be very tricky to work with and keep conductivity.  Do you have any tips or tricks for hand or machine sewing conductive thread? If so, please share in the comments below.

Continue reading “Sewing Conductive Thread In Parallel Lines”