CNC Sound Enclosure for Living Room

Sound Isolation Box Makes Living Room Based CNC Routing Tolerable

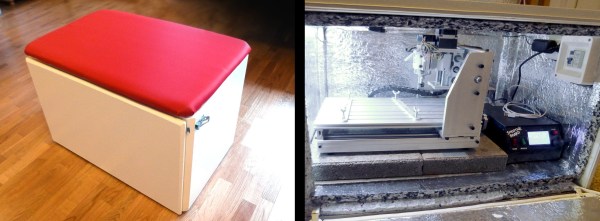
CNC Machines can be loud, especially if they are equipped with a high-speed router spindle. Unfortunately, such a loud racket could be a problem for the apartment dwellers out there. Fear Not! [Petteri] has come up with a solution. It’s a sound isolation enclosure for his mini CNC Router that doubles as furniture. It keeps the sound and dust in while pumping out some cool parts….. in his living room.

What may just look like a box with an upholstered top actually had a lot of thought put into the design. The front MDF panel folds down to lay flat on the floor so that the user can kneel on it to access the machine without putting unnecessary stress on the door hinges. The top also is hinged to allow some top-down access or permit a quick peek on the status of a job. All of the internal corners of the box were caulked to be air tight, even a little air passageway would allow sound and dust to escape. Two-centimeter thick sound insulation lines the entire interior of the box and the two access lids have rubber sealing strips to ensure an air tight seal when closed.

With stepper motors, the spindle motor and control electronics all running inside an enclosed box, there is some concern over heat build up. [Petteri] hasn’t had any problems with that so far but he still installed an over-temp power cutoff made from a GFCI outlet and a thermostat temperature switch. This unit will cut the mains power if the temperature gets over 50º C by intentionally tripping the GFCI outlet. None of the internal parts will ignite under 300º C, so there is quite a safety buffer.

Although the isolation box came out pretty good, [Petteri] admits there is room for improvement; when cutting wood or aluminum, the noise level is kind of annoying. If he had to do it again, he would use thicker MDF, 20mm instead of 5mm. However, during general use while cutting plastic, the router is still quieter than his dishwasher.

Video below.

Continue reading “Sound Isolation Box Makes Living Room Based CNC Routing Tolerable”

THP Semifinalist: OSHWatch

No, it’s not a finely crafted wrist accessory from Cupertino, but [Jared]’s OSHWatch, but you’re actually able to build this watch thanks to an open design and reasonable, hand-solderable layout.

Built around a case found on DealExtreme that looks suspiciously similar to enclosures meant to hold an iPod Nano, [Jared]’s smartwatch includes a 128×128 RGB OLED display, magnetometer, accelerometer, Bluetooth 4.0 transceiver, and a lithium-ion charger and regulator circuit. Everything is controlled with a PIC24, which should mean this watch has enough processing power to handle anything a watch should handle.

As for the UI and what this watch actually does [Jared] is repurposing a few Android graphics for this watch. Right now, the watch can display the time (natch), upcoming appointments on his schedule, accelerometer and magnetometer data, and debug data from the CPU. It’s very, very well put together, and repurposing an existing watch enclosure is a really slick idea. Videos below.


SpaceWrencherThe project featured in this post is a quarterfinalist in The Hackaday Prize.

Continue reading “THP Semifinalist: OSHWatch”

Hackaday Links: September 28, 2014

hackaday-links-chain

Kyocera is vastly expanding their product lineup with the Shop Sink 3530. The perfect addition to your copiers, fax machines, and laser printers.

About a year and a half ago and with objections from the editorial staff, we did a Top 10 hacking fails in movies and TV post. The number one fail is, “Stupid crime shows like NCIS, CSI, and Bones.” A new show on CBS just topped this list. It’s named Scorpion, and wow. Dropping a Cat5 cable from an airplane doing an almost-touch-and-go because something is wrong with the computers in the tower. Four million adults age 18-49 watched this.

thing[Derek] found something that really looks like the Hackaday logo in a spacer of some kind. It’s been sitting on his shelf for a few months, and is only now sending it in. He picked it up in a pile of scrap metal, and he (and we) really have no idea what this thing is. Any guesses?

[Sheldon] has a teardown of a vintage voltage and current standard. Just look at those hand drawn traces on a single sided board. Beautiful.

[Art] has another, ‘what is this thing’. He has two of them, and he’s pretty sure it’s some sort of differential, but other than that he’s got nothing. The only real clue is that [Art] lives near a harbor on the N. Cali coast. Maybe from a navigation system, or a governor from a weird diesel?

So you have a Kinect sitting on a shelf somewhere. That’s fine, we completely understand that. Here’s something: freeze yourself in carbonite. Yeah, it turns out having a depth sensor is exactly what you need to make a carbonite copy of yourself.

Tetris on your wrist!

Ardubracelet Lets You Play Tetris On Your Wrist!

Making your own Tetris game is almost a rite of passage for hackers — [Kevin] has stepped up the game a little by making this awesome-flexible-triple-displayed-Tetris-watch dubbed the Ardubracelet.

At the recent Maker Faire SF our head editor [Mike] got a chance to meet with [Kevin] from Arduboy who told us about some of his upcoming projects — this wearable was one of them!

It features three super bright OLED screens on a flexible circuit board with conductive touch buttons to continue with the minimalist design. Instead of a wrist strap he’s actually made the ends magnetic to hold it in place — did we mention the battery also lasts for over 10 hours?

At the heart of the flexible circuit board is an Atmega328p, which is the same chip used in the Arduboy (a credit card sized GameBoy). This is just the first prototype but he’s planning on making it even better in the future complete with Bluetooth and some 3D printed parts to make it look a bit nicer.

Continue reading “Ardubracelet Lets You Play Tetris On Your Wrist!”

DIY Steering Wheel Control Adapter

Arduino Translates Signals Between Steering Wheel Buttons And Aftermarket Head Unit

There is no question that steering wheel mounted controls are super convenient. Reaching all the way over to the dashboard to change a radio station is so 1990’s. An ever-increasing percentage of new cars are coming equipped with steering wheel controls for the stereo, however, you’ll lose the button control if you change out the stock head unit to something a little higher in quality. Sure, there may be an adapter readily available for your car/stereo combination, but there also may not be. [Ronnied] took the DIY road and made his own adapter.

The first obstacle for [Ronnied] was to figure out the wiring on the steering wheel controls. After some poking around he found that there were only two wires used for all of the control buttons, each button only changing the resistance between the two wires. The button states could easily be read by using an Arduino’s analog input. A Pro Mini model was chosen for its small size as it could be housed in the radio compartment of the dash.

The next step was getting the Arduino to control the aftermarket head unit. [Ronnied] did some research regarding JVC’s Stalk digital control interface but came to the conclusion that it would be easier to direct wiring the Arduino outputs to the appropriate spot on the head unit’s circuit board. To do this the button for each function that would also be represented on the steering wheel was traced out to find a common point on the circuit board. Jumper wires soldered to the circuit board simply allow the Arduino to emulate button pushes. To ensure that the head unit buttons still work in conjunction with the steering wheel buttons, the Arduino would have to keep the pins as inputs until a steering wheel button was pushed, the pin changed to an output, the signal sent and the pin changed back to an input. This feature was easily created in the Arduino sketch.

Video below.

Continue reading “Arduino Translates Signals Between Steering Wheel Buttons And Aftermarket Head Unit”

Digital Decade Resistance Box On The Cheap

[Stynus] has finished a unique decade resistance box which doesn’t use conventional rotary switches to select the appropriate resistors. These switches are old fashioned and expensive, so [Stynus] built this decade resistance box that uses a microcontroller and a series of relays to switch the resistors.

Simply selecting a resistance on the screen tells the microcontrollers which resistors need to be switched in order to provide the proper resistance. The box uses relays to do switching instead of transistors because the transistors don’t handle high frequency AC as well as the relays. The device is powered by an 18V transformer and rectifier and, as a bonus, [Stynus] got all of his parts on the cheap which made this a great solution to the expensive resistance decade box problem.

This is a very well-polished piece of test equipment. We’ve featured other decade resistance boxes but never one that was controlled by a microcontroller. All of the PCB layouts and the code for microcontroller are available on the project site if you have a desire to make your own.

Power Glove LED Suit

Prototype LED Light Suit Runs Off Of A NES Power Glove

[Greg’s] been playing around with wearable hacks for quite some time now, and he’s decided to add a new twist for his latest LED light suit (Mk 4) — An ancient NES Power Glove to control it.

He was inspired by the band Hypercrush who had a music video where one of the guys was wearing a laser-shooting power glove — awesome. Having already made light suits before, he thought it’d be fun to do something similar.

The suit is controlled by an Arduino Pro Mini which has been hacked into the Power Glove for ultimate button pushing capabilities. He’s using 5 meter LED strips of the classic WS2812  RGB variety, which allow for individual LEDs to be addressed using a single pin. It’s powered by a 5V 2A USB battery pack, and he’s made all the components very modular, you could even say it’s “plug and play”!

Continue reading “Prototype LED Light Suit Runs Off Of A NES Power Glove”