Your Robot Stand-in Has Arrived

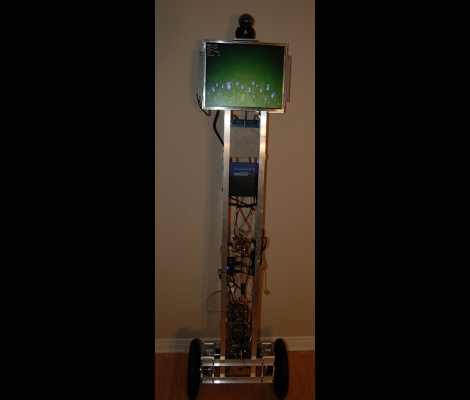
Meet TIPI, the Telepresence Interface by Pendulum Inversion. TIPI is something of a surrogate, giving physical presence to telecommuters by balancing an LCD screen and camera atop its six foot frame. The user has full control of the robot’s movement, with their own camera image shown on the display so that others interacting with the bot will with whom they are conversing.

A pair of 12.5″ wheels connec to DC motors via a gear box with a 37:1 ratio. These specs are necessary to recover from a sudden 20 degree loss of equilibrium, quite impressive for a bot of this stature. An Orangutan SVP board monitors a two-axis accelerometer and a gyroscope for accurate positioning data. This board automatically keeps balance, while taking user commands from a second control, a Beagle Board. The Beagle Board handles the communications, including sending and receiving the video signals, and delivering incoming position control data to the Orangutan. Separating the two systems guards against a screen-shattering fall by making sure the hardware likely to face slow-down or lockup is physically separate from that responsible for balance.

Check out the video clip after the brake to see some balancing goodness. It shouldn’t be hard to build your own version for much less than the $15k price tag enjoyed by some commercial versions.

Continue reading “Your Robot Stand-in Has Arrived”

More Cellphone Controlled Door Locks

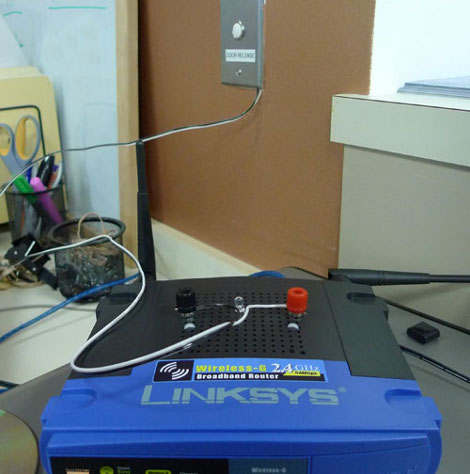
[Tom Lee] and his colleagues just moved to a new office. The doors are setup like a security checkpoint with electronic strikes and buttons on the inside to allow entry. The button simply completes a low-voltage circuit, activating the strike which made it quite easy to patch into. They build an interface board with a small relay to complete that circuit. As we’ve seen before, Linksys routers have plenty of extra room in the case so there was no problem housing the new circuit in this tiny network device. Now [Nicko] and his friends can use a custom app to input an access code or to verify a device ID from a cell phone and gain entry. The door still has keyed locks in case of a power outage. In fact, the only change made to the system was the addition of two wires to the “door release” button as seen above. See the one-touch device ID authentication in the video after the break.

This hack is similar to the GSM door entry from last year. In this case, the phones are communicating with the door via web interface and not the GSM network.

Continue reading “More Cellphone Controlled Door Locks”

Add IR Control To Your WiFi Router

wrt54g_ir_receiver

[Craig] wanted to use Boxee on his TV but his computer was in a different room. He rigged up a rather dubious method of delivering the A/V signal (this is a hack in the most guttural sense). More interesting to us is his solution for a remote control interface. We’re familiar with building USB connected infrared receivers but [Craig] decided to patch one into the serial connection on his Linksys WRT54G router. Continue reading “Add IR Control To Your WiFi Router”

Home Power Monitoring

powermonitor

Reader [john] finished up his home power monitor over the holiday weekend. It uses a pair of current transducers clamped onto the mains. These output 0-3V and are read by the Arduino’s ADC. The Arduino averages samples over a 20 second period, calculates power used, and uploads it using an Ethernet Shield. The shield can’t do DNS lookups, so he uses a WRT54G to negotiate with the remote webserver. He admits that the system could be more accurate; it can’t detect small loads like wall warts. He also says that money could be saved by talking serial to the router instead of over ethernet. Here are the current usage charts.

You can find many power monitor projects like this in out Home Hacks category.

Inexpensive Powerful Router Based Robot

[Andrey Mikhalchuk] Has posted some great instructions on how to build an inexpensive router based robot. Starting with a Linksys WRT54GL, he takes us through the process of disassembling and modifying it to directly control servos.  He has put together a custom version of OpenWRT Linux that you can download from his site.  After testing to make sure everything is functional, he goes through a quick and dirty chassis build.  As you can see from the picture above, there are lot of household items thrown in there such as rubber bands and zip ties.  After adding a camera mounted on two servos for x y movement, he fine tunes it and lets it go.

This project looks fairly simple, cheap, and fun.  It may look familiar as it is very similar to our Wifi Robot post from August.

[thanks Matt]

WarBallooning At Defcon

[rocketman] has posted about a new event at Defcon dubbed WarBallooning. They are using a Kismet drone (a modified WRT54G), a webcam, and a few high gain antennas. The balloon will be launched at about 15 stories and will be remotely fed targets chosen directly by the Defcon participants. The the directional antenna will be mounted to the camera so pan and tilt can be controlled. The Kismet CSV files will be available for everyone after the event.

If you are interested in WarDriving or building you own high-gain antennas, we suggest you check out this WiFi biquad dish antenna mounted on a car. If cars are too boring, or you do not have one, you could always go WarSailing or WarFlying. Yes, the permutations are endless.

[photo: JoergHL]