Arduino Measures Remaining Battery Power With Zero Components, No I/O Pin

[Trent M. Wyatt]’s CPUVolt library provides a fast way to measure voltage using no external components, and no I/O pin. It only applies to certain microcontrollers, but he provides example Arduino code showing how handy this can be for battery-powered projects.

The usual way to measure VCC is simple, but has shortcomings.

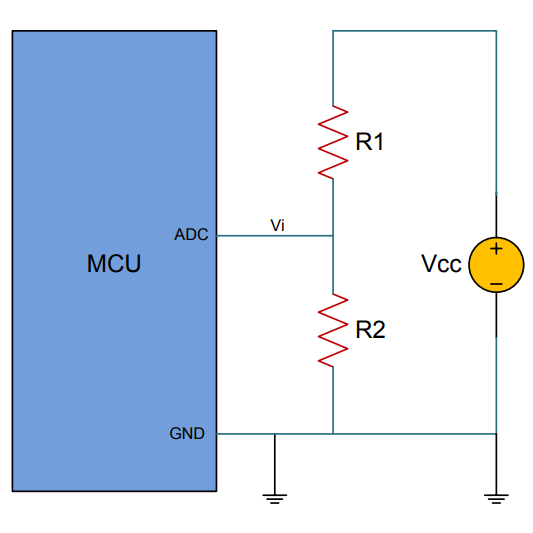
The classical way to measure a system’s voltage is to connect one of your MCU’s ADC pins to a voltage divider made from a couple resistors. A simple calculation yields a reading of the system’s voltage, but this approach has two disadvantages: one is that it constantly consumes power, and the other is that it ties up a pin that you might want to use for something else.

There are ways to mitigate these issues, but it would be best to avoid them entirely. Microchip application note 2447 describes a method of doing exactly that, and that’s precisely what [Trent]’s Arduino library implements.

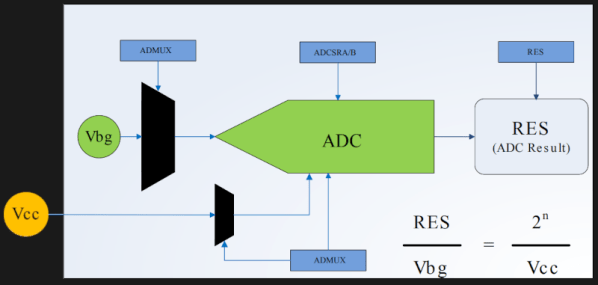
What happens in this method is one selects Vbg (a fixed internal voltage reference that is temperature-independent) as Vin, and selects Vcc as the ADC’s voltage reference. This is essentially backwards from how the ADC is normally used, but it requires no external hookup and is only a bit of calculation away from determining Vcc in millivolts. There is some non-linearity in the results, but for the purposes of measuring battery power in a system or deciding when to send a “low battery” signal, it’s an attractive solution.

Being an Arduino library, CPUVolt makes this idea very easy to use, but the concept and method is actually something we have seen before. If you’re interested in the low-level details, then check out our earlier coverage which goes into some detail on exactly what is going on, using an ATtiny84.

Open Hardware Board For Robust USB Power Monitoring

We’ve all seen the little USB power meters that have become popular since nearly every portable device has adopted some variation of USB for charging. Placed between the power source and the device under test, they allow you to see voltage and current in real time. Perfect for determining how long you’ll be able to run a USB powered device on batteries, or finding out if a USB power supply has enough current to do the business.

[Jonas Persson] liked the idea of these cheap little gadgets, but wanted something a bit more scientific. His design, which he refers to as UPM, is essentially a “smart” version of those ubiquitous USB gadgets. Instead of just showing the data on a little LCD screen, it can now be viewed on the computer and analyzed. His little gadget even allows you to cut power to the device under test, potentially allowing for automated testing of things such as inrush current.

Essentially the UPM works in much the same way as the simple USB meters: one side of the device goes towards the upstream power source, and the device under test plugs into the other side. Between the two devices is a 16 bit ADC and differential amplifier which measures the voltage and current. There’s a header on the board which connects to the ADC if you wanted to connect the UPM to an external microcontroller or other data logging device.

But most likely you would be using the internal microcontroller to analyze the output of the ADC over I2C, which [Jonas] very cleverly connected to the upstream port with an integrated USB hub. One side of the hub goes off to the device being tested, and the other to the microcontroller. So the host device will see both the UPM’s integrated microcontroller and the target device at the same time. From there, you can use the ncurses user interface to monitor and control the device in real-time.

While the hardware looks more or less finished, [Jonas] has some more plans for the software side of UPM, including support for remote control and monitoring over TCP/IP as well as robust logging capabilities. This is definitely a very interesting project, and we’re excited to see it develop further.

In the past we’ve seen homebrew USB power meter builds, and even commercial offerings which boasted computer-based logging and analysis, so it was only a matter of time before somebody combined them into one.

Adding Energy Use And Cost To “Laundry Done” Notifications

Some time ago [Xose Pérez] got interested in generating a notification when his washer had completed a cycle, and now with added features like reporting power usage and cost, he’s put it all together into a Node-Red node that makes it easy to modify or integrate with other projects.

[Xose] started this journey with a Laundry Monitor he created that effectively used cheap hardware (and his own firmware) to monitor his washing machine’s current usage. That sensor was used as the basis for sending notifications informing him whenever the appliance’s cycle was done. Since then, he has continued to take household power monitoring seriously, and with a bit of added work can not only tell when a given appliance has been started and stopped, but can also summarize the energy usage and cost of the appliance, making the notifications more useful. The package is named node-red-contrib-power-monitor and is also hosted on GitHub.

Cheap WiFi-enabled smart switches are making it possible for even the dumbest of appliances to join the Internet of Things, so don’t ignore [Xose]’s complementary work on ESPurna, which is an alternative open-source firmware for a wide variety of ESP8266 and ESP8285 based smart switches, lights and sensors.

Put A Reverse Engineered Power Meter In Your Toolkit

It seems that one can buy cheap power meters online and, well, that’s it. They work just fine, but to use them for anything else (like datalogging or control or…) they need a bit more work. The good news is that [Thomas Scherrer], alias [OZ2CPU], just did that reverse engineering work for us.

Inside these budget power meters, you’ll find an LCD driver, a power-monitoring chip, and an STM32F030, which is a low-cost ARM Cortex M0 chip that’s fun to play with on its own. [Thomas] traced out the SPI lines that the power-monitoring chip uses to talk to the microcontroller and broke in to snoop on the signals. Once he got an understanding of all the data, tossing an ATmega88 chip on the SPI line lets him exfiltrate it over a convenient asynchronous serial interface.

If you’re going to do this hack yourself, you should note that the internals of the power meter run at line voltage — the 3.3 V that powers the microcontroller floats on top of the 230 V coming out of [Thomas]’s wall plug. He took the necessary precautions with an isolation transformer while testing the device, and didn’t get shocked. That means that to get the serial data out, you’ll need to use optoisolation (or radio!) on the serial lines.

Now that we know how this thing works on the inside, it’s open-season for power-management hacks. Toss a mains socket and an ESP8266 in a box and you’ve got a WiFi-logging power meter that you can use anywhere, all for under $20. Sweet.

Watt Meter Build Walks You Through Power Measurement Basics

You almost never hear of a DC Watt Meter – one just does some mental math with Volts and Amps at the back of one’s head. An AC Watt Meter, on the other hand, can by pretty useful on any workbench. This handy DIY Digital AC Watt Meter not only has an impressive 30A current range, but is designed in a hand-held form factor, making it easy to carry around.

The design from Electro-Labs provides build instructions for the hardware, as well as the software for the PIC micro-controller at its heart. A detailed description walks you through the schematic’s various blocks, and there’s also some basics of AC power measurement thrown in for good measure. The schematic and board layout are done using SolaPCB – a Windows only free EDA tool which we haven’t heard about until now. A full BoM and the PIC code round off the build. On the hardware side, the unit uses MCP3202 12 bit ADC converters with SPI interface, making it easy to hook them up to the micro-controller. A simple resistive divider for voltage and an ACS-712  Hall Effect-Based Linear Current Sensor IC are the main sense elements. Phase calculations are done by the micro-controller. The importance of isolation is not overlooked, using opto-isolators to keep the digital section away from the analog. The board outline looks like it has been designed to fit some off-the-shelf hand-held plastic enclosure (if you can’t find one, whip one up from a 3D printer).

Although the design is for 230V~250V range, it can easily be modified for 110V use by changing a few parts. Swap the transformer, change the Resistive voltage divider values, maybe some DC level shifting, and you’re good to go. The one feature that would be a nice upgrade to this meter would be Energy measurements, besides just Power. For an inside look at how traditional energy meters work, head over to this video where [Ben Krasnow] explains KiloWatt Hour Meters


Reading Power Use Data With A Webcam And Python

As any hacker will attest to, whenever an important tool is missing, you might as well just build a new one! That’s the position that [Matt] found himself in when he was attempting to measure the power consumption at his parents’ house. He left the transmitter for the power meter at home, and so the logical thing to do was to set up a webcam and a python script to monitor his dad’s power meter instead of going back to get his.

The power meter that he had handy was a GEO Minim Electricity Monitor. He found it very difficult to extract the data directly from this particular meter, so instead of digging into any of the communications protocols int he meter, he set up a webcam in a box with an LED and monitored it with a specially-written Python script. The script is able to see the particulars of the meter, and then reports back to the computer with all of the relevant data. [Matt] has put this code up on his project site for anyone to use.

This is a great workaround that doesn’t involve delving too deep into the inner workings of the meter in question. You could always build your own power monitoring system though, if that’s more of your style!

Cheap Power Meter

Digital Data From A Cheap Power Meter

Power meters like the Kill-A-Watt are great for keeping track of energy usage, and are also very hackable. The Kill-a-Watt in particular puts out analog signals proportional to current and voltage, which makes it easy to interface with a microcontroller.

Although reading analog voltages is easy enough, [Kalle] found a cheap Chinese power meter that is even more hackable. These inexpensive power meters cost about the same as a first-generation Kill-a-Watt, but they directly stream out digital data. The power meter [Kalle] hacked has a non-US plug, but the meter is available from the usual suppliers (eBay, Aliexpress, etc) with a 3-prong US plug and 120v rating.

After breaking out a logic analyzer, [Kalle] discovered that the meter constantly streams voltage, current, and power data from the measurement board to the display board on a SPI-like bus. The ribbon cable inside the meter even has the clock and data bus lines clearly labelled. [Kalle] went on to reverse-engineer the protocol and write an Arduino sketch that parses the stream, making it even easier to integrate this meter into your next power monitoring project.