Launching A Glider From Space

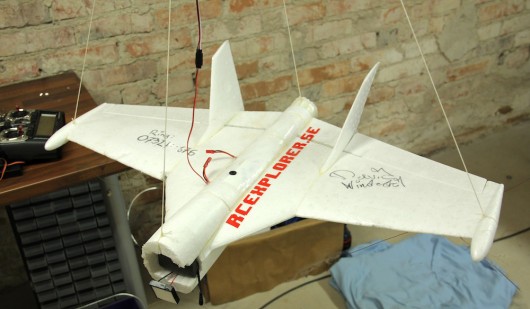
We get a ton of tips about weather balloon launches taking hobby electronics into space. But every once in a while one of them stands out from the rest. This project does send an electronic payload into space, but it also lets [David] fly his hardware back from near-space using an RC airplane.

The return vehicle is unpowered, but that shouldn’t be a problem as launching from a weather balloon will provide plenty of altitude for the flight. Because the temperature experienced in that part of the atmosphere is so cold [David] had to take several things into account. Obviously you want your batteries and control electronics to be insulated from the cold. But something that doesn’t usually pop into mind are issues with the servo motors which run the glider’s flaps. They usually have some white grease on the gears. At temps as low as -50C that grease will harden and make the servo stop working so he made sure to clean the gears thoroughly before the flight.

Unfortunately [David] had several problems capturing images and recorded video from the ground station. But his write up is still a fun read and the clip after the break gives a general overview of the entire project from the nose camera of the glider.

Continue reading “Launching A Glider From Space”

Makerbot Shows Off 3D Scanner

scan

We’ve said our piece over Makerbot and their interpretation of what Open Source means, but the fact remains if you’re sourcing a 3D printer for a high school shop class or a hackerspace, you really can’t do much better than a Makerbot Replicator. Apparently Makerbot is looking to expand their 3D design and fabrication portfolio; they just announced an upcoming 3D scanner at SXSW. It’s called the Makerbot Digitizer, and it takes real, 3D objects and turns them into CAD files.

Since Makerbot and [Bre Pettis] didn’t give out much information about the 3D scanner they’re working on, the best information comes from Techcrunch. The Makerbot Digitizer uses two lasers to scan real objects and turns them into 3D CAD files. The hardware isn’t finalized, and the prototype is made of a few pieces of laser cut plywood. No details are available on how much the Digitizer will cost, when it will be available, or what its resolution is.

Of course 3D scanning of real objects to translate them into CAD files is nothing new for Hackaday readers. We’ve seen our fair share of desktop 3D scanners, including one that was built in a day out of junk. Even the Kickstarter crew has gotten into the action with a few desktop 3D scanners, some of which scan in full color.

Another Salvo In The PIC Vs. AVR Holy War

Ah, PIC vs. AVR, the never-ending battle of electronic design supremacy. Some people swear by Atmel’s AVR microcontrollers, while others are wrong. [majenko] is firmly planted in Microchip’s PIC camp, so he wrote up a nice comparison of Atmel’s AVR versus Microchip’s PIC family of microcontrollers. The results aren’t that surprising; PIC microcontrollers come out as a better product that no hobbyist uses because no hobbyist uses them.

Atmel and their series of AVR microcontrollers has seen a huge increase in popularity in the hobbyist market in the last few years, no doubt thanks to the Arduino and other AVR-powered dev boards. This isn’t to say Microchip and PIC haven’t seen their time in the lime light; there was a time when you could actually buy electronic components at Radio Shack, including kits containing Microchip’s very popular but somewhat outdated Basic Stamp.

After going over the capabilities of the Atmel AVR ATMega328p, the similarly equipped Microchip’s PIC PIC18F25K80, and TI’s MSP430G2533, [majenko] found the perennial favorite, the AVR, lacked in some very important categories. The AVR has a lower resolution ADC, fewer PWM pins, fewer 16-bit timers, while costing about $0.75 more.

Of course [majenko]’s analysis doesn’t take into account the intangibles of choosing a PIC over an AVR. Thanks to the Arduino’s adoption of the AVR, there are many, many more code and schematic examples floating around on the Internet for just about every project imaginable. The development tools for PIC are a bit more expensive than their AVR equivalents; A PICkit2 runs about $50 while AVR ISP programmers can be found just about everywhere for pocket change.

It’s a lazy Sunday, so all ‘yall can go on and argue in the comments.

DIY Lighting Solutions

pvc-lights

With daylight savings time starting up, you might not have quite as much need for lighting, but this pair of hacks should keep everything well lit whether outside or indoors.  Check out the videos of both in action after the break.

The first lighting solution comes to us from [Ben]’s Youtube channel. It’s a simple solution, press-fitting a clamp light into a 1 inch PVC Tee to attach the light to a pipe. The base is made with PVC shaped into three feet for a (hopefully) sturdy rest.  Several lights can be used as needed, and would probably work well for making his next video.

The second light also comes to us from Youtube, and is about converting a stock LED light into one that is much brighter. Skip to around 7:00 to see the outdoor comparison.  You may or may not want to do this exact hack, but you never know when you might want to swap out your blinkenlights for something that will scare the neighbors!
Continue reading “DIY Lighting Solutions”

Tracking A Car Like It Were A Computer Mouse

optical-mouse-sensor-tracks-vehicle-motion

This is [Paul Mandel’s] Ground-truth velocity sensor. That’s a fancy name for a device which tracks the movement of a vehicle by actually monitoring the ground its travelling over. This differs from simply measuring wheel rotation (which is how traditional odometers work) in that those systems are an indirect measurement of motion. For us the interesting part is the use of an ADNS-3080 single-chip optical mouse sensor on the left. It’s cheap, accurate, and only needs to be ruggedized before being strapped to the bottom of a car.

[Paul] designed a case that would protect the electronics and allow the sensor to mount on the uneven underbelly of a vehicle. The optical chip needs to be paired with a lens, and he went with one that cost about ten times as much as the sensor. Data is fed from the sensor to the main system controller using the PIC 18F2221. One little nugget that we learned from this project is to poll a register that always returns a default value as a sanity check. If you don’t get the expected value back it signals a communications problem, an important test for hardware going into the vibration-hell that is automotive technology.