BigDog Throwing Cinder Blocks

bigdog-throwing-cinder-blocks

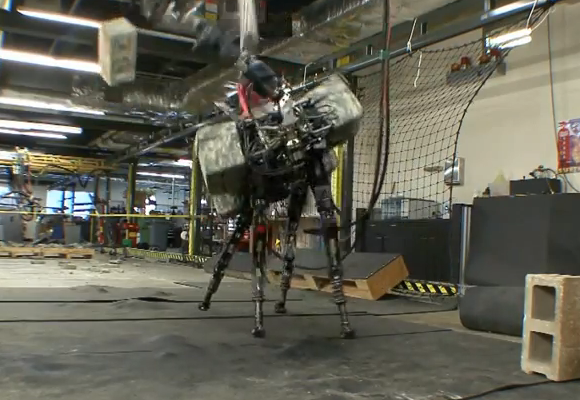
It’s as if giving cheetah-like speed to an advanced robot wasn’t good enough. The engineers over at Boston Dynamics must have been thinking to themselves, how can we make this thing even more menacing? The answer seems to be adding a highly dexterous articulated arm that gives the robot the ability to chuck objects as heavy as cinder blocks. We’re not kidding, look at the image above and you’ll see one mid-flight in the upper left. A quick search tells us that block probably weighs 30 pounds!

BigDog is a research project for the US military that we’ve seen navigating all kinds of terrain. It’s a heavy lifter able to carry loads where other machinery cannot. But now they’ve added an appendage that reminds us of an elephant’s trunk. It branches off of BigDog’s body where a quadruped’s neck would be. At the end of the appendage is a gripper that looks much like what you’d seen on industrial assembly robots. But enough talk, click through to see the action video. Oh, and if you didn’t pick up on the cheetah reference we made earlier you’ll want to check out this post.

Continue reading “BigDog Throwing Cinder Blocks”

Car Stereo Hack Gives Your Party Tunes And An Extra Place To Sit

car-stereo-boombox

With summer on the horizon it’s time to start thinking about outdoor leisure. [x2Jiggy] is chomping at the bit having recently completed this project. It’s a portable stereo that also gives you somewhere to sit.

Unlike several of these types of project, he didn’t build the system inside of a cooler. Instead, the chassis was built from scratch using MDF. This material is strong and easy to work with, but we’d bet the finished case is a beast to haul around because of the weight. At least there’s a heavy-duty handle on either side so that you and a buddy can split the burden. One nice perk is that it’ll make a sturdy yet comfortable seat thanks the padded and upholstered top.

The audio components that went into it are all automotive parts and shouldn’t mind being jostled during transport. A computer PSU provides the 12V needed by the stereo. But there are a couple of external rail connections if you want to haul around a 12V battery instead.

Homemade Bocce Balls

homemade-bocce-balls

For those unfamiliar with it, Bocce Ball is an outdoor game played with a set of heavy grapefruit-sized balls. We’ve never really thought of making our own set, but as you can see above, it can be done. These are six Bocce balls produced at home by [Horvitz444].

It seems the commercially available balls have a cement or clay core covered in a layer of high-impact epoxy. [Horvitz444] was able to recreate this starting with some vacuum forming. He built his own former out of peg board and a shop vac. The plastic stock he used was a light panel from the home store. After heating it up in the oven he formed a mold using what looks like two halves of Bocce balls. The mold halves were melted together using a soldering iron. After pouring in the secret concoction of cement ingredients and letting them harden, he removed the orbs from the molds and ground down the seams until smooth. They were covered in epoxy and painted. Most of these details were gleaned from his comments in the Reddit thread.

AVR VGA Generator

avr-vga-generator

This simple circuitry makes up the hardware for [Andrew’s] AVR-based VGA generator. He managed to get an ATmega1284 to output a stable VGA signal. Anyone who’s looked into the VGA standard will know that this is quite an accomplishment. That’s because VGA is all about timing, and that presented him with a problem almost immediately.

The chip is meant to run at a top speed of 20 MHz. [Andrew] did manage to get code written that implemented the horizontal and vertical sync at this speed. But there weren’t enough clock cycles left to deal with frame buffering. His solution was to overclock the chip to 25 MHz. We assume he chose that because he had a crystal on hand, because we think it would have been easier to use a 25.174 MHz crystal which is one of the speeds listed in the specification.

Red, green, and blue each get their own two-bit range selected via a set of resistors for a total of 64 colors. As you can see in the video after the break, the 128×96 pixel video is up and running. [Andrew] plans to enlarge the scope of the project from here to make it more versatile than just showing standard images. The code (written in assembly) is available at his GitHub repository.

Continue reading “AVR VGA Generator”

Ask Hackaday: Are We Close To Reinventing The Keyboard For Touchscreens?

minuum-keyboard

We mourn the loss of the physical keyboard with the advent of tablets. After all, we do a bit of typing getting all of these features posted throughout the week. And we kind of blame tablets for the decline of the netbook industry (we still use a Dell Vostro A90 when not at home). But we’re trying to keep an open mind that we may not need a physical keyboard anymore. If someone can come up with an innovative alternative to the Qwerty layout that we are able to learn and can use with speed and without physical strain we’ll be on board. Our question is,  do you think we are close to a screen typing breakthrough?

This question came to mind after seeing the Minuum keyboard shown above. It compresses all of the rows of a Qwerty into a single row, monopolizing less screen space than conventional smartphone input methods. The demo video (embedded after the break) even shows them hacking the concept into a distance sensor and using a graphite-on-paper resistor. Pretty cool. But what happens when you type a word not in the dictionary, like this author’s last name?

You can actually try out the Minuum style thanks to [Zack’s] in-browser demo hack. He’s not affiliated with Minuum, but has done quite a bit of alternative keyboard input work already with his ASETNIOP chorded typing project. It’s another contender for changing how we do things.

Continue reading “Ask Hackaday: Are We Close To Reinventing The Keyboard For Touchscreens?”

DVD Power Supply Repair Tips

bridge-rectifier-repair

This demonstration fixes the power supply of a DVD player, but the skills transcend this one application. [Alan] walks us through the process of repairing a power supply (translated) on a simple consumer electronics unit.

Obviously this starts by cracking open the dead device and verifying that the culprit is the power supply. [Alan] then removes that board from the chassis and gets down to work with a visual inspection. He’s got several images which illustrate things to look for; blistered electrolytic capacitors, cracked solder joins, scorch marks, etc. In his case there’s obviously a burnt out fuse, but that merely protects the hardware from further damage, it’s not the cause. Next he examines the diodes of the bridge rectifier. These need to be removed from the system to do so, which he accomplishes by clipping one end of each as seen above. He found that two diodes on one side of the bridge had broken down. After replacing them he tries a new fuse which immediately burns out. But a quick swap of the capacitors and he gets the thing back up and running.

We perk up every time we see this type of repair hack. We figure if we can build our own hobby electronics we should be able to fix the cheap devices like this one.

Wooden Teeth For Your USB Keyboard

wooden-keyboard

We just got an ergonomic keyboard for the first time and absolutely love it. But the look of this keyboard hack has us second guessing ourselves. [Will Pretend] pulled off an absolutely stunning wooden retrofit for his USB keyboard. Be warned, his project log includes 175 photos, and most of them have captions.

He started off by taking apart the original USB keyboard to see what he was working with. Before digging in to the valuable wood stock he cut test pieces using some thin MDF. But once he had a clear plan to get to the end of the project it was full stem ahead.

The keys are not simple Chicklet style overlays, they have depth like you would expect to find on low-grade plastic peripherals. This was accomplished by milling each key, then sending them through the laser cutter to each the letter on top.

Take some time to make your way through the entire project (here’s a thumbnail layout if you get frustrated). Unfortunately [Will] says he doesn’t actually use the keyboard because of grains catching and the keys move around a bit too much. But it does work.