Coffee Grinder Gets Bluetooth Weighing

Some people take their coffee grinding seriously. So what do you do when the hot new grinders automatically weigh coffee, and yours doesn’t? Well, if you are like [Tech Dregs] and the rest of us, you hack your existing grinder, of course. The link is to the source code, but for a quick overview, check out the video below.

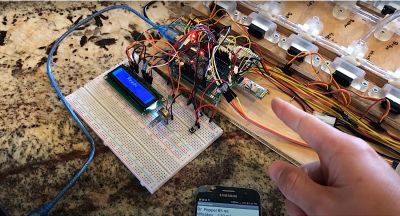
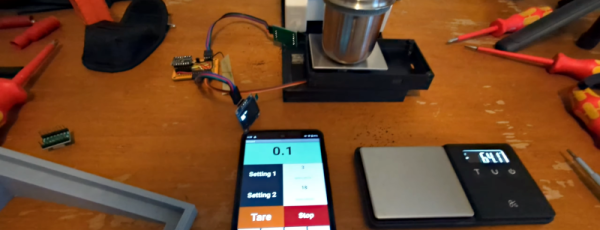
In true hacker fashion, the first order of business was to pull a load cell out of a cheap scale. Originally, he intended to reuse the processor inside, too, but it was epoxied, so it was a good excuse to use some more modules. A load cell amplifier, an OLED display, and a tiny Xiao processor, which he describes as “ridiculous.” From the context, we think he means ridiculously small in the physical sense and ridiculously powerful for such a tiny board.

With the modules, the wiring wasn’t too hard, but you still need some kind of app. Thanks to App Inventor, an Android app was a matter of gluing some blocks together in a GUI. Of course, the devil is in the details, and it took a lot of “focused cursing” to get everything working correctly.

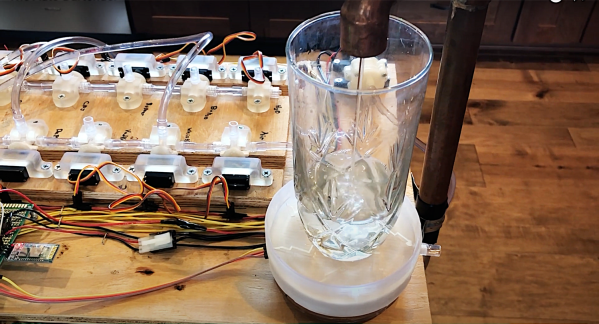
The coffee grinder has a relay to turn the motor on and off, so that’s the point the scale needs to turn the motor on and off. Conveniently, the grinder’s PCB had an unpopulated pin header for just this purpose.

This is one of those simple projects you can use daily if you drink coffee. We are always impressed that the infrastructure exists today and that you can throw something like this together in very little time without much trouble.

WiFi hacking coffee makers is a popular Java project in these parts. Upgrading a machine can get pretty serious with PID control loops and more.

Continue reading “Coffee Grinder Gets Bluetooth Weighing”

Robot Arm Has The Touch

[Maurizio] built a robot arm, which is always a great accomplishment. But his project includes a very cool touch interface for an Android device that sets it apart from many other similar projects.You can see a very fast summary of the construction in the video below.

The design uses Fusion 360 and there are good explanations of each step in the process. The gripper is adapted from an existing design. Various 3D printed parts make up the wrist, shoulder, elbow, and rotating base.

Continue reading “Robot Arm Has The Touch”

The Auto-Bartender

It’s the end of the academic semester for many students around the globe, so here comes the flurry of DIY projects. Always a great time to check out all the cool hacks from our readers all over the world. One project that piques our interest comes courtesy of [Jason Ummel] and his Auto-Bartender. (Video, embedded below.)

[Jason] developed this project as a part of his robotics class taught by Professor Martinez, one of our friends at FlexiLab. Powered by one of our favorite microcontrollers, the ATmega328, the Auto-Bartender is driven by a single 12 V motor coupled with 10 individual valves for separate drinks. Drinks are pumped into a cup sitting on top of a scale, allowing the device to know how much of each drink has been dispensed. The entire setup is controlled using a smartphone application developed in MIT App Inventor, a super-easy way to prototype Android applications.

Furthermore, [Jason] incorporated a number of user-centered design considerations into his project. These include an LCD to display updates, a green LED to indicate the device is in progress, and a buzzer to let the user know the drink is complete.

We really like the combination of craftsmanship, electronics hardware design, and software development that [Jason] put into his project. It’s the kind of project we know our readers will enjoy.

It looks like Jason substituted tap water for Whiskey and Dr. Pepper for his demo. Not exactly what we had in mind, but I guess he still has exams to finish.

Cool project [Jason]! We can’t wait to see Auto-Bartender on Hackaday.io.

Bottoms up! Continue reading “The Auto-Bartender”

A Simple App Controlled Door Lock

[Adnan.R.Khan] had a sliding door latch plus an Arduino, and hacked together this cool but simple app controlled door lock.

Mechanically the lock consists of a Solarbotics GM3 motor, some Meccano, and a servo arm. A string is tied between two pulleys and looped around the slide of a barrel latch. When the motor moves back and forth it’s enough to slide the lock in and out. Electronically an Arduino and a Bluetooth module provide the electronics. The system runs from a 9V battery, and we’re interested to know whether there were any tricks pulled to make the battery last.

The system’s software is a simple program built in MIT App Inventor. Still, it’s pretty cool that you can get functionally close to a production product with parts that are very much lying around. It also makes us think of maybe keeping our childhood Meccano sets a little closer to the bench!

Android Controlled RGB Lights

ScreenShot032

Here’s a handy hack for an Android controlled, Arduino driven, RGB light setup.

[Kerimil] recently wrote up this project on the Arduino.cc, and is sharing all of the source code and plans. While many of our seasoned Arduino-lovers can easily throw together the code for an RGB LED circuit in their sleep, [Kerimil] also threw in the Android app, and the source file to be modified in App Inventor, an Android app development program originally released by Google, but now maintained by MIT.

We’ve seen many commercial versions of this product, but it’s nice to see one that can be easily hacked to our liking. Next up is writing an app to use the phone’s camera to identify colors and reproduce them with the LED! While you’re at it, why not mix it with an easy to build infinity mirror!

To see the board and app in action, check out the video after the break.

Continue reading “Android Controlled RGB Lights”

Beginner’s Android/Arduino Example Shows The Power Of App Inventor

This is a simple project. It uses an Android device to switch an LED driven by the Arduino. Connectivity is provided by the Bluetooth module inserted in the breadboard. But one look at the UI on the Android device and you might think this is anything but simple. The truth is that [Kerimil] didn’t spend forever learning Java and programming the app. Instead he’s showing off the power of  App Inventor to get your Android controls up and running fast.

Check out the third button down; when was the last time you added voice commands to your project? It’s worth clicking through to see just how simple that portion was. App Inventor — a Google cast-out that is now maintained by MIT — is a graphical tool that unlocks the power of an Android handset to those with the most basic of programming understanding. For instance, the voice controls shown off after the break are provided by a single bracket which uses conditional statements to ‘listen’ for the words on, off, and blink. You’ll find the voice recognition diagram after the break as well.

You could try to go completely graphical with this project. There’s the option of programming the Arduino side of the project in a similar way.

Continue reading “Beginner’s Android/Arduino Example Shows The Power Of App Inventor”