Body Fat Measurement

DIY Electrical Body Fat Analyzer

Whether you are trying to drop some fat or build some muscle, it’s important to track progress. It’s easy enough to track your weight, but weight doesn’t tell the whole story. You might be burning fat but also building muscle, which can make it appear as though you aren’t losing weight at all. A more useful number is body fat percentage. Students from Cornell have developed their own version of an electrical body fat analyzer to help track body fat percentage.

Fat free body mass contains mostly water, whereas fat contains very little water. This means that if you were to pass an electrical current through a body, the overall bioelectrical impedance will vary depending on how much fat or water there is. This isn’t a perfect system, but it can give a rough approximation in a relatively easy way.

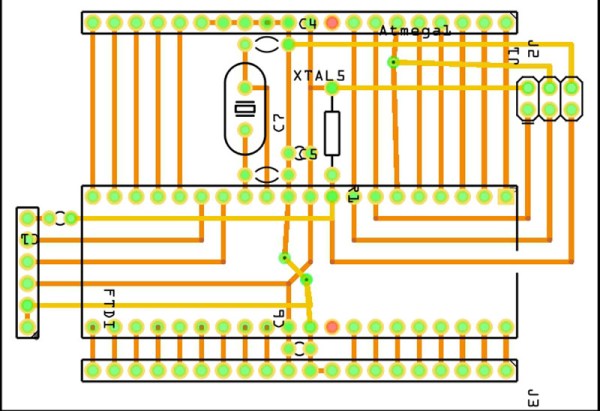
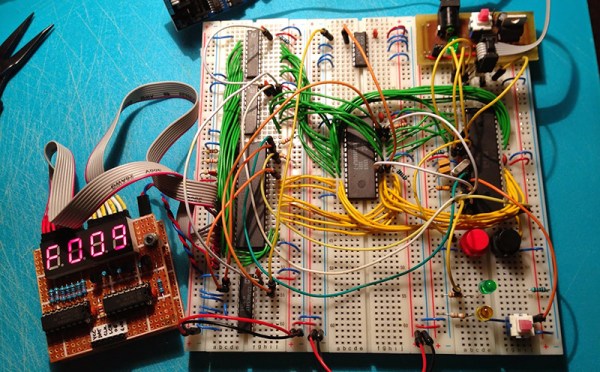
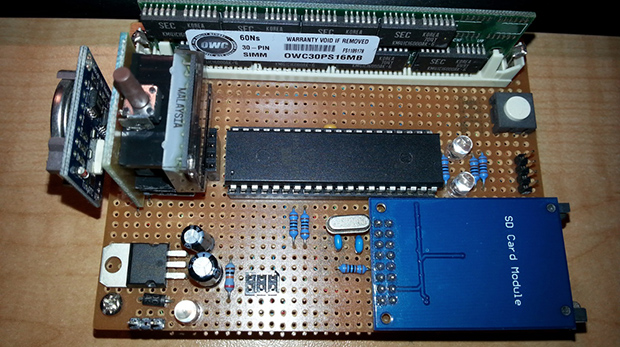
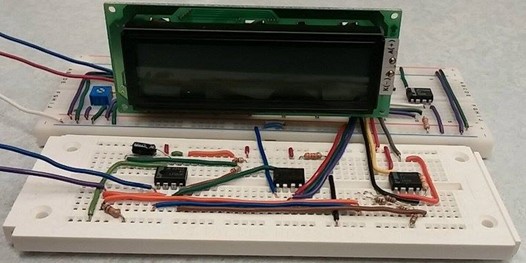
The students’ system places an electrode on one hand and another on the opposite foot. This provides the longest electrical path possible in the human body to allow for the most accurate measurement possible. An ATMega1284P is used to generate a 50kHz square wave signal. This signal is opto-isolated for user safety. Another stage of the circuit then uses this source signal to generate a 10ua current source at 50kHz. This is passed through a human body and fed back to the microcontroller for analysis.

The voltage reading is sent to a MATLAB script via serial. The user must also enter in their weight and age. The MATLAB script uses these numbers combined with the voltage reading to estimate the body fat percentage. In order to calibrate the system, the students measured the body fat of 12 of their peers using body fat calipers. They admit that their sample size is too small. All of the sample subjects are about 21 years old and have a similar body fat percentage. This means that their system is currently very accurate for people in this range, but likely less accurate for anyone else. Continue reading “DIY Electrical Body Fat Analyzer”

Prototyping With The ATMega1284P

While most people are moving onto ARMs and other high-spec microcontrollers, [Dave Cheney] is bucking the trend. Don’t worry, it’s for a good reason – he’s continuing work on one of those vintage CPU/microcontroller mashups that implement an entire vintage system in two chips.

While toying around with the project, he found the microcontroller he was using, the ATMega1284p, was actually pretty cool. It has eight times the RAM as the ever-popular 328p, and twice as much RAM as the ATMega2560p found in the Arduino Mega. With 128k of Flash, 4k of EEPROM, 32 IOs, and eight analog inputs, it really starts to look like the chip the Arduino should have been built around. Of course historical choices don’t matter, because [Dave] can just make his own 1284p prototyping board.

The board is laid out in Fritzing with just a few parts including a crystal, a few caps, an ISP connector, and pins for a serial connector. Not much, but that’s all you need for a prototyping board.

The bootloader is handled by [Maniacbug]’s Mighty 1284 Arduino Support Package. This only supports Arduino 1.0, not the newer 1.5 versions, but now [Dave] has a great little prototyping board that can be put together from perfboard and bare components in a few hours. It’s also a great tool to continue the development of [Dave]’s Apple I replica.

Beating The Skins Of Oatmeal Tins

Ithaca-based power trio [Nick, Roshun, and Ian] share a love of music and beating on things with drum sticks. To that end (and for class credit), they built a Digitally-Recordable, User-Modifiable Sound Emitting Tool (DRUMSET) using force-sensing resistors housed in oatmeal cans.

Anyone who has dealt with FSRs knows how persnickety they can be. In order to direct the force and avoid false positives, these enterprising beat purveyors suspended a sawed-off 2-liter bottle to the underside of each lid. This directs the force coming in from their patent-pending foam-enhanced drum sticks to the small, round sensing area of the FSR. There’s just enough space between the cap and the FSR to account for the play in the oatmeal can lid drum head when struck.

DRUMSET offers different-sounding kits at the push of a momentary switch. At present, there are four pre-programmed kits: the acoustic and electronic foursomes you’d expect, and a kit of miscellaneous sounds like hand claps and wooden claves that sound like something They Might Be Giants would have used on their first album. The fourth is called ‘Smoke on Water’, and is exactly what it sounds like. Should you tire of these, DRUMSET has a program mode with around 20 samples. These can be cycled through on the LCD and assigned to any of the four drums.

The microphone is for record mode, and whatever is recorded can be mapped to any drum. The memory limitations of the ‘1284P make for a 0.2 second sample of whatever is barked into the mic, but that’s plenty of time for shouting ‘hack!’ or firing off whatever hilarious bodily sound one can muster. We think this four track-like functionality of DRUMSET has interesting recording and live performance implications. The team’s future plans include space for longer samples and more robust drum construction (although it is possible to do this without any drums whatsoever). They’d also like to add more drums in case Neil Peart calls. The beat goes on after the break.

Continue reading “Beating The Skins Of Oatmeal Tins”

Tiptoe Through The Tulips In No Time With Ukule-LED

Take it from someone who has played at the guitar for over 20 years: reading sheet music can be a big stumbling block to musical enjoyment. Playing by ear is somewhat unreliable, tablature only works well if you’re already familiar with the tune and tempo, and pulling melody from chord charts is like weaving fiction from the dictionary. A lot can be said for knowing basic chord formations, but it can be difficult get your fingers to mimic what you see on the page, the screen, or someone else’s fretboard. Enter Ukule-LED, a learning tool and all-around cool project by [Raghav and Jeff] at Cornell.

Ukule-LED uses 16 NeoPixels across the first four positions of the fretboard to teach chord positions. All 16 NeoPixels are connected in series to a single pin on an ATMega1284P, which sits on a board mounted to the bottom of the uke along with power and serial. [Raghav and Jeff] set the NeoPixels below the surface so as not to interrupt playability. The uke can operate in either of two modes, ‘play’, and ‘practice’. In ‘play’ mode, the user feeds it a text file representing a song’s chords, tempo, and time signature. The LEDs show the chord changes in real-time, like a karaoke teleprompter for fingers. In ‘practice’ mode, the user enters a chord through the CLI, and the lights hold steady until they get a new assignment. Knowing which fingers to use where is up to the user.

To add another layer of learning, major chords alight in green, minor chords in red, and 7th chords in blue. These are the currently supported chord types, but the project was built with open, highly extendable Python sorcery available for download and subsequent tinkering. Go on tour after the break.

Continue reading “Tiptoe Through The Tulips In No Time With Ukule-LED”

The ERIC-1 Microcomputer

Everyone is having a go at building their own 8-bit 80s-era microcomputer now, and [Petri] thought he would throw his hat into the ring with ERIC-1, a homebrew, 6502-based computer that’s running at about 2MHz.

We’re about 30 or 40 years ahead of the game compared to the old-school 6502 designs, and [Petri] decided to capitalize on that. Instead of a separate ROM, VIA, and other peripherals, [Petri] is connecting a microcontroller directly to the data and address pins. This is a technique we’ve seen before, and [Petri] is doing it right: the micro and 6502 share 64k of RAM, with the ROM stored in the micro’s Flash. Video (PAL in this case) is handled by the ATMega, as is clocking and halting the CPU.

There were a few changes [Petri] made along the way to make this microcomputer a little more useful. One of the biggest changes was switching out the old NMOS Rockwell 6502 with the modern CMOS W65C02 from Western Design Center. The CMOS variant is a fully static design, keeping the registers alive even if the clock is stopped and making single-stepping and halting the CPU easier.

The CMOS variant also has a Bus Enable (BE) pin. Like similar pins on later, more advanced processors, this pin puts the address, data, and R/W pins into a high impedance state, giving other peripherals and microcontrollers the ability to write to RAM, peripherals, or anything else. It’s a handy feature to have if you’re using a microcontroller for everything except the CPU.

It’s already a great build, and since [Petri] has the skills to program this 8-bit ‘duino game, he’s sure to come up with something even better for this computer.

Oh, if you’re looking for something even cooler than a 3-chip 6502, there’s a bunch of stuff over on hackaday.io you should check out. Everything from 4-bit computers built from discrete components to dual AVR board can be found there.

Gesture Based Security Lock

1

A team of students from Cornell University are looking into alternative ways of creating a security system that can be locked or unlocked by using physical gestures in an enclosed space.

It is the final year project for [Ankur], [Darshan] and [Saisrinivasan] in their MEng of Electrical and Computer Engineering. The system prototype is capable of recording a gesture and then comparing the gesture with future gestures to lock or unlock the system. Consider it like a secret handshake to get into the office!

To analyze the gesture they are using four SparkFun proximity sensors setup in a linear array to sense the distance a hand is moved. An ATMega1284P is used to convert the analog sensor signal to digital for further processing. The project is extremely well documented, as it appears to be the final report for the project.

A short video after the break shows off the prototype and gives a good explanation of how the system works.

Continue reading “Gesture Based Security Lock”

Making The Worst Linux PC Useful

AVR

After seeing [Dimitry] build the most minimal Linux computer ever, [Kyle] decided he needed one for himself. In true hacker fashion, he decided to take this build for the worst Linux PC one step further: he would add I2C to his version, making it somewhat useful, considering the number of I2C peripherals out there.

This build is based on [Dmitry]’s ARM Linux computer emulated on an 8-bit AVR. It’s a full-blown Linux computer with 16 MB of RAM courtesy of a 30-pin SIMM, a lot of storage provided by an SD card, all running on an emulated ARM processor inside a lowly ATMega1284p. [Kyle] built this clone over the course of a few months, but from the outset decided he wanted to implement an I2C protocol on this terribly under specced computer.

After booting his computer, [Kyle] eventually got an I2C module loaded by the kernel. With an I2C module and a few spare GPIO pins, he set out to create something to attach to this terribly slow computer – an ancient LED dot matrix display. With a real-time clock, this display became a clock  with the help of a homebrew program written in C. Considering the speed of the emulated processor, the program takes nearly three seconds to read the RTC and display the current time to the display. We’re thinking it was a wise choice to only implement hours and minutes in this clock.

If having a useful computer running at about 10 kilohertz isn’t enough, [Kyle] also compiled the classic text-based adventure Zork. It actually runs, proving you don’t need Megahertz of power to do something useful and fun.