The ERIC-1 Microcomputer

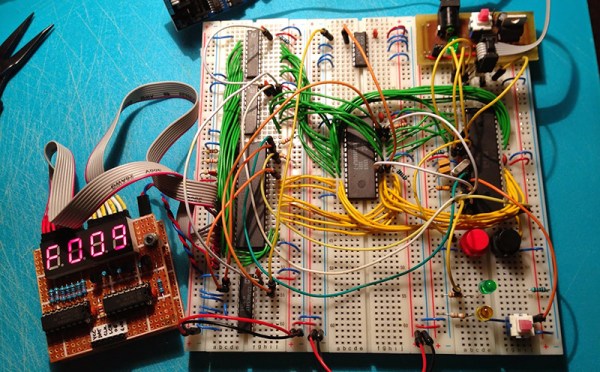
Everyone is having a go at building their own 8-bit 80s-era microcomputer now, and [Petri] thought he would throw his hat into the ring with ERIC-1, a homebrew, 6502-based computer that’s running at about 2MHz.

We’re about 30 or 40 years ahead of the game compared to the old-school 6502 designs, and [Petri] decided to capitalize on that. Instead of a separate ROM, VIA, and other peripherals, [Petri] is connecting a microcontroller directly to the data and address pins. This is a technique we’ve seen before, and [Petri] is doing it right: the micro and 6502 share 64k of RAM, with the ROM stored in the micro’s Flash. Video (PAL in this case) is handled by the ATMega, as is clocking and halting the CPU.

There were a few changes [Petri] made along the way to make this microcomputer a little more useful. One of the biggest changes was switching out the old NMOS Rockwell 6502 with the modern CMOS W65C02 from Western Design Center. The CMOS variant is a fully static design, keeping the registers alive even if the clock is stopped and making single-stepping and halting the CPU easier.

The CMOS variant also has a Bus Enable (BE) pin. Like similar pins on later, more advanced processors, this pin puts the address, data, and R/W pins into a high impedance state, giving other peripherals and microcontrollers the ability to write to RAM, peripherals, or anything else. It’s a handy feature to have if you’re using a microcontroller for everything except the CPU.

It’s already a great build, and since [Petri] has the skills to program this 8-bit ‘duino game, he’s sure to come up with something even better for this computer.

Oh, if you’re looking for something even cooler than a 3-chip 6502, there’s a bunch of stuff over on hackaday.io you should check out. Everything from 4-bit computers built from discrete components to dual AVR board can be found there.

Keurig

Dead Simple Hack Allows For “Rebel” Keurig K-Cups

If you haven’t actually used a Keurig coffee machine, then you’ve probably at least seen one. They are supposed to make brewing coffee simple. You just take one of the Keurig “k-cups” and place it into the machine. The machine will punch a hole in the foil top and run the water through the k-cup. Your flavored beverage of choice comes out the other side. It’s a simple idea, run by a more complex machine. A machine that is complicated enough to have a security vulnerability.

Unfortunately newer versions of these machines have a sort of DRM, or lockout chip. In order to prevent unofficial k-cups from being manufactured and sold, the Keurig machines have a way to detect which cups are legitimate and which are counterfeit. It appears as though the machine identifies the lid specifically as being genuine.

It turns out this “lockout” technology is very simple to defeat. All one needs to do is cut the lid off of a legitimate Keurig k-cup and place it on top of your counterfeit cup. The system will read the real lid and allow you to brew to your heart’s content. A more convenient solution involves cutting off just the small portion of the lid that contains the Keurig logo. This then gets taped directly to the Keurig machine itself. This way you can still easily replace the cups without having to fuss with the extra lid every time.

It’s a simple hack, but it’s interesting to see that even coffee machines are being sold with limiting technology these days. This is the kind of stuff we would have joked about five or ten years ago. Yet here we are, with a coffee machine security vulnerability. Check out the video demonstration below. Continue reading “Dead Simple Hack Allows For “Rebel” Keurig K-Cups”

How to cast rings

Casting Engagement Rings (Or Other Small Metal Parts!)

[Paul Williams] wrote in to tell us about his most recent and dangerous endeavor. Marriage.

As a masters student in Mechanical Engineering, he wanted to give his wife (to be) to be a completely unique engagement ring — but as you can imagine, custom engagement rings aren’t cheap. So he decided to learn how to make it himself.

During the learning process he kept good notes and has produced a most excellent Instructable explaining the entire process — How to make the tools you’ll need, using different techniques and common problems you might have. He even describes in detail how to make your own mini-kiln (complete with PID control), a vacuum chamber, a wax injector and even the process of centrifugal casting. Continue reading “Casting Engagement Rings (Or Other Small Metal Parts!)”

PeriUSBoost: A USB Battery Charger

PeriUSBoost: A DIY USB Battery Pack

If you travel often, use your mobile devices a lot, or run questionable ROMs on your phone, you likely have an external USB battery pack. These handy devices let you give a phone, tablet, or USB powered air humidifier (yes, those exist) some extra juice.

[Pedro]’s PeriUSBoost is a DIY phone charging solution. It’s a switching regulator that can boost battery voltages up to the 5 volt USB standard. This is accomplished using the LTC3426, a DC/DC converter with a built in switching element. The IC is a tiny SOT-23 package, and requires a few external passives work.

One interesting detail of USB charging is the resistor configuration on the USB data lines. These tell the device how much current can be drawn from the charger. For this device, the resistors are chosen to set the charge current to 0.5 A.

While a 0.5 A charge current isn’t exactly fast, it does allow for charging off AA batteries. [Pedro]’s testing resulted in a fully charged phone off of two AA batteries, but they did get a bit toasty while powering the device. It might not be the best device to stick in your pocket, but it gets the job done.

Vintage Apple Keyboard Revived As Standalone Computer

Many of our readers are familiar with the gold standard of classic PC keyboards – the bunker with switches known as the IBM Model M. The Model M’s Apple contemporary is the Apple Extended Keyboard and they are just as highly sought-after by their respective enthusiasts. Though discontinued almost 25 years ago and incompatible with anything made in the last 15, the codenamed “Saratoga” is widely considered the best keyboard Apple ever made.

[Ezra] has made a hobby of modernizing these vintage heartthrobs and rescuing them from their premature obsolescence. In a superbly documented tutorial he not only shows how to convert them to USB (a popular and trivial hack), but teaches you how and where to smuggle a Raspberry Pi in as well.

After disassembly, the project requires only a little bit of chisel and Dremel work before the soldering iron comes out. [Ezra] was fairly meticulous in removing or redirecting the Pi’s connectors and hardwiring the internals. Only 3 pins need to be traced from the original keyboard and [Ezra]’s ADB–>USB Rosetta Stone of choice is the Hasu Converter running on a Atmega 32u4 clone. Balancing cost, range, and power draw from the Pi, he settled on the TP-LINK WN722N for his WiFi solution which is also tucked away inside the case. A single pullup resistor to finish it off and [Ezra] was delighted to discover it worked the first time he plugged it in.

Keyboards from this era use actual momentary switches that audibly click twice per keypress. In our world of screens-as-keys celebrating the lack of tactile constraints, using beasts like the Model M or the AEK to force transistors to do your bidding is like racking a shotgun during a game of lasertag – comically obtuse but delightfully mechanical.

If you are looking to expand on [Ezra]’s tinkering, he has already made a wishlist of additions: a toggle switch to lobotomize the Pi back into a plain USB keyboard, an internal USB hub, and a power switch.

Hear the video of an AEK in action after the break (or loop it to sound productive while you nap).

Continue reading “Vintage Apple Keyboard Revived As Standalone Computer”

YikYak

Yik Yak MITM Hack (Give The Dog A Bone)

Yik Yak is growing in popularity lately. If you are unfamiliar with Yik Yak, here’s the run down. It’s kind of like Twitter, but your messages are only shared with people who are currently within a few miles of you. Also, your account is supposed to be totally anonymous. When you combine anonymity and location, you get some interesting results. The app seems to be most popular in schools. The anonymity allows users to post their honest thoughts without fear of scrutiny.

[Sanford Moskowitz] decided to do some digging into Yik Yak’s authentication system. He wanted to see just how secure this “anonymous” app really is. As it turns out, not as much as one would hope. The primary vulnerability is that Yik Yak authenticates users based solely on a user ID. There are no passwords. If you know the user’s ID number, it’s game over.

The first thing [Sanford] looked for was an encrypted connection to try to sniff out User ID’s. It turned out that Yik Yak does actually encrypt the connection to its own servers, at least for the iPhone app. Not to worry, mobile apps always connect to other services for things like ad networks, user tracking, etc. Yik Yak happens to make a call to an analytics tool called Flurry every time the app is fired. Flurry needs a way to track the users for Yik Yak, so of course the Yik Yak App tells Flurry the user’s ID. What other information would the anonymous app have to send?

Unfortunately, Flurry disables HTTPS by default, so this initial communication is in plain text. That means that even though Yik Yak’s own communications are protected, the User ID is still exposed and vulnerable. [Sanford] has published a shell script to make it easy to sniff out these user ID’s if you are on the same network as the user.

Once you have the user ID, you can take complete control over the account. [Sanford] has also published scripts to make this part simple. The scripts will allow you to print out every single message a user has posted. He also describes a method to alter the Yik Yak installation on a rooted iPhone so that the app runs under the victim’s user ID. This gives you full access as if you owned the account yourself.

Oh, there’s another problem too. The Android app is programmed to ignore bad SSL certificates. This means that any script kiddie can perform a simple man in the middle attack with a fake SSL certificate and the app will still function. It doesn’t even throw a warning to the user. This just allows for another method to steal a user ID.

So now you have control over some poor user’s account but at least they are still anonymous, right? That depends. The Yik Yak app itself appears to keep anonymity, but by analyzing the traffic coming from the client IP address can make it trivial to identify a person. First of all, [Sanford] mentions that a host name can be a dead giveaway. A host named “Joe’s iPhone” might be a pretty big clue. Other than that, looking out for user names and information from other unencrypted sites is easy enough, and that would likely give you everything you need to identify someone. Keep this in mind the next time you post something “anonymously” to the Internet.

[via Reddit]

Reverse Engineering The Proto X Quadcopter Radio

Just a few years ago, palm sized radio controlled toys were nothing more than a dream. Today, you can find them at every mall, toy store, and hobby shop. [Alvaro] couldn’t resist the tiny Estes Proto X quadcopter. While he enjoyed flying the Proto X, he found that the tiny controller left quite a bit to be desired. Not a problem for [Alvaro], as he embarked on a project to reverse engineer the little quad.

Inside the quadcopter and its lilliputian radio, [Alvaro] found a STM8 based processor and an Amiccom A7105 2.4G FSK/GFSK Transceiver radio. The A7105 is well documented, with datasheets easily obtained on the internet.  The interface between the processor and the radio chip was the perfect place to start a reverse engineering effort.

With the help of his Saleae logic analyzer, [Alvaro] was able to capture SPI data from both the quadcopter and the transmitter as the two negotiated a connection. The resulting hex files weren’t very useful, so [Alvaro] wrote a couple of Python scripts to decode the data. By operating each control during his captures, [Alvaro] was able to reverse engineer the Proto X’s control protocol. He tested this by removing the microcontroller from the remote control unit and wiring the A7105 to a STM32F4 dev board. Connecting the STM32 to his computer via USB, [Alvaro] was able to command the quad to take off. It wasn’t a very graceful flight, but it did prove that his grafted control system worked. With basic controls covered, [Alvaro] knocked up a quick user interface on his computer. He’s now able to fly the quadcopter around using keyboard and mouse. Not only did this prove the control system worked, it also showed how hard it is to fly a real aircraft (even a tiny model) with FPS controls.

The Estes Proto X is actually manufactured by Hubsan, a China based manufacturer best known for the x4 series of mini quadcopters. Since the Proto X and the x4 share the same communication protocol, [Alvaro’s] work can be applied to both. With fully computer controlled quads available for under $30 USD, we’re only a few cameras (and a heck of a lot of coding) away from cooperative drone swarms akin to those found in the University of Pennsylvania GRASP Lab.

Continue reading “Reverse Engineering The Proto X Quadcopter Radio”