DIY TV-B-Gone Is A-OK

Where won’t they put a TV these days? We’ve even seen one creeping behind semi-transparent mirror film in the ladies’ room of a sports bar, though that one didn’t last long. Up until that moment, we had never wished so hard for a TV-B-Gone, especially one as small and powerful as this DIY version by [Shane].

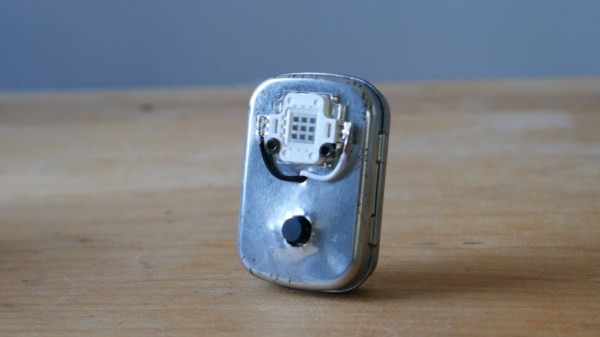
The best thing about [Shane]’s DIY TV-B-Gone is the strength of signal, though the size is nothing to sneeze at. That’s a 10-watt array or IR LEDs out of a security camera, and you can see how much brighter it is than a single IR LED in the video after the break.

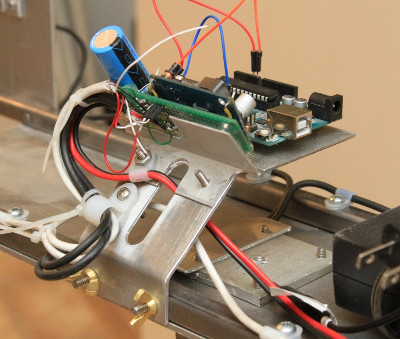
Packed inside this minty enclosure is an Arduino Nano, which holds all the TV power-off codes known to hackers and fires them off in quick succession. [Shane] salvaged a MOSFET from an electronic speed controller to drive that LED array, and there’s a voltage booster board to raise the 3.7V lithium battery to 5V. [Shane] hasn’t really had the chance to test this out in public what with the global pandemic and all, but was able to verify a working distance of 40 feet inside the house.

Don’t care for such a raw look? Hide your zapper inside a toy, like this sonic screwdriver version.

Continue reading “DIY TV-B-Gone Is A-OK”

Bee Counter Will Have You Up To Your Nectar In Hive Data

While we admit that free honey sounds pretty good, beekeeping is not some set-it-and-forget-it hobby where you can just put bees in a box and come back in a month to collect the goods. With the world’s bee population in decline, it’s more important than ever to monitor the health of hives.

One way to do that is to count the bees as they leave and reenter the hive. You can use the data to determine how many workers are working, or to compare activity between multiple hives. If you notice the bees are gone for longer and longer periods, it’s probably because their nearby nectar sources are dwindling and they have to travel farther to find flowers.

This open-source bee counter built by [hydronics2] is designed to fit the opening of a standard hive. The bees can only buzz themselves back in by flying through one of 24 little IR break-beam gates. Our favorite thing about this build is the way [hydronics2] created the individual gates by sandwiching two boards together with headers as spacers. It’s such a simple and perfect solution.

It’s also pretty cool that the board is designed to be compatible with any Feather or ItsyBitsy board, so there are a lot of options for data handling. Check out the brief demo we planted after the break, and stick around for the build video. If you’d prefer a more hands-off approach, try computer vision.

Continue reading “Bee Counter Will Have You Up To Your Nectar In Hive Data”

High Speed Chronograph Looks Like Pro Gear

It can be hard enough to take a good photograph of a running kid or pet, and if we’re being honest, sometimes even stationary objects manage to elude our focus. Now imagine trying to take a picture of something moving really fast, like a bullet. Trying to capture the moment a fast moving projectile hits an object is simply not possible with a human behind the shutter button.

Enter the ballistic chronometer: a device that uses a set of sensor gates and a highly accurate timer to determine how fast an object is flying through it. Chronometers that operate up to a couple hundred meters per second are relatively common, but [td0g] had something a little faster in mind. He’s come up with an optical setup that he claims can capture objects moving as fast as Mach 2. With this chronometer tied into a high-speed flash rig, [td0g] is able to capture incredible shots such as the precise instant a bullet shatters a glass of water.

Because he couldn’t find any phototransistors with the sub-microsecond response time necessary to detect a small object moving at 1,000 m/s, [td0g] ended up using LEDs in a photoconductive configuration, where 27 VDC is applied backwards against the diode. Careful monitoring of voltage fluctuations across the diode allows for detection of changes in the received light level. To cut down on interference, [td0g] used IR LEDs as his light sources, reasoning there would be less ambient IR than if he used something in the visual range.

What really impresses with this build is the attention to detail and amount of polish [td0g] put into the design. From the slick angled bracket that holds the Arduino and LCD to the 3D printed covers over the optical gates, the final device looks like a professional piece of equipment with a price tag to rival that of a used car.

For the future, [td0g] plans on upgrading to faster comparators than he LM339’s he has installed currently, and springing for professionally done PCBs instead of protoboard. In its current state this is already a very impressive piece of kit, so we’d love to see what it looks like when it’s “finished”.

If you don’t need something quite this high end but still would like to see how fast something is going, we have covered chronometer builds to fit every budget.

World Smallest TV-B-Gone

uTVBG

The TV-B-Gone has proven to be a dangerous and versatile gadget. At Interactive Matter, they created an even smaller version with more sneaking potential. Called the µTVBG, it packs an entire TV-B-Gone in a 1.4 x 2.5 cm footprint and even has room for a programming header. He found some high-powered surface-mount IR LEDs that would match the original TV-B-Gone’s power. To drive the board, they used a CR1220 button battery on the bottom of the board. The whole thing is smaller than your thumb and should be easier to hide next time you wreak havoc.

Wii Don’t Need No Stinkin’ Sensor Bar


[duff] found this and sent it in. The video demonstrates that the Wii ‘sensor bar’ is just an array of IR leds. The actual sensor is in the remote control – which probably sends data to the Wii via RF. These guys faked the ir signal using a pair of standard remotes. This’ll probably open the door to some controller cheats as things progress. [Better than using a belt sander on a trackball.]

[Hey – If you want to get on the podcast, email some questions or comments as mp3s to podcast at hackaday.]