Using Fishing Wire To Hold In Pin Headers Is A Nifty Trick

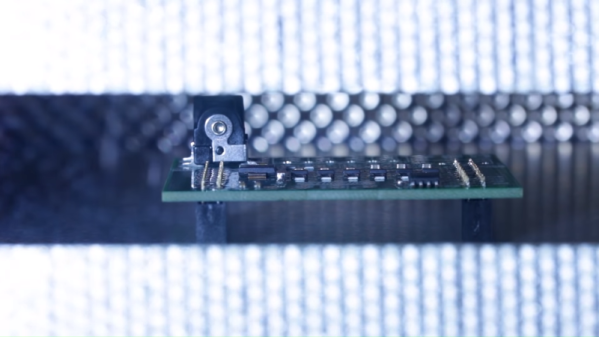
Working on a breadboard, one can get used to the benefits of being able to readily plug and unplug jumper wires to reconfigure a project. One could only dream of doing so with PCBs, right? Wrong! [Stewart Russell] recently shared a tip on Twitter on how to do just that, with the help of a little fishing wire.

The wire can be neatly threaded through the board to enable quick hookups.

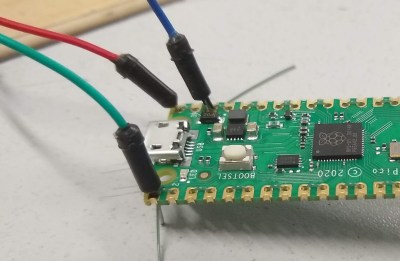
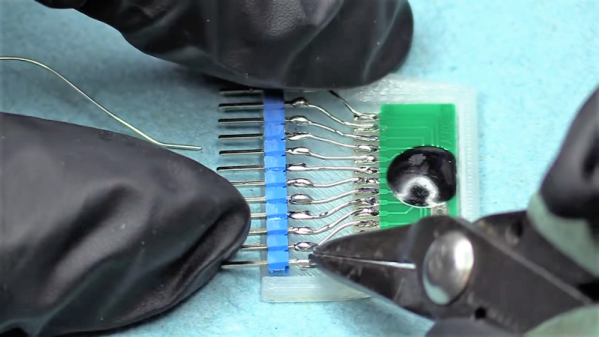
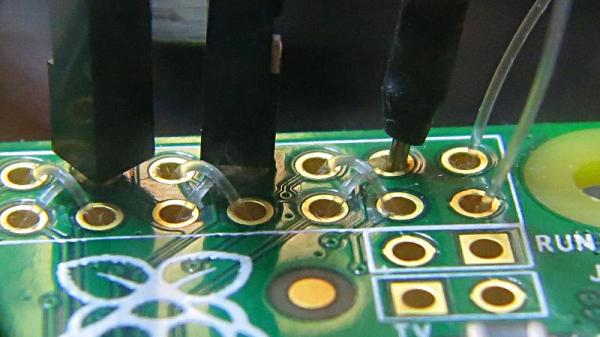
The trick is simple: on any old development board that uses 0.1″ pitch headers, simply weave some fishing line through the plated through-holes in the PCB. Then, regular jumper wires can be inserted just like on a breadboard. The fishing wire has just enough give to allow the jumper wires to be jammed in, holding them steady and in good contact, while still allowing them to be easily removed.

[Hackspace Magazine] has raved about the trick, noting great success using 0.38 mm fishing line. Alternative methods involve using toothpicks, though we suspect solution is likely messier and less reliable.

If you’ve got your own tricks for prototyping quickly using development and breakout boards, be sure to share them below in the comments. Alternatively, send your best stuff to us on the tipsline!

Bright White Night Light Fights E-Waste

E-waste is a gigantic problem, and it can seem impossible as a lone individual to make any kind of dent in it. But [akshar1101] is trying to do their part by looking past the defective aspects of broken, discarded electronics to draw out the possibilities of what’s left.

This friendly night light is made from the PCBs of four broken Nokia 5110 LCD modules. The screens were all toast, but the nice white LEDs that used to light them from the sides work just fine. [akshar1101] cleverly tied all the LED and GND lines together with single right-angle header pins. To power the LEDs, they wired up a JST receptacle to one of the PCBs and connected a 3.7 V lithium battery pack that sits underneath. [akshar1101] diffused the piercing white lights into a soft glow with two pieces of acrylic.

We love to see electronic components get saved from landfills, especially when they can be turned into something useful and beautiful. Something about the traces on these boards makes them visually interesting to us — it’s that little hiccup that interrupts otherwise parallel lines.

If all of your 5110 LCDs are in working order, you could spice one of them up with an RGB backlight.

An Adapter To Solve Your ESP-01 Breadboard Woes

The ESP-01 launched the ESP8266 revolution back in 2014, and while today you’re far more likely to see somebody use a later version of the chip in a Wemos or NodeMCU development board, there are still tasks the original chip is well suited for. Unfortunately, they can be tricky to use while prototyping because they aren’t very breadboard friendly, but this adapter developed by [Miguel Reis] can help.

Of course, the main issue is the somewhat unusual pinout of the ESP-01. Since it was designed as a daughter board to plug into another device, the header is too tight to fit into a breadboard. The adapter that [Miguel] has come up with widens that up to the point you can put it down the centerline of your breadboard and have plenty of real estate around it.

The second issue is that the ESP-01 is a 3.3 V device, which can be annoying if everything else in the circuit is running on 5 V. To get around this, the adapter includes an SPX3819 regulator and enough capacitors that the somewhat temperamental chip gets the steady low-voltage supply it needs to be happy.

[Miguel] has released the schematics and board files so you can spin up your own copy of the adapter, but they’re also available for around $3 USD from his Tindie store.

Bee Counter Will Have You Up To Your Nectar In Hive Data

While we admit that free honey sounds pretty good, beekeeping is not some set-it-and-forget-it hobby where you can just put bees in a box and come back in a month to collect the goods. With the world’s bee population in decline, it’s more important than ever to monitor the health of hives.

One way to do that is to count the bees as they leave and reenter the hive. You can use the data to determine how many workers are working, or to compare activity between multiple hives. If you notice the bees are gone for longer and longer periods, it’s probably because their nearby nectar sources are dwindling and they have to travel farther to find flowers.

This open-source bee counter built by [hydronics2] is designed to fit the opening of a standard hive. The bees can only buzz themselves back in by flying through one of 24 little IR break-beam gates. Our favorite thing about this build is the way [hydronics2] created the individual gates by sandwiching two boards together with headers as spacers. It’s such a simple and perfect solution.

It’s also pretty cool that the board is designed to be compatible with any Feather or ItsyBitsy board, so there are a lot of options for data handling. Check out the brief demo we planted after the break, and stick around for the build video. If you’d prefer a more hands-off approach, try computer vision.

Continue reading “Bee Counter Will Have You Up To Your Nectar In Hive Data”

Fail Of The Week: How Not To Re-Reflow

There’s no question that surface-mount technology has been a game-changer for PCB design. It means easier automated component placement and soldering, and it’s a big reason why electronics have gotten so cheap. It’s not without problems, though, particularly when you have no choice but to include through-hole components on your SMT boards.

[James Clough] ran into this problem recently, and he tried to solve it by reflowing through-hole connectors onto assembled SMT boards. The boards are part of his electronic lead screw project, an accessory for lathes that makes threading operations easier and more flexible. We covered the proof-of-concept for the project; he’s come a long way since then and is almost ready to start offering the ELS for sale. The PCBs were partially assembled by the board vendor, leaving off a couple of through-hole connectors and the power jack. [James]’ thought was to run the boards back through his reflow oven to add the connectors, so he tried a few experiments first on the non-reflow rated connectors. The Phoenix-style connectors discolored and changed dimensionally after a trip through the oven, and the plastic on the pin headers loosened its grip on the pins. The female header socket and the power jack fared better, so he tried reflowing them, but it didn’t work out too well, at least for the headers. He blames poor heat conduction due to the lack of contact between the board and the reflow oven plate, and we agree; perhaps an aluminum block milled to fit snugly between the header sockets would help.

Hats off to [James] for trying to save his future customers a few steps on assembly, but it’s pretty clear there are no good shortcuts here. And we highly recommend the electronic leadscrew playlist to anyone interested in the convergence of machine tools and electronics.

Continue reading “Fail Of The Week: How Not To Re-Reflow”

Extreme Pi Overclocking With Mineral Oil

Liquid cooling is a popular way to get a bit of extra performance out of your computer. Usually this is done in desktops, where a special heat sink with copper tubing is glued to the CPU, and the copper tubes are plumbed to a radiator. If you want dive deeper into the world of liquid cooling, you can alternatively submerge your entire computer in a bath of mineral oil like [Timm] has done.

The computer in question here is a Raspberry Pi, and it’s being housed in a purpose-built laser cut acrylic case full of mineral oil. As a SoC, it’s easier to submerge the entire computer than it is to get a tiny liquid-cooled heat sink for the processor. While we’ve seen other builds like this before, [Timm] has taken a different approach to accessing the GPIO, USB, and other connectors through the oil bath. The ports are desoldered from the board and a purpose-built header is soldered on. From there, the wires can be routed out of the liquid and sealed off.

One other detail used here that  we haven’t seen in builds like this before was the practice of “rounding” the flat ribbon cable typically used for GPIO. Back in the days of IDE cables, it was common to cut the individual wires apart and re-bundle them into a cylindrical shape. Now that SATA is more popular this practice has been largely forgotten, but in this build [Timm] uses it to improve the mineral oil circulation and make the build easier to manage.

Continue reading “Extreme Pi Overclocking With Mineral Oil”

A Hacked Solution For Non-Standard Audio Modules

When life hands you lemons, lemonade ends up being your drink of choice. When life hands you non-standard components, however, you’ve got little choice but to create your own standard to use them. Drinking lemonade in such a situation is left to your discretion.

The little audio record and playback modules [Fran Blanche] scored from eBay for a buck a piece are a good example. These widgets are chip-on-board devices that probably came from some toy manufacturer and can record and playback 20 seconds of audio with just a little external circuitry. [Fran] wants to record different clips on a bunch of these, and pictured using the card-edge connector provided to plug them the recording circuit. But the pad spacing didn’t fit any connector she could find, so she came up with her own. The module and a standard 0.1″ (2.54 mm) pitch header are both glued into a 3D-printed case, and the board is connected to the header by bonding wires. It makes a nice module that’s easily plugged in for recording, and as [Fran] points out, it’s pretty adorable to boot. Check it out in the video below.

Sure, the same thing could have been accomplished with a custom PCB breaking out the module’s pins to a standard card-edge connector. But [Fran] knows a thing or two about ordering PCBs, and our guess is she wanted to get this done with what was on hand rather than wait for weeks. There’s something to be said for semi-instant gratification, after all. And lemonade.

Continue reading “A Hacked Solution For Non-Standard Audio Modules”