A Wireless Speaker Pair From Dead Earbuds

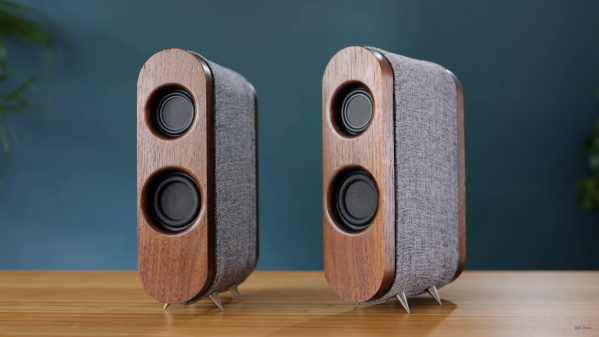
Building a Bluetooth speaker is easy with the availability of cheap Bluetooth receivers, but surprisingly there isn’t a simple way to build a pair of truly wireless stereo speakers. [Matt] from DIY Perks realized that modern Bluetooth earbuds contain all the electronics to do just that.

Due to the popularity of these earbuds, a broken pair can be picked up very cheaply on eBay. Usually, it’s only the battery or speaker unit that give out, neither of which are required for this build. [Matt] goes through the process of taking a pair of earbuds apart, and then soldering on battery and speaker wires. The speaker wires are connected to an audio amp, which drives a mid-range and treble speaker driver, and a subwoofer. The outputs to the amp are also filtered to match the speakers. Power is provided by a set of four 18650 cells.

[Matt] housed the driver and electronics in some attractive CNC machined wood enclosures. In the video, he places a lot of emphasis on properly sealing all the gaps to get the best possible audio quality. As with all of his projects, the end result looks and performs like a high-end commercial product. We’re almost surprised that he didn’t add any brass to the speakers, as he did on his USB-C monitor or PS5 enclosure build. Continue reading “A Wireless Speaker Pair From Dead Earbuds”

Building Distributed Mode Loudspeakers With Plywood

Distributed-mode loudspeakers work rather differently from the typical drivers used in 99% of applications. Instead of using piston-like motion to create sound waves, they instead rely on exciting an entire panel to vibrate and thus produce sound. [JGJMatt] decided to build a pair of bookshelf-sized units, with great results.

The build begins with a pair of 44mm DML exciters, readily available online. These had to be modified to remove their stock metal mounting plates that degraded the sound output in early tests. Instead, 3D printed pieces were used to mount the exciters to the 3mm plywood boards, which were lasercut to act as the main DML panels. Additionally, whizzer cones were fitted to the panels in an effort to further boost the high frequency response of the speakers. The speaker stands are assembled out of more 3D printed pieces and aluminium rods, giving a clean, modern look to the final product.

The performance of the speakers is admirable based on the test video, though [JGJMatt] notes that they should be paired with a subwoofer in use as the DML units do not readily produce frequencies below 100Hz. We’ve seen similar builds before on a larger scale, too. Video after the break.

Continue reading “Building Distributed Mode Loudspeakers With Plywood”

Digispark Spoofs IR To Get Speakers Under Control

The Microlab 6C are a pretty nice pair of speakers, but [Michał Słomkowski] wasn’t too thrilled with the 8 watts they consume when on standby. The easy fix is to just unplug them when they aren’t in use, but unfortunately the digital controls on the front panel mean he’s got to turn them on, select the correct input, and turn the volume up to the appropriate level every time they’re plugged back in. Surely there must be a better way.

His solution was to use a Digispark to fire off the appropriate IR remote codes so they’d automatically be put back into a usable configuration. But rather than putting an IR LED on one of the GPIO pins, he simply spliced it into the wire leading back from the speaker’s IR receiver. All his code needs to do is generate the appropriate pulses on the line, and the speaker’s electronics think its a signal coming in from the remote.

Distinctive patterns on the IR sensor wires.

Power for the Digispark is pulled from the speaker itself, so it turns on once [Michał] plugs them back in. The code waits five seconds to make sure the hardware has had time to start up, then proceeds with the “Power On”, “Change Input”, and “Volume Up” commands with a few seconds in between each for good measure.

Not only was it easier to skip the IR and inject the signals directly, but it also made for a cleaner installation. Since the microcontroller doesn’t need line of sight to the IR receiver, [Michał] was able to hide it inside the speaker’s enclosure. From the outside, the modification is completely invisible.

We’ve seen similar code injection tricks used before, and it’s definitely one of those techniques you should file away mentally for future reference. Even though more and more modern devices are embracing WiFi and Bluetooth control, the old school IR remote doesn’t seem like it’s going away anytime soon.

3D Printing Transmission Line Speakers

Anyone who has played with speakers on the workbench knows the huge difference enclosure design makes to the frequency response of an audio system. Speakerheads spend hours tinkering with designs and calculations, aiming to get the best out of a given set of drivers. [HexiBase] decided to try some experiments of his own, running into some hurdles along the way.

[Hexibase] aimed to 3D print a compact transmission line design, to suit a pair of 1 1/8″ full-range drivers. Being aware of the benefits of high-resolution resin 3D printing, he set out to print a design taking full advantage of the build volume of his Longer 3D Orange 30 printer. Unfortunately, after much fiddling with slicer settings, the printer turned out to have a fundamental fault, leading to unusable prints.

Undeterred, [Hexibase] switched to using his Longer FDM model instead. Printing out the enclosures in PLA. he noted that the different material will have a slightly altered frequency response than originally intended. Regardless, the final result sounds great, and barring some higher-frequency anomalies, the output correlates well with the mathematical model of expected performance.

3D printers make great tools for budding speaker builders, as they make constructing advanced geometries a cinch. Of course, you can even try and 3D print the drivers themselves if you’re so inclined. Video after the break.

Continue reading “3D Printing Transmission Line Speakers”

Peek At The Off-Ear Speaker Prototypes For Valve’s VR

The Valve Index VR headset incorporates a number of innovations, one of which is the distinctive off-ear speakers instead of headphones or earbuds. [Emily Ridgway] of Valve shared the design and evolution of this unusual system in a deep dive into the elements of the Index headset. [Emily] explains exactly what they were trying to achieve, how they determined what was and wasn’t important to deliver good sound in a VR environment, and what they were able to accomplish.

First prototype, a proof-of-concept that validated the basic idea and benefits of off-ear audio delivery.

Early research showed that audio was extremely important to providing a person with a good sense of immersion in a VR environment, but delivering a VR-optimized audio experience involved quite a few interesting problems that were not solved with the usual solutions of headphones or earbuds. Headphones and earbuds are optimized to deliver music and entertainment sounds, and it turns out that these aren’t quite up to delivering on everything Valve determined was important in VR.

The human brain is extremely good at using subtle cues to determine whether sounds are “real” or not, and all kinds of details come into play. For example, one’s ear shape, head shape, and facial geometry all add a specific tonal signature to incoming sounds that the brain expects to encounter. It not only helps to localize sounds, but the brain uses their presence (or absence) in deciding how “real” sounds are. Using ear buds to deliver sound directly into ear canals bypasses much of this, and the brain more readily treats such sounds as “not real” or even seeming to come from within one’s head, even if the sound itself — such as footsteps behind one’s back — is physically simulated with a high degree of accuracy. This and other issues were the focus of multiple prototypes and plenty of testing. Interestingly, good audio for VR is not all about being as natural as possible. For example, low frequencies do not occur very often in nature, but good bass is critical to delivering a sense of scale and impact, and plucking emotional strings.

“Hummingbird” prototype using BMR drivers. Over twenty were made and lent to colleagues to test at home. No one wanted to give them back.

The first prototype demonstrated the value of testing a concept as early as possible, and it wasn’t anything fancy. Two small speakers mounted on a skateboard helmet validated the idea of off-ear audio delivery. It wasn’t perfect: the speakers were too heavy, too big, too sensitive to variation in placement, and had poor bass response. But the results were positive enough to warrant more work.

In the end, what ended up in the Index headset is a system that leans heavily on Balanced Mode Radiator (BMR) speaker design. Cambridge Audio has a short and sweet description of how BMR works; it can be thought of as a hybrid between a traditional pistonic speaker drivers and flat-panel speakers, and the final design was able to deliver on all the truly important parts of delivering immersive VR audio in a room-scale environment.

As anyone familiar with engineering and design knows, everything is a tradeoff, and that fact is probably most apparent in cutting-edge technologies. For example, when Valve did a deep dive into field of view (FOV) in head-mounted displays, we saw just how complex balancing different features and tradeoffs could be.

3D Printed Speakers With Many Lessons Learned

Although we all wish that our projects would turn out perfect with no hiccups, the lessons learned from a frustrating project can sometimes be more valuable than the project itself. [Thomas Sanladerer] found this to be the case while trying to build the five satellite speakers for a 5.1 surround sound system, and fortunately shared the entire process with us in all its messy glory.

[Thomas] wanted something a little more attractive than simple rectangular boxes, so he settled on a very nice curved design with few flat faces and no sharp corners, 3D printed in PLA. Inside each is an affordable broadband speaker driver and tweeter, with a crossover circuit to improve the sound quality and protect the drivers. The manufacturer of the drivers, Visatron, provides very nice speaker simulation software to select the appropriate drivers and design the crossover circuit. The front of each speaker consisted of a 3D printed frame, covered with material from a cut-up T-shirt. These covers attach to the main body using magnets and really look the part.

After printing, [Thomas] soaked all the parts in water to clean of the PVA support structures but discovered too late that the outer surfaces are not watertight and a lot of water had seeped into the parts. In an attempt to dry them he left them in the sun for a while which ended up warping some parts, so he had to reprint them anyway. The main bodies were printed in two parts and then glued together. This required a lot of sanding to smooth out the glue joints, and many cycles of paint and sanding to get rid of the layer lines. When assembling the different pieces, he found that many parts did not fit together, which he suspects was caused by incorrect calibration on the delta-bot printer he was using.

In the end, the build took almost two years, as [Thomas] needed breaks between all the frustration, and eventually only used one of the speakers. We’re glad he shared the messy parts of the project, which will hopefully spare someone else a bit of trouble in a project.

Listening to a high-quality audio setup is always a pleasure, and we’ve covered several projects from audiophiles, including affordable DML speakers, and 3D printed speaker drivers.

Continue reading “3D Printed Speakers With Many Lessons Learned”

Patterned Plywood Makes For Attractive Speakers

In the matter of audio, we’re well past the reign of the home hi-fi and the boombox. If you’re not listening on headphones or directly on your phone, you’ve got a brick-sized Bluetooth speaker pumping out the tunes. Still a fan of the old-school, [Amanda Ghassaei] built some bookshelf speakers with a hip aesthetic.

First, the speaker enclosures were designed in WinISD, a software package specifically made for the task. For given woofers and tweeters, it helps get the enclosure and port sizes in the correct range for good sound. Panels were then fabricated out of plywood to make the enclosures. The plywood was cut and reformed several times to make the panels, using the pattern from the multiple plies to create the zig-zag look. Audio wise, a class D amplifier takes in line-level signals, before pumping them out to a woofer and tweeter through a custom designed crossover network.

It’s a tidy build, and we’d love to experiment ourselves with the fancy patterned plywood technique. Getting your enclosure design right can make a big difference to sound quality, as we’ve seen before. Video after the break.

Continue reading “Patterned Plywood Makes For Attractive Speakers”