A robot that detects whether you are awake and gently taps you if not.

Wake-Up Robot Does It Gently

For hundreds of years, people have fallen asleep while reading in bed late at night. These days it’s worse, what with us taking phones to the face instead when we start to nod off. At least they don’t have pointy corners like books. While you may not want to share your bedroom with a robot, this wake-up robot by [Norbert Zare] may be just the thing to keep you awake.

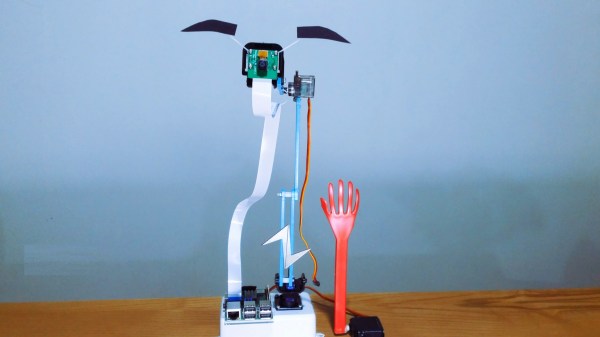
Here’s how it works: a Raspberry Pi camera on a servo wanders around at eye level, and the Pi it’s attached to uses OpenCV to determine whether those eyes are open or starting to get heavy. The bot can also speak — it uses eSpeak to introduce itself as a bot designed not to let you sleep. Then when it catches you snoozing, it repeatedly intones ‘wake up’ in a bored British accent.

We were sure that the thing was designed to slap [Norbert] in the face a la [Simone Giertz]’s robot alarm clock, but no, that long-fingered hand just slowly swings down and gently taps [Norbert] on the arm (or whatever is in the path of the slappy hand). Check out the short demo and build video after the break.

Do you want to be awoken even more gently? Try a sunlight lamp. We’ve got dozens in stock, but this one gradually gets about as bright as the sun.

Continue reading “Wake-Up Robot Does It Gently”

Christmas tree PCB with Blinky Circuit

Is It Finally Time For Christmas Decorations?

[Arnov] is trying to get into the holiday spirit and is doing so the way he knows how. He was thinking of some cool decorations for his Christmas tree and decided the best decorations are the ones you make yourself, so he made his own blinky Christmas tree ornament.

The famed “blinky circuit” is certainly one that we are no strangers to here at Hackaday. Some of our readers will be very pleased to see that he did in fact use a 555 timer and not an Arduino. The 555 timer is wired to drive the clock pin of the CD4017 decade counter and the outputs of the decade counter are wired to the LEDs. The LEDs are lit up sequentially upon each low to high transition of the clock pulse though you may try getting creative with your LED wiring scheme to achieve different blinking effects.

What readers might really take away from this build is [Arnov] detailing how to import images into his CAD tool of choice, OrCAD in his case. We know that can be a bit tricky sometimes. Finally, we love that this project doubles as PCB art and a soldering challenge. It would definitely make for a good demo project at your next beginner soldering workshop.

Cool project [Arnov!]

Continue reading “Is It Finally Time For Christmas Decorations?”

Paper Plate Surround Sound System

With the holiday season, you might turn to paper plates to cut down on dishwashing after having family or friends over. But what do you do with the extras? If you are [TKOR] you make some speakers. The process is fairly simple and if you know how a speaker works, you won’t find any surprises, but there are some neat techniques you might pick up. You can see the video below.

A drill and a steel rod help with the coil winding duty. You can probably adapt the technique to make other kinds of coils and we’d rig up an encoder to count revolutions, too.

Continue reading “Paper Plate Surround Sound System”

An array of 3D-printed parts for old sewing machines.

Printed Sewing Machine Parts Extend Singer’s Range

[Grow Your Own Clothes] had finally found their ideal sewing machine for doing zig-zag stitches (/\/\/\) and converting to a treadle drive (mechanically foot-fed) — a Singer 411G. This is a well-respected workhorse of a machine, and if you see one in a secondhand store, you might want to grab it. The only problem is that its multi-step zig-zag stitch is a 4-stepper and not a 3-step, which is what [GYOC] prefers. Having heard it was possible to hack them into doing a 3-step, [GYOC] set out to learn Tinkercad and grow their own sewing machine parts.

A 3D-printed cam lets this machine do the zig-zag in three steps instead of four.
The new zig-zag top hat cam in place.

So once upon a time, sewing machines didn’t just do a bunch of things out of the box. They needed an array of plastic cams to do different stitches, kind of like trading out the element or disk in a typewriter to print in italics. While most machines still have exchangeable feet for different needs and special parts for sewing things like buttonholes, most domestics now have decorative stitches and their cams built in.

The 3-step zig-zag cam was just the beginning. [GYOC] decided to make a few more parts before their Tinkercad knowledge faded: a needle adapter with an improved design, some tension stud sprockets for a different machine, and a couple of buttonhole templates for making different sizes with a buttonholer. Although they aren’t giving away the files for free, all of these parts are available quite cheaply in their Shapeways store.

Got an old machine you don’t know what to do with? Try converting it to a computerized embroidery machine.

Thanks for the tip, [Raphael]!

This Ham Radio Is Unsafe At Any Frequency

When we were kids we rode bicycles without pads and helmets. We drank sugary drinks. We played with chemistry sets and power tools. We also built things that directly used AC line current. [Mike] remembers and built one, presumably more to discuss the safety precautions around things that can shock you and not entice you to duplicate it. He calls it The Retro QRP Widowmaker, if that’s any kind of a hint. (Video of this unsafe transmitter also embedded below.)

The design showed up from time to time in old electronic magazines. Built on an open board and with no ground wire, the radio didn’t need a complex power supply. This wasn’t limited to transmitters, either. Some TVs and radios had a “hot chassis.” That’s why we were taught to touch an unknown chassis with the back of your hand first. A shock will contract your muscles and that will pull your arm away instead of making you grab the electrically active part.

Continue reading “This Ham Radio Is Unsafe At Any Frequency”

Building The DIY HP41C: A Field Report

I have a confession to make. I write about a lot of projects for Hackaday, but there are very few I read about and then go actually build a copy of it. I don’t have a lot of time and I’m usually too busy building my own stuff. But once in a while, something strikes my fancy and I’ll either raid the junk box or buy the kit. The most recent case of that was the PX-41C, a replica of the classic HP-41C.

Nicely bagged parts.

The HP-41C is a somewhat legendary reverse-polish notation calculator. I still have my original HP-41C from 1979 (a very low serial number). It is still a workhorse but at 43 years old or so, I don’t like to leave it hanging around or near anything that might damage it. It has enough wear from the daily use it received 40 years ago. Sure, I have great emulation on my phone and I use that too, but the PX-41C kit looked fun, and with all through-hole parts it would be a quick build. The black Friday sale on Tindie sealed the deal for me.

Start-Up

The kit arrived on the Saturday after Thanksgiving, I decided to tackle it while waiting for some 3D prints. The components were all nicely bagged and marked. Tearing into the bags was a bit frustrating, but not hard and it did keep everything separate. There was a bill of materials, but — I thought — no instructions. Turns out the last part of the bill of materials is a link to some instructions. They aren’t much and I didn’t realize they were until after completing the board, but it isn’t hard to figure out. All the parts are marked on the silkscreen and you can probably figure it out — with a few caveats.

Continue reading “Building The DIY HP41C: A Field Report”

Hackaday Podcast 147: Animating Traces, Sucking And Climbing, Spinning Sails, And Squashing Images

Hackaday editors Mike Szczys and Elliot Williams get caught up on the week that was. You probably know a ton of people who have a solar array at their home, but how many do you know that have built their own hydroelectric generation on property? Retrocomputing software gurus take note, there’s an impressive cross-compiler in town that can spit out working binaries for everything from C64 to Game Boy to ZX Spectrum. Tom took a hard look at the Prusa XL, and Matthew takes us back to school on what UEFI is all about.

Take a look at the links below if you want to follow along, and as always, tell us what you think about this episode in the comments!

Direct download (55 MB)

Continue reading “Hackaday Podcast 147: Animating Traces, Sucking And Climbing, Spinning Sails, And Squashing Images”