VME Reverse Engineering

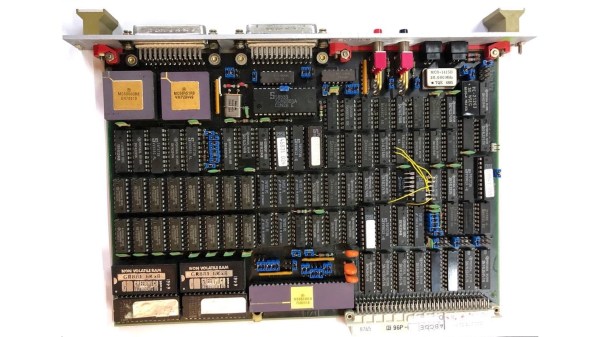
With some free time on his hands waiting for delayed parts to arrive, [Rik] set out to reverse engineer an old VME system he had acquired. VMEbus computers are based on the standard Eurocard PCB format, which defines a wide range of card sizes — the most common being 6U height like [Rik]’s system. They usually consist of a rack-mounted card cage with a passive backplane. Originally, Motorola 68000-based CPU cards were used in VMEbus systems, but any processor could be used as long as you provided the right signals and timings to the system bus. Eurocard systems are less common these days, but are still used in some applications. In fact, if you’re into synthesizers, you may be using Eurocards today — the Eurorack standard is based on the standard 3U card size.

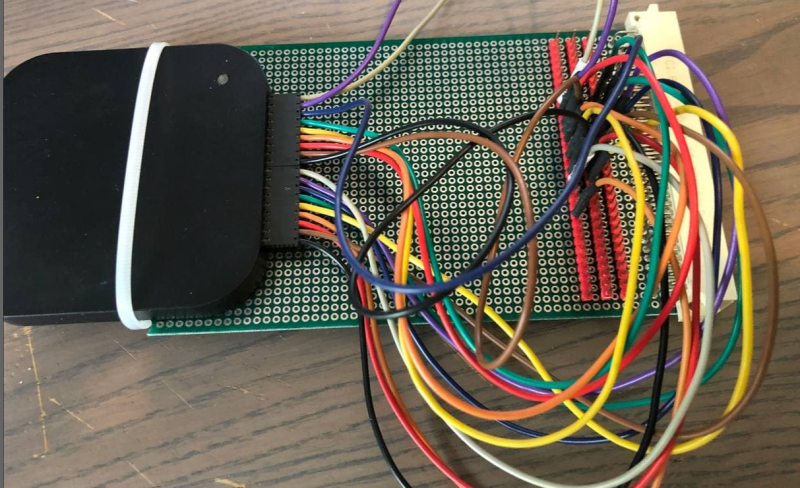
Back to [Rik]’s project, he had no idea what this system was nor how to use it. A bit of probing around and he found two UARTs, a system monitor, and a way to load and dump S-record files. He documents the process quite well, as the internal layout and memory map of the system is unlocked piece by piece. We also like his method of instrumenting the VMEbus signals — logic analyzers are so small today, you can just mount one inside the rack.

Spoiler alert: [Rik] succeeds in mapping out the memory, writes some small programs in 68k assembly language, and even builds his own LED accessory card so he can blink some lights (as one must do).

We wrote about modularity recently, and VMEbus + Eurocard systems are good examples of modular design. You could quickly put together a robust assembly using entirely off-the-shelf cards, or mix in your own custom cards. But technology advancements in clock speeds and miniaturization have made these card cage, passive backplane systems less and less relevant today. Do any of you still use the VMEbus, or have you designed with them in the past? Let us know down in the comments below.

Learn Engineering Concepts With Some Cool Animations

All feats of engineering build on a proper understanding of the basic engineering concepts. Learning these concepts from a book or class tends to be a rather uninspiring exercise, unfortunately. To make this task a lot more enjoyable, [The Efficient Engineer] has produced a series of high-quality, easy-to-watch videos on the concepts.

The videos focus mainly on mechanical and structural engineering and contain excellent animations and just enough math to give you a basic understanding. There are 22 videos so far and cover a wide variety of topics, including FEA analysis, stress and strain, aerodynamics, and Young’s modulus. Each video starts with the basics, then digs down into the topic, all the while visualizing the subject being discussed. For example, for FEA he starts with the applications, then covers discretization (meshing) and how to solve the calculations.

For more excellent educational videos, check out [Real Engineering] and [Practical Engineering]. Continue reading “Learn Engineering Concepts With Some Cool Animations”

A Wireless Speaker Pair From Dead Earbuds

Building a Bluetooth speaker is easy with the availability of cheap Bluetooth receivers, but surprisingly there isn’t a simple way to build a pair of truly wireless stereo speakers. [Matt] from DIY Perks realized that modern Bluetooth earbuds contain all the electronics to do just that.

Due to the popularity of these earbuds, a broken pair can be picked up very cheaply on eBay. Usually, it’s only the battery or speaker unit that give out, neither of which are required for this build. [Matt] goes through the process of taking a pair of earbuds apart, and then soldering on battery and speaker wires. The speaker wires are connected to an audio amp, which drives a mid-range and treble speaker driver, and a subwoofer. The outputs to the amp are also filtered to match the speakers. Power is provided by a set of four 18650 cells.

[Matt] housed the driver and electronics in some attractive CNC machined wood enclosures. In the video, he places a lot of emphasis on properly sealing all the gaps to get the best possible audio quality. As with all of his projects, the end result looks and performs like a high-end commercial product. We’re almost surprised that he didn’t add any brass to the speakers, as he did on his USB-C monitor or PS5 enclosure build. Continue reading “A Wireless Speaker Pair From Dead Earbuds”

A DIY Enclosed Motorcycle To Keep You Dry In The Rain

Motorcyclist’s vulnerability to bodily harm and weather has spawned several enclosed motorcycle designs over the years. Fascinated by the idea, [Meanwhile in the garage] finally got around to building his own. (Video, embedded below.)

The vehicle started life as a 125cc scooter, stripped of all the unnecessary bits, he welded a steel cockpit onto it. A windshield, doors, and side windows were also added. The ends of the handlebars were cut off and reattached at 90 degrees to fit inside the narrow cockpit. A pair of retractable “training wheels” keep the vehicle upright and at slow speeds.

Legalities aside, we can’t help but think that the first test drives should not have been on a public road. It almost ended in disaster when a loose axle nut on the front wheel caused steering oscillations which caused the vehicle to tip over. Fortunately, there were no injuries and only light cosmetic damage, so a more successful test followed the first.

While many companies have tried, enclosed motorcycles have never achieved much commercial success. Probably because they inhabit a no-mans-land between the rush and freedom of riding a motorcycle and the safety and comfort of a car.

For some less extreme conversion, check out this electric motorcycle, or a rideable tank track.

Continue reading “A DIY Enclosed Motorcycle To Keep You Dry In The Rain”

Using Docker To Sail Through Open-Source Xilinx FPGA Development

Until a few years ago, developing for FPGAs required the use of proprietary locked-down tools, but in the last few years, the closed-source dam has burst, and open-source FPGA tools such as Yosys, SimbiFlow, and Icestorm have come flooding out. Setting up a build environment for these exciting new tools can still be quite a challenge, but [Carlos Eduardo] has decided to make setting up an open-source toolchain for Xilinx FPGAs a breeze with Docker.

His image only has three prerequisites: Docker, Python 3, and OpenOCD (which is used to load your FPGA with your bespoke bitfile). After the Docker image has been built and all of the tools installed, [Carlos] guides you through using Python, FuseSoc, and SymbiFlow to build your first open-source Xilinx FPGA project.

In addition to making setup a whole lot easier, utilizing containers allows the same development environment to be built on Linux, Mac, and Windows (using WSL), which will make life a lot easier for teams working across different OSs.  [Carlos’s] Dockerfile is unique because it supports the popular Artix-7 series of FPGAs — for the Lattice FPGAs that have been supported for a lot longer, there are existing Docker files already up on DockerHub. It’s easier than installing the vendor’s toolchain!

If this has you thinking it might be time to dip your toes into open-source FPGA development, check out this rundown of open-source FPGA tools from the 2019 Superconference.

Julius Sumner Miller Made Physics Fun For Everyone

Let’s face it — for the average person, math and formulas are not the most attractive side of physics. The fun is in the hands-on learning, the lab work, the live action demonstrations of Mother Nature’s power and prowess. And while it’s true that the student must be willing to learn, having a good teacher helps immensely.

Professor Julius Sumner Miller was energetic and enthusiastic about physics to the point of contagiousness. In pictures, his stern face commands respect. But in action, he becomes lovable. His demonstrations are dramatic, delightful, and about as far away from boring old math as possible. Imagine if Cosmo Kramer were a physics professor, or if that doesn’t give you an idea, just picture Doc Brown from Back to the Future (1985) with a thick New England accent and slightly darker eyebrows. Professor Miller’s was a shouting, leaping, arm-waving, whole-bodied approach to physics demonstrations. He was completely fascinated by physics, and deeply desired to understand it as best he could so that he could share the magic with people of all ages.

Professor Miller reached thousands of students in the course of his nearly 40-year teaching career, and inspired millions more throughout North America and Australia via television programs like The Mickey Mouse Club and Miller’s own show entitled Why Is It So? His love for science is indeed infectious, as you can see in this segment about the shock value of capacitors.

Continue reading “Julius Sumner Miller Made Physics Fun For Everyone”

3D Printed Camera Crane For The Workshop

When you make a living building stuff and documenting the process camera setups take up a lot of time, breaking expensive equipment is an occupational hazard. [Ivan Miranda] knows this all too well, so he built a fully-featured camera crane to save his time and camera equipment. Video after the break.

The basic design is a vertical mast with a pivoting camera mounted to the end. The aluminum mast telescopes for increased vertical adjustability, and rides on a plywood base with caster wheels. The aluminum pivoting arm is counterweighed to offset the camera head, and a parallel bar mechanism allows the camera to hold a constant vertical angle with the ground. Thanks to the explosion of home gyms during the pandemic, gym weights were hard to find, so [Ivan] used an ammo can filled with sand and screws instead. A smaller sliding counterweight on top of the arm allows for fine-tuning. [Ivan] also wanted to be able to do horizontal sliding shots, so he added a pulley system that can be engaged with a clutch mechanism to keep a constant horizontal angle with the camera. Most of the fittings and brackets are 3D printed, some of them no doubt on his giant 3D printer.

We can certainly see this crane meeting its design objectives, and we can’t help but want one ourselves. [Alexandre Chappel] also built a camera crane a while back which utilized a completely different arm mechanism. As cool as these are, they still pale in comparison to [mingul]’s workshop-sized 8-axis CNC camera crane. Continue reading “3D Printed Camera Crane For The Workshop”