Hack Mobile With A Bus Pirate GUI For Your Phone

You need to get an SPI bus on something right now, but you left your laptop at home. No problems, because you’ve got your Bus Pirate and cellphone in your pocket. And a USB OTG cable, because you’re going to need one of those. And some probes. And maybe a soldering iron for tacking magnet wire onto those really small traces. And maybe a good magnifying glass. And…

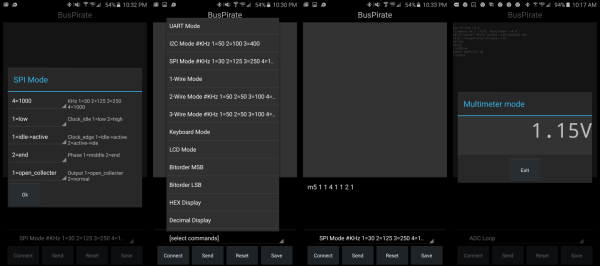
OK, our fantasy of stepping away from the party for a quick JTAG debugging session is absurd, but what’s not at all absurd is the idea of driving your Bus Pirate from a nice GUI app on your Android phone. [James Newton] wrote DroidScriptBusPirate so that he wouldn’t have to hassle with the Bus Pirate’s nested single-character menu system, and could easily save complete scripts to do common jobs from pleasant menus on his phone.

The setup depends on downloading DroidScript, a free Javascript and HTML5 IDE, and then pasting and saving [James]’ code. He’s written up full instructions to help you with the install. It’s not so hard, and once you’re done you’ll be ready to drive the Pirate from the comfort of your phone.

In fact, now that we think of it, we’re missing a Bus Pirate GUI for our desktop as well. Whenever we have complex tasks, we end up scripting something in Python, but there ought to be something more user-friendly. Anyone know of a good GUI solution?

Raspberry Pi Zero – Programming Over USB

Raspberry Pi Zero – Turning The Pi Into A USB Gadget, Over USB

[gbaman] has figured out a simpler way to program the new Raspberry Pi Zero over USB without modifying the board. Why is this useful? One example which appealed to us was setting the Zero’s USB port up as a mass storage device. Imagine plugging in your Pi powered robot, dragging and dropping a Python script into the mass storage device that shows up, and pressing a button on the robot to run the new script. Pretty fancy for $5.00.

You can get the PI to emulate a whole range of devices from a USB MIDI controller to a simple USB serial interface. We’re excited to see what uses people come up with. Unfortunately the Pi Zero is still out of stock most everywhere as we wait for the next production run to finish. Though if you’ve got one, why not check out a few of our thoughts and experiences with the device!

[gbaman] based his work off the work done by [Dave-0] and others over at the Raspberry Pi forums. [LadyAda] also has a version of this hack, which we covered, that involves soldering a header to the pi and using a UART adapter.

[via Hacker News]

Turning The Pi Zero Into A USB Gadget

The Raspberry Pi Zero is limited, or so everyone says, and everyone is trying to cram a USB hub and WiFi adapter on this tiny, tiny board. One thing a lot of people haven’t realized is that the Raspberry Pi Zero comes with a USB OTG port, meaning it can function as a USB device rather than a USB host. This means the Raspi can become a serial device with just a USB cable, an Ethernet device, MIDI device, camera, or just about anything else you can plug into a USB port. Adafruit has your back with a tutorial for using the USB OTG port as a serial and Ethernet interface, and the possible applications are extremely interesting.

The only requirement for using the USB OTG port for device applications is an update to the kernel. This is easily installed by dumping a few files on an SD card and a employing bit of command line wizardry. The simplest example is setting up the Pi Zero as a USB serial device, allowing anyone to log into a serial console on the Pi with just a USB cable.

A slightly more interesting application is setting up the Pi as an Ethernet gadget. This effectively tunnels all the networking on the Pi Zero through a USB cable and a separate computer. The instructions are extremely OS-specific, but the end result is the same: you can apt-get on a Pi Zero to your heart’s desire with a new kernel loaded onto the SD card and a USB cable.

This experimentation is just scratching the surface of what is possible with the OTG port on the Pi Zero. MIDI devices are easy, and with a ton of GPIOs, the Pi Zero itself could become a very interesting musical instrument. Want the Pi Zero to be a storage device? That’s easy too. The USB Gadget will end up being one of the most exciting uses for the Pi Zero, and we can’t wait to see what everyone will come up with next.

BeagleBones And Teensies Become KVMs

[pmf], like most of us, I’m sure, spends most of his days on a computer. He also has a smartphone he keeps at his side, but over the years he’s grown accustomed to typing on a real keyboard. He came up with the idea of making a USB switch that would allow his keyboard to control either his computer or his phone, and hit upon a really neat way of doing it. He’s using a BeagleBone Black and a Teensy to switch his keyboard between his computer and his phone with just a press of a button.

This homebrew smart KVM uses a BeagleBone Black for most of the heavy lifting. A keyboard and mouse is connected to the USB host port of the BeagleBone, and the main computer is connected to the device port. The BeagleBone is set up to pass through the USB keyboard and mouse to the computer with the help of what Linux calls a ‘gadget’ driver. This required an update to the Linux 4.0 kernel.

With the BeagleBone capable of being a USB pass through device, the next challenge was sending keypresses to another USB device. For this, a Teensy 2.0 was connected to the UART of the BeagleBone. According to [pmf], this is one of the few examples of the Teensy serving as a composite USB device – sending both keyboard and mouse info.

There are a few neat features for [pmf]’s build: the keyboard and mouse don’t disconnect when switching, and thanks to a slight modification of the USB OTG adapter, this will also charge a phone as well as allow for the use of a keyboard. Because the BeagleBone Black has more than one UART this build can also switch keyboards and mice between more than two computers. For those of us who invest heavily in keyboards, it’s a godsend.

Hackaday Links: July 20, 2014

hackaday-links-chain

Etch-a-Sketch spray-painted silver with electronics bolted onto the side? Sign us up! This art installation adds one thing that we don’t often see in these types of hacks, eerie audio.

If you’re still mining bitcoin you need to do it faster than anyone else… that’s pretty much how the whole thing works. [Lewin] has been using the Antminer USB ASIC and toyed around with overclocking to 2.2 GH/s (gighashes per second) but to make sure his hardware holds up to the overwork he hacked his own water cooling system for the dongle.

Smart phones are the best bang for your buck on portability and power. Better yet you can get slightly broken ones for a song. If you manage to find an Android device with a broken touch screen but functioning LCD try this trick to add a mouse to it. There must be another life for this in a future hack!

We have a love-hate relationship with this particular crowd-funding campaign. First this hate: It’s basically a 100% clip-art video presentation with an $800,000 ask. Yeah… good luck buddy. On the other hand, this is the type of stuff we actually want to see as crowd funding. The idea is to use modern materials and techniques to build [Nikola Tesla’s] Wardenclyffe Tower, which was designed and built to research wireless energy (both as a means of communication and actual energy transfer). It was never fully functional and ended up being demolished. Wouldn’t it be great if teams of highly skilled and motivated people took grand ideas like this, crossing every theoretical “t” and dotting every theoretical “i”, and then proposed a crowd funding campaign to build a test platform? Oh wait, that sounds very much like a government research grant. Anywhoo… check out the Global Energy Transmission’s campaign.

LED-Guided Piano Instruction

LEDpianoGuide

[Kay Choe] can’t play the piano. Rather, he couldn’t, until he converted his keyboard to include LED-guided instruction. [Kay] is a microbial engineering graduate student, and the last thing a grad student can afford is private music lessons. With $70 in components and a cell phone, however, he may have found a temporary alternative.

The build works like a slimmed-down, real-world Guitar Hero, lighting up each note in turn. We’ve seen a project like this before, with the LEDs mounted above the keys. [Kay]’s design, however, is much easier to interpret. He embedded the LEDs directly into the keys, including ones above each black key to indicate the sharps/flats. An Android app takes a MIDI file of your choice and parses the data, sending the resulting bits into an IOIO board via USB OTG. A collection of shift registers then drives the LEDs.

For a complete novice, [Kay] seems to benefit from these lights. We are unsure whether the LEDs give any indication of which note to anticipate, however, as it seems he is pressing the keys after each one lights up. Take a look at his video demonstration below and help us speculate as to what the red lights signify. If you’re an electronics savant who wants to make music without practicing a day in your life, we recommend that you check out [Vladimir’s] Robot Guitar.

Continue reading “LED-Guided Piano Instruction”

New IOIO Is Faster, Cheaper

board-nobg

For the last few years, [Ytai] has been working on the IOIO, a device that connects your Android devices to the other homebrew peripherals. There’s a new version of this really cool board out now that includes a few much-needed features like USB-OTG and a lower component cost that is passed on in savings to you.

A few months ago, our own [Mike Szczys] caught a glimpse of this new IOIO board. It’s the same size as the previous revision, but with USB-OTG, the new IOIO can be a master when connected to a phone, or a slave when connected to a PC.

In addition to USB-OTG, [Ytai] improved the power regulation circuit, and even went so far as to refuse royalties to the board to get the costs down. It’s currently available at Sparkfun for $40.

[Ytai] says he’s working on a few software upgrades to the IOIO, including making capacitive sensing a possibility and including support for stepper motors and controllers. There’s also support for the Raspberry Pi coming up, but we’re just glad [Ytai] managed to put a yo-yo graphic on the bottom silkscreen. Finally, and hopefully, everyone will know how to pronounce IOIO.