Halloween Time Machine Simulator Built Into An Outhouse

[Sam] is an avid Halloween builder and has been hard at work on a time-machine simulator for this year’s festivities (alternate link). He recently assembled the enclosure which is seen above. It’s got room for two riders who will be strapped in place, with plenty of interior items to keep them occupied. There will be three LCD monitors acting as front and side windows for the time machine.

In the video after the break (taken from his vblog on the page linked above) [Sam] walks us through all of the electronics that went into this. He’s got red lights controlled by a servo motor attached to a dimmer switch. There’s a vibrating seat to give the riders a jolt, and a control panel which shows the status of the time machine. The thing is, it’s not just the physical build that’s impressive. We know from his past projects that [Sam] is a showman and he doesn’t disappoint this year. He spent a lot of time filming and generating computer graphics and sound to really make the ride a multimedia odyssey.

Continue reading “Halloween Time Machine Simulator Built Into An Outhouse”

Custom Flat Cables To Suit Your Needs

[Cosimo Orlando] has a Motorola Xoom tablet. It’s an Android device that works great as a tablet, but can double as a Laptop when you need it to by adding a keyboard. The problem he was having is that the USB On-The-Go cables that he tried were never the right size or orientation. So he scavenged them for parts and built his own flat cable for a custom fit.

The final product pictured here actually uses protoboard to give the body some strength. [Cosimo] first laid out the dimensions on the substrate using a felt-tipped pen. He then took connectors from his mis-sized commercial cables and affixed them to the board with a combination of hot glue and solder. From there, just connect the five data lines and ground with some jumper wire and test for continuity. He finished this off with what he calls ‘adhesive plastic glossy black’ shaped to make a decent looking case. If you have any idea what product was used here, let us know by leaving a comment.

Halloween Hacks: Terrifying Mask Follows You Everywhere

It’s less than 5 days away from Halloween and the projects to scare small children are pouring in. [Noel] sent in his robotic Halloween mask he’s been working on, and the only way his build could be any better is by placing it underneath a child’s bed.

[Noel] took the mask he used last year and stuffed a few styrofoam craft balls inside to ‘fill it up.’ Two LEDs and a PIR sensor were fitted into the eyes of the mask and a few more electronics added to the brain. A servo was fitted to the base of the project to turn the head left and right.

The build uses a Gizduino Arduino clone with an Adafruit Wave shield. After a little bit of wiring up the LEDs, PIR sensor and neck servo, [Noel] had a bit of coding ahead of him. He ran into a problem with the WaveHC and Servo libraries because they both used the same timer. After finding a another software-based servo libraries, he had a reasonably terrifying project to put in front of a bowl of candy.

Check out the video below for a demo of [Noel]’s work.

Continue reading “Halloween Hacks: Terrifying Mask Follows You Everywhere”

Nintenduo Stuffs An NES And SNES In The Same Case

[lovablechevy] loves her Retro Duo console, especially since it takes up less space than the NES and SNES it has replaced. There’s a small problem though: the Retro Duo isn’t 100% compatible with her old Nintendo cartridges. Battletoads is a deal breaker for her, so she built Nintenduo, an NES/SNES console that uses all original Nintendo hardware.

The Queen of Bondo began her project with a top-loading NES and the smaller revision of the SNES. There’s a Photobucket gallery showing the innards lovingly placed in their new plastic home.

Not only can [lovablechevy] play classics like Paperboy, Donkey Kong Country, and the Super Mario RPG that are incompatable with the Retro Duo, all the accessories like the Zapper and Power Pad now work.

The finished build is very small; not much bigger than an SNES 2, and is nearly dwarfed by the gigantic NES cartridges. She posted a video of herself trying not to shoot the stupid Duck Hunt dog with her Nintenduo. Check it out after the break.

Continue reading “Nintenduo Stuffs An NES And SNES In The Same Case”

Minibloq Arduino IDE Is In Beta And In Need Of Testers

minibloq_beta

If you have been chomping at the bit to give drag and drop Arduino programming a try, Minibloq is finally in Beta and ready for you to test!

We mentioned the application back in April of this year, when [Julián da Silva] was still in the early stages of developing the software. His graphical programming environment is meant to put the power of the Arduino and its derivatives into the hands of children in an easy fashion, with a gentle learning curve.

A lot has transpired since we first wrote about Minibloq, including a very successful Kickstarter campaign, along with many hours of programming and testing. The current Beta release includes a ton of features and programming “blocks” beyond what we saw earlier this year, so be sure to check out the video below for a quick tour of what’s new.

[Julián] says that the application’s source code will be released after they add a few key features, so keep an eye out for that if you’re interested in taking a peek under the hood.

Continue reading “Minibloq Arduino IDE Is In Beta And In Need Of Testers”

Huge Flexible LED Matrix Can Be Worn Almost Anywhere

lightbright_led_mesh

[Erik] has been keeping extremely busy with his latest project, a flexible RGB LED matrix that he calls “Project Light Bright”. The folks at BuildLounge tell us that this is the first entry they have received so far in their “Light Contest”, in which they are giving away a free laser cutter to the best entry.

[Erik] hand soldered ten 16×16 RGB LED panels together in order to build this display, and the results are awesome. The entire thing is controlled by a WiFi-enabled Beagleboard, which drives all of the panels and then some. The Beagleboard features embedded web and DNS servers, which allows it to act as a wireless AP, enabling him to control the display using any WiFi capable device. The Light Bright displays all sorts of predefined artwork, but [Erik] can also alter the display on the fly via his phone as well. The entire thing is powered by a reasonably sized LiPo battery pack that he keeps tucked away in his pocket, which allows the display to run continuously for about 20 hours.

Check out the video below to see a quick walkthrough of [Erik’s] Light Bright suit, then be sure to stop by his site for more videos, details and updates on the project.

Continue reading “Huge Flexible LED Matrix Can Be Worn Almost Anywhere”

Tilt Compensation When Reading A Digital Compass

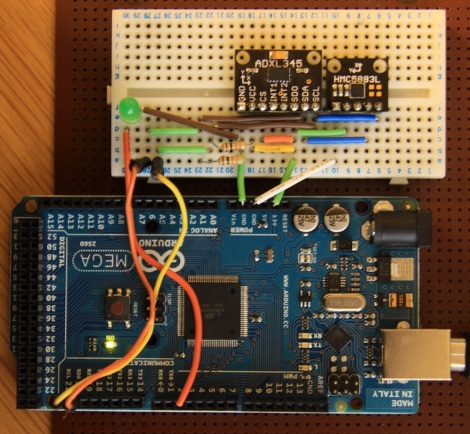
If you’re familiar with using a compass (the tool that points to magnetic north, not the one that makes circles) the concept of holding the device level makes sense. It must be level for the needle to balance and rotate freely. You just use your eyes to make sure you’re holding the thing right. Now think of a digital compass. They work by measuring the pull of a magnetic field, and have no visual method of showing whether they’re level or not. To ensure accurate readings you might use an accelerometer to compensate for a tilted magnetometer.

The process involves taking measurements from both an accelerometer and a magnetometer, then performing calculations with that data to get a true reading. Luckily the equations have been figured out for us and we don’t need to get too deep into trigonometry. You will, however, need to use sine, cosine, and arctangent in your calculations. These should be available in your programming language of choice. Arduino (used here) makes use of the avr-libc math library to perform the calculations.