Hackaday Merit Badges Now Available At Adafruit!

The folks over at Adafruit had this idea to make “merit badges” for different achievements. One of the major achievements they mentioned was having your project posted to Hackaday. They asked our approval and got it. The badges have finally come in, so we are happy to announce them. You can purchase them directly from Adafruit, along with a plethora of other badges to adorn your projects.

[Phil Torrone] had a great idea though. To celebrate this, they are going to give away 10 badges to the projects that you, our readers, choose to be the top 10. Go on, dig back through the ranks and post links in the comments. We’ll dig through them and try to compile a list. We will then try to contact those people to send them a free badge.

Scam-o-Matic Determines If You Bought Fake SD Cards

[Andrew] recently got scammed on an SD card purchase and put together a small tool that can help you determine if you’ve had the wool pulled over your eyes as well.

You see, he purchased a set of MicroSD cards, all of which had an advertised capacity of 4GiB. When he tried to use them, they all failed to write more than about 115MiB of data, so he knew something was up. He sat down with some tools that can be used to check the actual capacity of flash media, but he says they were unbelievably slow to scan the cards.

While he waited for one of the scans to complete, he decided to create a utility of his own that would do the same thing in a fraction of the time. His quick and dirty application, called “Scam-o-Matic”, writes random data to the card, double-checking the written region to ensure that data can be read back. If it finds errors your card is likely either a fake or damaged, but if not, it automatically prepares the media for use.

Obviously this sort of situation is relatively rare, but if you think that you have picked up some shady SD cards, be sure to check out [Andrew’s] Github repository.

Programming The 6502 One Nibble At A Time

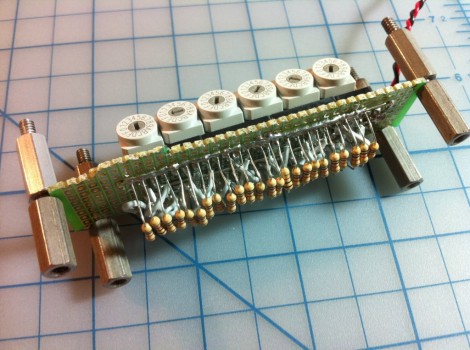
[Quinn Dunki] keeps rolling with her 6502 based computer build. This time around she’s added some memory to store the programs, but needed a way to get that code into the device. Above is her solution, a bank of hex switches used to program the 8-bit command and 16-bit address for each line of machine code.

This is a continuation of her Veronica project. The last time we saw it she had hardwired the logic levels for the data bus, but that’s no fun since nothing can actually be computed. [Quinn] picked up an SRAM chip which will store the program. It’s compatible with the 6502’s memory bus, but needs a bit of extra circuitry for her to be able to hand program it with this switch bank. She used some tri-state buffers to switch between connections to the processor, and to the hex switches. This way, she disconnects the RAM from the processor using the buffers, uses the switches and push button to clock in the program, then patches the RAM back into the computer.

Seeing this process in the video after the break certainly gives you an appreciation for what an improvement the punch-card system was over this technique. Still, seeing this is a delight that we’d like to try! Continue reading “Programming The 6502 One Nibble At A Time”

I2C Level Converter

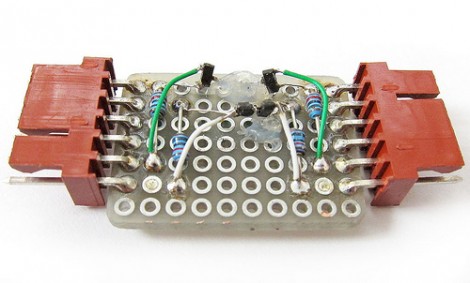
You’ve got several devices which communicate via the I2C protocol, but some of them can only operate at 3.3V while the rest are hungry for a 5V connection. What to do? [Linux-works] built this I2C level converter to solve the problem.

The circuit comes from an NXP app note (PDF) on the issue. You can take a quick peek at the suggested schematic from that document. The design uses two MOSFETS for each side of the adaptor. Perhaps a better way to explain this is that you need one for the higher voltage and one for the lower voltage on each of the two data lines for a total of four parts. This allows for both of the buses to communicate as one, while still having their own 3.3V and 5V pull-up resistors.

[Linux-works] concedes that there are chips designed to do this for you, but he was able to source the BSS138 MOSFETs locally and for about ten cents a piece. Not a bad alternative to putting in a parts order.

Laser Cutting Technique Makes Plywood Bendable

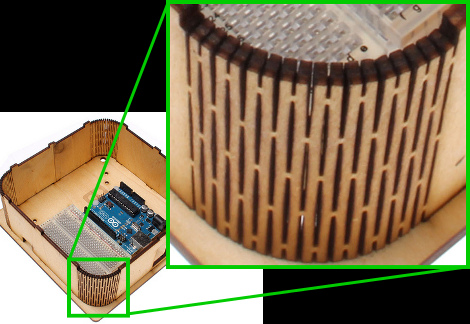
Here’s a laser cutting technique that makes thin plywood bendable. By cutting away elongated diamond shapes from the material, a lattice of strips connected minimally by alternating tabs is left over. The wood is then bendable, and it must be somewhat durable since the idea came from a product that uses the technique as a hinged notebook enclosure.

We don’t have much interest in it as an often used pivot point as surely it must be a problem with long-term use. But we love the look of it as a rounded corner on an enclosure like the Arduino project box seen above. The side walls are one continuous piece, with identical top and bottom sections which receive the alignment tabs. The whole thing is held together with just four bolt/washer/nut combinations.

But if you don’t have access to a laser cutter, we guess you’ll have to stick to altering pre-made enclosures for now.

Periodic Table Of Swearing Would Even Make A Sailor Blush

periodic-table-of-swearing

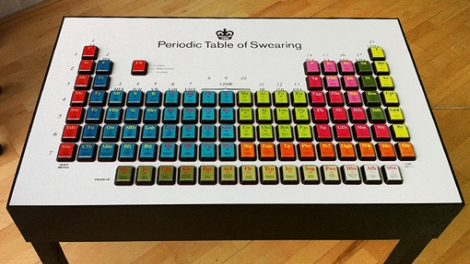
If you often find yourself at a loss for words in the heat of an argument, perhaps this Periodic Table of Swearing is something you might be interested in. Built as a marketing tool for the British comic “Modern Toss”, the table features over 100 fruit machine (slot machine) buttons, each of which triggers an audio clip of the cheeky word or phrase listed.

The buttons were mounted on a piece of laser-cut MDF which makes up the table’s surface, while all of the wiring and the guts of the machine are neatly tucked away underneath. Clay, the company that actually built the table, doesn’t elaborate a whole heck of a lot on the details other than stating that it includes over 100 meters of wiring, 300 solder joints, and a whole lot of swearing. We imagine it could likely be replicated with a small micro, an SD card reader, and a couple of speakers – for anyone interested in having one of their own.

While it’s not a hack in the strictest sense, we’re sure it’s a great conversation starter ender, and we did get a chuckle out of the demo video below (Warning: Language).

[Thanks, Jack]

Continue reading “Periodic Table Of Swearing Would Even Make A Sailor Blush”

Christmas Tree Water Sensor Gets An Upgrade And A Fancy New Box

xmas-tree-water-sensor

[Eric Ayars] has a nice cast iron Christmas tree stand at home, but the only drawback is that the stand makes it hard to see just how much water is available to the tree. Last year we covered a small gadget he created to help keep tabs on the water level, but as several of you predicted, the system eventually failed.

His previous solution used copper plated proto board to sense how much water was in the stand, but the leads corroded in about a week’s time. With Christmas just around the corner, he decided to give things another try.

His revamped water level sensor relies on measuring capacitance changes in a copper strip board when under water rather than detecting a complete circuit like the previous model. To protect his sensor this time around he coated the board with polyurethane, which should provide a decent corrosion barrier.

Using the Arduino CapSense library, the sensor can detect the presence of water, signaling an alarm if the base needs refilling. One of our readers suggested that he use the tree itself as a low water indicator, which is just what [Eric] did this year. If the water is somewhat low, the Arduino-controlled relay powering the tree is switched off and then on again, every 5 seconds. If the base is nearly dry, the tree asks for water by blinking the word “Water” repeatedly in Morse code.

We think that this year’s solution is pretty clever, and we’re glad to see that [Eric] didn’t give up after last year’s setback!