Naughty Duck Will Be The End Of Secret Santa At Your Place Of Work

Aw, isn’t he cute? Looks are deceiving, because if you get him started, this duck says some vulgar things. [Gigavolt] found the little guy abandoned at the Goodwill store and decided it might have some hacking potential. Boy was he right. The stock toy can already sing a tune while flapping its beak and wings. After spending some time in [Gigavolt’s] lair, this duck is going to be on the naughty list. The best part is that this is going to end up in the hands of someone else thanks to a Secret Santa exchange.

The build article linked above is safe for you to read at work, but the video embedded after the break most certainly is not. [Gigavolt] got to work replacing the integrated circuit inside with his own PIC 16F628 microcontroller. He uses a new audio track, which is played back by a SOMO-14D audio player board. The two use different input voltage levels which is something of a bother, but it’s a standby power drain that has been vexing [Gigavolt] he rolled his own board using the DorkbotPDX order and can’t figure out why the current consumption is so high. Take a look at the cursing duck, then see if you can’t troubleshoot his electrical issues.

Continue reading “Naughty Duck Will Be The End Of Secret Santa At Your Place Of Work”

Dilemmabox Brings Tactile Upvoting

Here’s a fun art installation which you might run into downtown. It’s called the Dilemmabox and lets you pull a rope to up or down vote a question. [Christoffer Lorang Dahl] realized that touchscreens are wiping out a lot of really fun user interfaces of yore. He incorporated the two hanging rope inputs as an homage to doorbell ropes.

The built process works much like a laptop-to-digital photo frame conversion. The first step is to liberate the LCD screen from the laptop body. Both are housed in a wooden box, with a window cut out to show the screen. The mechanically clever part is the rope pulls. They’re both just pressing a key on the keyboard in a roundabout sort of way. [Christoffer] attached a smooth hemispherical piece to two keys. The ropes are connected to wooden levers which are held in place by springs. They rub on the hemispheres just enough when passing by to register a keypress.

The photo above was taken during the Dilemmabox’s brief appearance at a shopping plaza in Oslo.

Android Legs Stability Testing

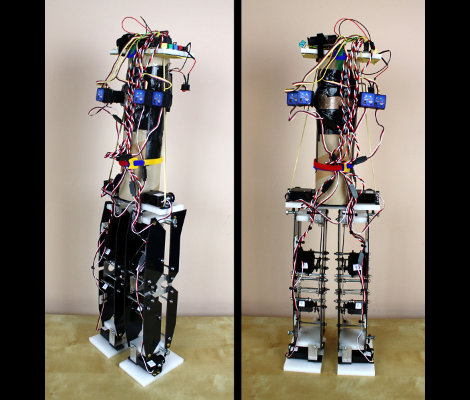
This is [James’] latest android build, a set of legs that use gyroscopes for balance.

He started off by planning the build with some LEGO pieces to get an idea of how each foot and leg joint would fit together. This let him achieve one of his goals. From the start he wanted to create a robot that would remain stable, and not build up enough momentum to tip itself over if there is a problem. With the dimensions established he cut out parts from 2mm sheets of HIP plastic using a hobby knife. They work in conjunction with a frame made from aluminum and HDPE. The whole thing houses eight servos responsible for movement, but he found an interesting way to use them for balance as well.

[James] came across some gyroscopic sensors which are made for use with RC helicopters. They connect in-line with a servo motor and offset it based on the gyro data. He’s using four of them with this bot, playing the hip and ankle servos against each other for balance. What results is a set of legs that look like their jonesin’ for a fix. See for yourself in the clip after the break.

Continue reading “Android Legs Stability Testing”

Troubleshooting Household Light Timers

timer-repair

When [Todd Harrison’s] Christmas lights stayed on well past the pre-defined shut off time, he knew there was something wrong with the timer. He took the device into his workshop and spent some time diagnosing and repairing the device, a process he recorded for all to see.

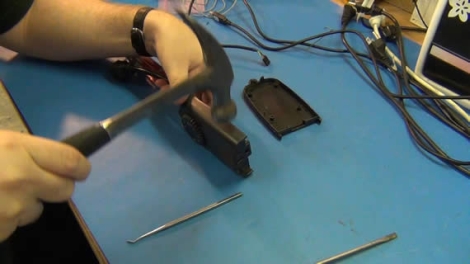
After busting the screw-less timer open with a hammer, he inspected the PCB for any apparent signs of damage. After seeing what looked like a damaged transistor, he desoldered it from the board for testing. After the transistor passed his tests with flying colors, [Todd] assumed that the fault had to be in the relay which the transistor was responsible for switching.

Sure enough, the relay had shorted out, and upon cutting it open he found that the contact points were fused together. He separated and sanded the contacts down, enabling him to get the timer working – at least for the time being.

Part of [Todd’s] goal with this video was to show off different methods of desoldering, including a manual solder sucker (my favorite), desoldering braid, and a purpose built desoldering iron. If you’re in the market for some desoldering tools, but don’t know what to buy, [Todd] is more than happy to offer his advice.

Continue reading to see a video of [Todd’s] troubleshooting process.

Continue reading “Troubleshooting Household Light Timers”

Simple IR Sensor Simplifies Laptop Audio Control

tiny-ir-tv-remote-receiver

[Owen] has a fairly big project in the works, where he’ll need to use infrared light to send data wirelessly between two nodes. The only problem with his grand plan is that he has never built anything of the sort. As a learning exercise, he decided to try his hand at building a wireless control interface for his laptop, which he uses to play music while doing homework.

His laptop usually sits across the room from [Owen], where it is connected to a speaker and amplifier. He hates getting up repeatedly to change songs, so he figured he might as well build an IR receiver to control Winamp that responds to commands from his TV’s remote control. Using his Open Bench logic sniffer and an IR receiver from an old VCR, he deciphered his remote’s encoding system. He then programmed an ATtiny13 to decode messages received by the IR sensor, sending them to his laptop via USB.

He packaged things inside a tiny mint tin, which he hangs from a desk lamp while in use. Now he can easily perform just about any action in Winamp with a few button presses on his remote. [Owen] says that he’s incredibly happy with the results, and now that he has a firm grasp of IR signaling concepts, we can’t wait to see what he builds next.

Ask Hackaday: Organizing A Growing Collection Of Electronic Odds And Ends

ask hackaday

[Tim] wrote in, lamenting a problem that many of us can likely echo. Over the years, he has acquired all sorts of small electronic parts and components, along with tools and accessories – all of which are starting to crowd his workspace. He says that most of his stockpile is being stored in a tackle box, but it’s getting unwieldy and he would like to find a better way to organize things.

Yours truly suffers from the same sort of situation. It’s mostly a result of being a tad bit lazy, while conveniently finding alternative storage containers for my electronic odds and ends. My workbench is strewn with plastic snack baggies (for screws, not ESD-sensitive bits), Glad-Ware containers, Eclipse gum packages, and old plastic baby formula tubs for larger items. While I’m certainly doing my share to reuse plastic packaging, I am aware that it’s not exactly the best organization methodology.

This topic does come up pretty often, and even though we’ve talked about it on several occasions, people still like to hear fresh feedback from their peers. If you have some clever organization tips, or a novel way of storing your electronics components, be sure to share them in the comments!

Dial 1 To Get Siri As Your Operator

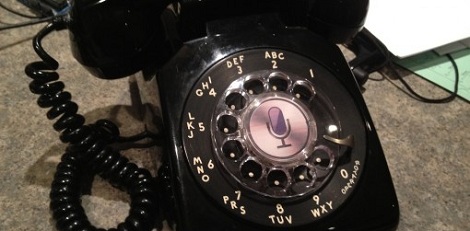
Back in the days of yore when hats were fashionable and color TV didn’t exist, there were real life people who would answer the phone if you dialed 0. These operators would provide directory assistance, and connect you to another number (such as KL5-8635). Apple’s Siri is a lot like an olde-timey phone operator, so [davis] decided to put Siri in an old rotary telephone.

The build started off with a very inexpensive Bluetooth headset and very old rotary phone. The single button on the Bluetooth headset was wired to a contact of the dial – in this case, the number 1. Dialing 1 shorts two contacts in the phone and the Bluetooth headset turns on.

[davis] came up with a very easy build but dialing 1 just isn’t the same as dialing 0. Connecting the Bluetooth button to 0 closes the button for too long. He says ‘0 for operator’ could be implemented with an ATtiny or similar, but we’re wondering if [davis] could make due with a dial-less candlestick phone.

Continue reading “Dial 1 To Get Siri As Your Operator”