Steganography In Xkcd Comics Without The Img Alt Tag

Inspired by a recent Hackaday post [austin] decided to try his hand at steganography. Steganography, or ‘concealed writing’ has come a long way from ancient Greek slaves/couriers shaving their head, tattooing a message on their scalp, and regrowing their hair. We recently saw a music file masquerading as a picture of a kitten, but that method of hiding data required running a Ruby script. [austin] thought steganography would be a great way to hone his JavaScript skills, so he made an image encoder and decoder purely in JS and HTML.

Like the previous incarnation, [austin]’s work takes a regular .PNG image file and hides stuff in the pixel data. A few of the lower bits for each pixel are modified (three bits from the red and blue, two bits from the green – a good choice, the human eye is very sensitive to green) and a file is embedded inside the .PNG image.

For an example, [austin] embedded some stuff inside the xkcd comic underneath this post’s title. Even though the image is mostly white, we can’t see anything wrong with the colors. If you’d like to decode the message, [austin] put his encoder and decoder up on github. Feel free to take a shot at it.

[Vijay Kumar’s] TED Talk On The State Of Quadcopter Research

[Vijay Kumar] is a professor at the University of Pennsylvania and the director of the GRASP lab where research centering around autonomous quadcopters is being met with great success. If you were intrigued by the video demonstrations seen over the last few years, you won’t want to miss the TED talk [Dr. Kumar] recently gave on the program’s research. We touched on this the other week when we featured a swarm of the robots in a music video, but there’s a lot more to be learned about what this type of swarm coordination means moving forward.

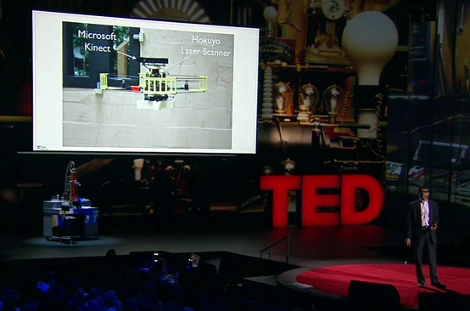
We’re always wondering where this technology will go since all of the experiments we’ve seen depend on an array of high-speed cameras to give positional feedback to each bot in the swarm. The image above is a screenshot taken about twelve minutes into the TED talk video (embedded after the break). Here [Dr. Kumar] addresses the issue of moving beyond those cameras. The quadcopter shown on the projection screen is one possible solution. It carries a Kinect depth camera and laser rangefinder. This is a mapping robot that is designed to enter an unknown structure and create a 3D model of the environment.

The benefits of this information are obvious, but this raises one other possibility in our minds. Since the robots are designed to function as an autonomous swarm, could they all be outfitted with cameras, and make up the positional-feedback grid for one another? Let us know what you think about it in the comments section.

Continue reading “[Vijay Kumar’s] TED Talk On The State Of Quadcopter Research”

Chocolate As Rocket Fuel

[Adric Menning] has an unfortunate allergy. He’s allergic to chocolate. Instead of eating the stuff, he’s using it to build model rocket engines. The project stems from the Quelab Hackerspace’s chocolate hacking challenge which spawned a number of interesting hacks. [Adric’s] doesn’t use pure chocolate (an experiment with a Hershey’s bar was a bust) but manages to ignite using a Milky Way bar.

This is not as unorthodox as you might think. Sugar and potassium nitrate have long been used to create solid rocket propellant. The chocolate version is swapping out plain old sugar for the candy bar. It was chopped into 10 gram chunks to make proportion calculations easier later on. The chunks go into the freezer to make them easier to grind using a mortar and pestle. Once it’s a somewhat chunk-free powder he mixes it with the potassium nitrate which previously had its own trip through the grinder. After being packed into a chunk of PVC pipe and fitted with an exhaust nozzle the engine is ready to go.

You can check out the test-fire video after the break. There’s a burn restriction in his area due to drought so this is just an engine test and not an actual rocket launch.

Continue reading “Chocolate As Rocket Fuel”

Tuna Can And Some Other Trash Turned Into A Stirling Engine

Next time you’re making yourself a tunafish sandwich, try to figure out how to build a Stirling engine from the leftovers (translated). If you can pull it off as well as [Killerlot] did we’d say you’ve earned your hacker badge.

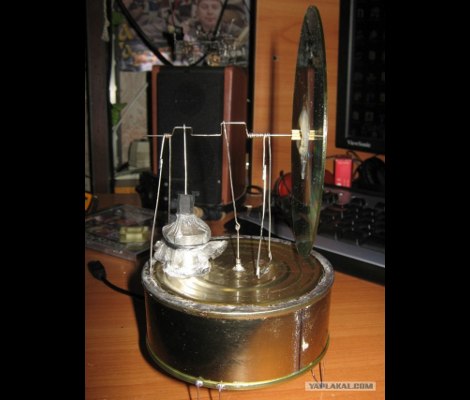
The can used in this project was actually sardines in tomato sauce, but the former contents are moot. The can serves as a steam chamber for the sterling engine. A cam rod, piston, and valve are all fashioned from paperclips, along with the support structure that holds them in place. Inside the can is a damp sponge. When an alcohol lamp is placed beneath the can it heats the water air inside, which creates pressure on the piston, pushing it up until the cam opens the valve, relieving pressure just in time for the cycle to start over again. Momentum is a necessary part of the mechanism and that’s where the CD fly-wheel comes in. See it chugging along in the clip after the break.

Update: Corrected spelling thanks to [Chris Muncy] and removed references to water/steam thanks to this comment from [Khordas].

Continue reading “Tuna Can And Some Other Trash Turned Into A Stirling Engine”

Build Your Own USB To Serial Dongle

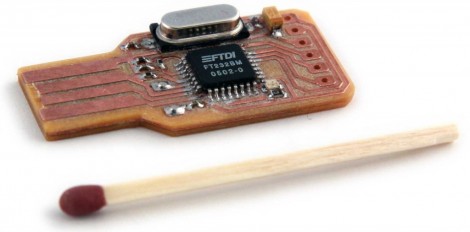
[Johan von Konow] found that he was using an FTDI USB-to-Serial chip in a lot of his projects and wanted to have an easy prototyping component on hand to facilitate this. What he came up with is the extremely small USB to serial dongle seen above. The copper fingers are designed to plug into your USB port. And if you’ve got an unused thumb drive (we’ve got a 128mb version that’s been collecting dust for years) it would make a perfect enclosure for the device.

He’s using an FT232BL chip in a LQFP-32 package. That’s got 0.8mm pitch so make sure you’ve got a steady hand, a fine tipped soldering iron, and some solder wick on hand. The 0603 passives might also give you a bit of a run-around during soldering, but all-in-all we think everyone will be able to successfully assemble this with a little bit of practice. The chip is the most expensive component at just under $6. But the good news is that the board is single sided and only needs one jumper wire making for very little drilling and easy home fabrication.

If you’re putting in a parts order, we’d recommend getting doubling the amount of resistors and capacitors. Chances are you’ll drop a few and nary will they be seen again. We also highly recommend looking into [Gerrit’s] surface mount component clamp.

Chipcon CC1110/CC1111 Serial Bootloader

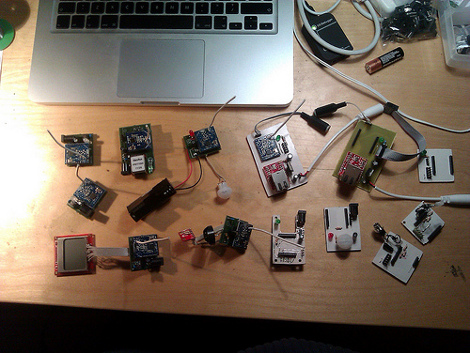
[Joby Taffey] just rolled out a serial bootloader for the Chipcon CC1110/CC1111 processors. The project is called CCTL and aims to make prototyping with the Girltech IM-ME a bit less tedious. Up until now firmware for the device had to be pushed in with a GoodFET or TI proprietary programmer which was quite slow. But this bootloader makes it possible to push your code via the chip’s serial port at 115200 baud. But the pretty pink pager isn’t the only device using these chips and to prove it [Joby] send this picture of all the electronics he has on hand running this architecture.

Once the 1KB CCTL bootloader has been flashed to the chip, a serial port or USB to Serial converter can be used as a programmer. [Joby] warns that the Chipcon processors are not 5V tolerant so you need to either use a 3V serial converter or add a level converter into the mix.

CCTL provides the features you’d expect from a bootloader. It uses the chip’s watchdog timer to guard against failure due to broken code. And there is an upgrade mode available at power up. Instruction for use are included in the Github repo linked at the top.

A Capacitive Discharge Welder/cutter For All Your Lightweight Needs

microspot-welder

[Radu Motisan] wrote in to share a cool project he has been working on lately, a pulsed microspot welder/cutter.

The device is capable of spot welding thin metals such as foils and battery tabs by sending a pair of high current pulses between the two electrodes whenever [Radu] presses the trigger button. The cutting portion of his device uses the same general mechanism, though it requires a far greater number of pulses to get the work done.

The welding/cutting process is controlled by an ATMega16, which is also tasked with taking input from the user and displaying information on the LCD panel. The microcontroller creates quick (in the ten to several hundred microsecond range) pulses for both welding and cutting, with the latter obviously requiring a long series of pulses.

[Radu] started out using a relatively small capacitor array to power the device, but has recently upgraded to a 1.6 Farad car audio capacitor, which works (and looks) much better than before. His blog seems to update every few days with more pictures and details about his welding station, so be sure to check back often for updates.

Be sure to stick around to see a short video of [Radu] adding metal tabs to batteries and tearing down an aluminum can with his cutter.

Continue reading “A Capacitive Discharge Welder/cutter For All Your Lightweight Needs”