Levitating Lightbulb Does It All With No Wires

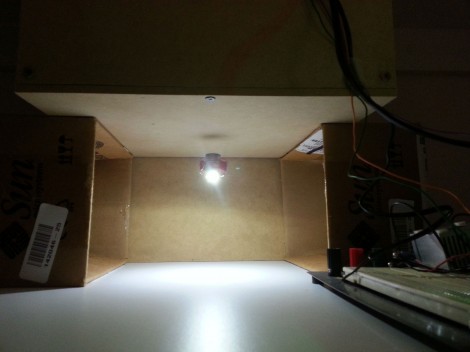
It would be really fun to do an entire hallway of these levitating wireless lights. This a project on which [Chris Rieger] has been working for about six months. It uses magnetic levitation and wireless power transfer to create a really neat LED oddity.

Levitation is managed by a permanent magnet on the light assembly and an electromagnetic coil hidden on the other side of the top panel for the enclosure. That coil uses 300 meters of 20 AWG wire. A hall effect sensor is used to provide feedback on the location of the light unit, allowing the current going to the coil to be adjusted in order to keep the light unit stationary. When working correctly this draws about 0.25A at 12V.

Wireless power transfer is facilitated by a single large hoop of wire driven with alternating current at 1 MHz. This part of the system pulls 0.5A at 12V, bringing the whole of the consumption in at around 9 Watts. Not too bad. Check out [Chris’] demo video embedded after the break.

A similar method of coupling levitation with power transfer was used to make this floating globe rotate.

Continue reading “Levitating Lightbulb Does It All With No Wires”

Ti Chronos Watch Controls Raspberry Pi

[Mike Field] was working on interfacing his TI Chronos eZ430 watch with the Raspberry Pi. As things were going pretty well, he took a side-trip from his intended hack and implemented watch-based control for an RPi audio player.

It really comes as no surprise that this is possible, and even easy. After all, the RPi board has native USB capability for hosting the watch‘s RF dongle, and it’s running Linux which we know already works well with the Chronos platform. But we still love the thought of having automation controls strapped to our wrist!

mpg321 is the audio playback program used for this hack. It plays MP3 files using ALSA for sound, which does have a few hiccups on the RPi. [Mike] found workarounds and included them in the C program he uses to gather everything into one nice code package. Control depends on keypresses sent from the watch (meant for use with PowerPoint) which are translated by his code and pushed to the audio/mp3 programs.

Game Of Chance Built As A Red Bull Creation Entry

[Tom Bourke] wrote in to show off the game of chance which was built for this year’s Red Bull Creation contest. The project was completed with the help of the Wausau Collaboration Center, a Hackerspace in Wausau, Wisconsin.

He does a great job of showing off the game in the clip after the break. Near the bottom of the device is a hard drive platter which each player can spin to test his or her luck. [Tom] used a max485 chip to turn the leads for the hard drive motor into a quadrature encoder. This input is monitored by the Bullduino board, which puts on a light and sound show during the spin. The LEDs that surround the display are individually addressable (probably the same LED strings as this wall display) and cycle trough different colors based on the rotational speed of the patters. The large seven segment display provides a readout for the random number that is generated. Roll a ten and you win! We guess you need to make the rest of the game up yourself, but this could easily be used as a 16-sided die (or less).

Continue reading “Game Of Chance Built As A Red Bull Creation Entry”

Christmas Prep Starts Early: MIDI Control For Strings Of Lights

If you’re planning to outdo yourself with this year’s Christmas decorations now’s the time to start planning. After all, what else have you got going on since the dreadful heat is making outdoor activities a sweat-soaked misery? Take some inspiration from [Tim] who just finished prototyping a wireless MIDI controller for his strings of Christmas lights. You can just see the four spools in the distance which are lighting up as he tickles the ivories.

The wireless link is provided by a WiFi access point which uses its USB port to control the external hardware. This is a USB Bit Whacker board which in turn drives a relay board that was designed to switch mains voltages. The high voltage parts of the rig are housed in a plastic food storage container which hosts two pair of outlets to drive four channels in total. [Tim] is happy with the outcome, which he shows off in the video after the break, and hopes to expand to a total of sixteen channels for this year’s festivities.

Continue reading “Christmas Prep Starts Early: MIDI Control For Strings Of Lights”

Two-thirds Of A Casting Foundry

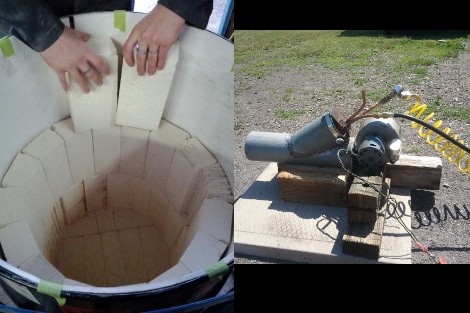
[Th3BadWolf] decided to undertake a casting foundry project of epic proportions. The hardest part of the build is obviously the apparatus for melting the metal. It needs a vessel that can stand up to the heat, and a heating method that has enough thermal power to melt metal. He’s just finished the burner portion of the build. His writeup includes information about the cement casting that finishes up the vessel on which he had already done a lot of work.

You’ll remember that for the enclosure he started with an oil drum and lined it with a ceramic blanket. That was lined with fire brick. In this update he finish it off by placing a smaller barrel inside to act as an inner form, then filled the remaining gap with 3000 degree cement.

The burner injects air, propane, and oil which are all driven by a blower and forced through a nozzle into the chamber. You can catch a quick blower and burner test clip after the break. We can’t wait to see the next post, which we assume will be a test run of the final assembly.

Continue reading “Two-thirds Of A Casting Foundry”

Easy To Build Parts Tumbler You Can Add To Your Shop

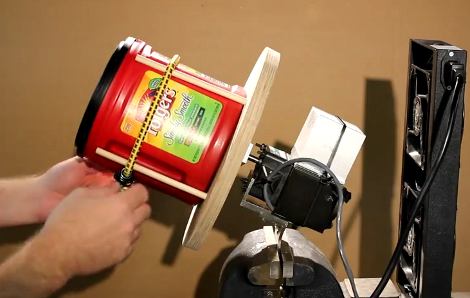
This parts tumbler was easy to build but it still does a great job of rounding rough edges and polishing the surfaces of parts cut with a CNC machine. You can see that it mounts in a bench vise, and the cooling fans have a magnet which holds the tray in place on the anvil portion of that tool. Since you’re not constantly tumbling parts this makes it very easy to store the unit between uses.

[Neo7CNC] mounted the wooden tumbler plate directly to the motor shaft. This is done with the help of some aluminum stock which bolts to the round wooden plate, and has a hole and set screw for the motor’s keyed shaft. There are four wooden dowels which cradle the plastic coffee jug where the parts go. As a first test he used zinc BB’s that he already had lying around, but has put some steel ball medium on order for future projects.

It’s certainly more robust and powerful than the LEGO ball mill we saw a while ago. Just be careful with motor. Even at a lowly 60 RPM it ended up getting really hot and that’s the reason there’s a heat sink and fan unit included in the build. See it in action after the break.

Continue reading “Easy To Build Parts Tumbler You Can Add To Your Shop”

[Dino] Upgrades His Robot Chassis

This is the fourth iteration that [Dino] has produced for his all-terrain robot. Just before this it was more of a turtle, with an aluminum pan shell. We think his upgrade to MicroRAX frame parts makes it look a lot better, and lightens the load so it can get around better as well.

It’s hard to tell from the picture, but many of the components are from a Roomba robot. The four motors, and the mainboard are all from units he picked up on eBay. To drive the motors he tapped into the H-bridge signals on the control board using a Seeeduino. His write-up (linked above) shares some of the details regarding the electronics, but the video after the break shows the development and assembly of the new chassis. It’s made from extruded aluminum bars which easily connect to each other with the system’s brackets. To interface with the non-standard parts he makes his own brackets from some aluminum sheet stock. It’s similar to other modular building materials, but the MicroRAX is a great size/weight for a small design like this one.

Continue reading “[Dino] Upgrades His Robot Chassis”