Ancient Mouse Teardown And Repair

For a young geek in the 80s, the it computer was the IBM PCjr. On paper, it was a truly remarkable leap in technology. With a wireless keyboard, light pen, and optical mouse it was an impressive, if maligned, piece of hardware. There was a small problem with the optical mouse, though; it required a special mousepad. [Michael], a PCjr aficionado, decided to make his own optical mousepad. It works, and was a lot easier to build than finding a used one for sale.

The PCjr mouse used two photodectors – a red LED and photodector for the horizontal axis, and an IR LED setup for the vertical. Light is shot through two holes in the bottom of the mouse and reflects back onto the photodetectors. [Michael] emulated the old mousepad with a sheet of aluminum foil and a transparency with a printed grid pattern. Surely not as elegant as an original, but it does the job nonetheless.

This clever-for-its-day optical mouse setup wasn’t limited to the lowly PCjr. A number of old Sun workstations had a similar setup that used small dots on the mousepad. There were several generations of mousepads that were generally incomparable with each other (because one type of mousepad wasn’t proprietary enough for Sun), but we would assume a similar build would work for these forgotten mice.

Thanks to [josh] for sending this one in.

Remove Function Lock Key With A 4016 And A 555

Many companies today try to simplify life by over complicating the keyboard. Microsoft has been doing it since 2001. If you love your ergonomic keyboard, but hate that “function lock” key, there are plenty of options out there for you to try.

The least complicated way is to either modify some XML or just set macros up in the MS software, but who wants to do that every time they re-install Windows? Reader [Elco] didn’t so he added a simple little 555 circuit inside the keyboard, that automatically re-enables the Flock after three seconds if he happens to hit it during fast and furious typing.

Now no matter what system the keyboard is plugged into he does not have to worry that if he hits F7 whether the system is going to spell check his document, or reply to an email, or that F2 is actually going to rename something and not undo his work silently.

A Bicycle Built For… Siamese Twins?

This project really puts an end to arguing over who has to ride in the back of the tandem bicycle. We challenge you not to smile while viewing the maiden voyage that [Carlos] and his daughter take on this side-by-side bicycle. The video can be found after the break.

It certainly makes a bit more sense than an over-under tandem, and the fabrication process is really quite manageable. This requires alterations to the seat, handle bars, and pedals, but the majority of the bike (frame, gearing, fork, wheels) is unaltered.

The cranks have been replaced by a custom welded cam mechanism that reminds us of how the pedals on a paddle boat work. Both riders must pedal at the same time and rate. To give each a place to sit the seat post was converted into a T bar to host saddles to the right and left of the frame. Finally, the handle bars are the most complicated of all. Extra framing was welded onto both sides for the front tube to provide a place to mount two pair of handle bars. One of them is fixed in place, the other can be turned, using a lever mechanism to steer the front fork.

It looks a bit awkward to get started, but once both riders are up it seems quite stable.

Continue reading “A Bicycle Built For… Siamese Twins?”

Treaded Robot Modified For Stair Climbing

[Mike Li] is showing of his stair climbing robot. It’s a bot that cruises around on a pair of tank treads, but some interesting modifications gave him the traction needed to ascend a flight of stairs without slipping backward.

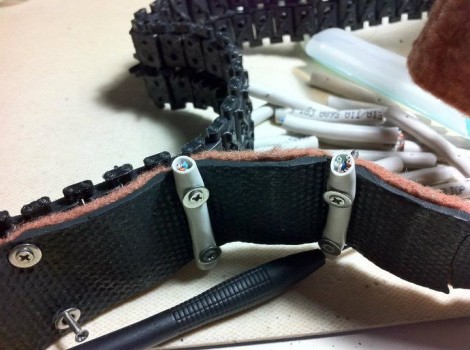
The image above shows this process in great detail. You can see the unaltered treads leaving the top of the image. In the foreground, strips of rubber-backed rug add some sticking power to the otherwise smooth surface. To really stop the bot from slipping, segments of CAT5 cable have been screwed to the tread at regular intervals, holding the carpeting tightly in the process.

You can see in the video after the break the little robot has no problem with rough terrain. The design was inspired by the iRobot Packbot which has a set of treaded appendages sticking off the front end. These ensure that the vertical face of an obstacle, such as the beginnings of a staircase, can still be reached by the main set of treads.

Continue reading “Treaded Robot Modified For Stair Climbing”

737 Cockpit Will Satisfy Even The Most Discriminating Simulator Afficiandos

This isn’t an airplane, it’s a simulator. But you won’t find it at a flight school as this labor of love is a home build of a 737 cockpit (translated) that has been going on for more than two years.

It started off as a couple of automotive bucket seats in a room with two computer monitors to display the view out the windscreen. From there each piece has been meticulously added for a wonderful overall reproduction. The range of skills needed to pull this off is impressive. The seats have been rebuilt with padding and upholstery true to the Boeing factory options. The support structure that forms the domed front of the aircraft was built from wood with a metal bracket system to hold the overhead control panels in the right position. The only thing missing here is the rest of the plane. Take a look at the simulated landing run in the video after the break to see what this thing can do.

Looking for something that will take you for a bit more of a ride? Here’s a collection of motion simulators that might satisfy your craving.

Continue reading “737 Cockpit Will Satisfy Even The Most Discriminating Simulator Afficiandos”

Running The Numbers On A Cheap PSU

[Mike] picked up a cheap USB hub for four pounds (about $6) including delivery. He wanted to know how it’s possible to get quality electronics for that price, and as you may have guessed it’s not possible. He cracked open the power supply that shipped with the hub and hooked it up for some testing.

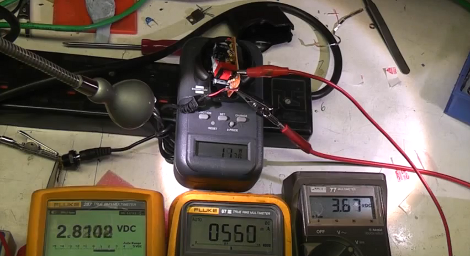
The wall wart has a sticker on it that claims a rating of 1 Amp at 5 volts. It’s pretty easy to see that this hardware cannot meet that spec just by looking at the circuit board. It’s a low-end single sided board that has some really disappointing isolation between the mains and regulated side of the circuit. As far as we can tell there’s really no reliable regulation circuit on the low side of the transformer, and the tests that [Mike] runs in the clip after the break show this. From left to right in the picture above you can see voltage at the hub-side of the power cord, current on the load, and voltage leaving the circuit board. At just 560 mA the voltage the USB hub is receiving has fallen below 3 volts!

The link to this project was sent in by [Paul] after reading about that fake Canon camera PSU. We love this kind of stuff so keep the tips coming as you find them!

Continue reading “Running The Numbers On A Cheap PSU”

Need A Hand Drying Those Gloves?

While being caught out in the rain skiing, [Andrew] was left with a pair of soaking wet gloves. Leaving them to air dry did little good, as after 3 days they were still wet, and blowing a fan at them did little to nothing to help the situation. Luckily [Andrew] had been thinking about ways to make a forced air glove drier for some time now using standard plumbing fittings.

A prototype was made similar to consumer models where the glove is fit over the end of a pipe, and while this worked great to dry the palms, it did not help the wet finger situation at all. In order to solve this issue a new design was whipped up featuring 4 fixed fingers and a movable thumb made out of copper pipe. A little drilling, and soldering was performed then the metal hand was then duct taped to the end of a hair drier, turning soaked gloves into perfectly dry ones in about three hours.