Displaying Images On The Surface Of Bubbles

The image you see above isn’t a simple photograph of our blue marble from thousands of miles above. No, that image is much cooler than a satellite because it’s a projection of the Earth onto a soap film screen. Yes, we can now display images on the surface of bubbles.

Instead of a the soap bubbles you’d normally give a small child, this project uses a mixture of sugar, glycerin, soap, surfactant, water, and milk to produce a film much more resistant to popping than your standard soap bubble. Shining an image through these films doesn’t result in much of an image, so the researchers used ultrasonic speakers to vibrate the film and make it possible to display a picture.

With a small projector, this system makes it possible to display an image on the surface of bubble. Of course, the display area is tiny right now, but the size will most likely increase as the experimentations continue.

You can check out a whole bunch of videos demoing this tech after the break.

Continue reading “Displaying Images On The Surface Of Bubbles”

Simulating LED Cubes In Blender

[youtube=http://www.youtube.com/watch?v=bl-kvfJxYwM&w=470]

The Jyväskylä, Finland hackerspace hacklab-jlk was lucky enough to work on a public arts project for their home town. They had the opportunity to design, build, and install a trio of LED cubes in Jyväskylä’s central Church Park. As such a high-profile project, the hacklab-jlk team decided to take their time and ended up implementing a lot of very cool features for their LED cubes, including simulating the light show in Blender.

The LED cube is similar to all the other LED cube builds we’ve seen before; it’s an 8x8x8 cube controlled by an ATMega328. The Elovalo project, as it is called, is a trio of LED cubes – one using red LEDs, one using green LED, and a blue LED cube each mounted on a pedestal in a Jyväskylä park.

Because the Elovalo is a permanent installation, the team needed a way to verify new firmware for the LED cubes. They came up with a LED cube simulator for Blender that allows them to write a new display function in C and render either single frames or a full animation of the lighting pattern.

A very cool build, and nearly too awesome for a public arts project. We look forward to a video of the complete installation, but until then we’ll make do with the short preview video available after the break.

Continue reading “Simulating LED Cubes In Blender”

Hacking Your Grill For Performance And Features

Summer is winding down, which means that sales will be beginning on grills at stores all over the place. For those that enjoy the outdoor cooking experience, a nice new grill is always tempting. If you’re anything like me though, it can be hard to justify the expense. All you need is some fire right? Well, not if you want to smoke foods, or do long controlled jobs, basically anything but quickly searing something.

[Joe Brown] over at Gizmodo found himself wanting to upgrade from simple coals/wood to something fancier, but really didn’t want to shell out the $2,000 that he found would be necessary to get the mic features he wanted. So, he set out to find a good platform to mod and added the features he wanted separately. The end result was a nicely performing out door cooking appliance that only cost him $540.

This hack is on the simpler side, but his modification really did add some great features. Many of you could build the addons from scratch, which makes me wonder, how would you improve a grill, dear Hackaday Reader?

For Vacation On Hoth: Snow Speeder Sleds

Next time you’re taking a vacation anywhere that resembles the planet Hoth, you might want to take the time to build a snow speeder sled before you go. As you can see in the video above (at around the 1:00 mark), the sled looks great, even as it “flies” down the slopes. We were fairly surprised to find it was made entirely out of cardboard. We were also fairly surprised at how large the person was that unfolded from the cockpit when it stopped!

You can see pictures of the build process over at Dvice.

Make Cell Phone Calls With Your Arduino

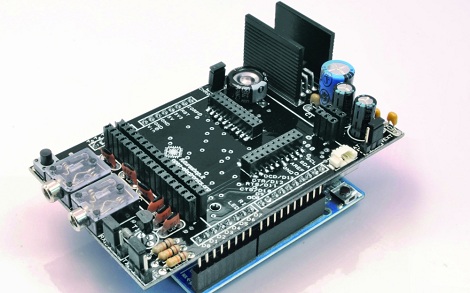
Cellular shields for the Arduino have been around for ages, but this is the first one we’ve seen that turns your Arduino into a proper cell phone.

The shield is based around the SIM900 GSM/GPRS radio module, and is compatible with the SIM908 GSM/GPRS module that adds a GPS receiver. Also on board this shield are a pair of 1/8″ audio jacks, perfect for connecting a microphone and headphones. Yes, you can actually make cell phone calls with your Arduino now.

The real star of this build is the new GSM Shield library. This library of code includes the methods necessary for an Arduino to function as a cell phone (answer, hang up, dial a number), but also includes a lot of improvements for TCP/IP communication.

Even though the cost of getting an Arduino communicating through a GSM or GPRS network is fairly high, we’re thinking this would be the perfect starting point for a completely open source, open hardware cell phone. A phone with the same functionality as an old Nokia brick that is also a MiFy would be an amazing piece of hardware, and would surely make for a profitable Kickstarter.

Saving A Bricked Phone With A Pencil Lead

[stompyonos] bricked his Samsung Captivate. Not wanting to be without a phone for a while, he researched a fix online and found shorting a pair of pins on the USB port would put the phone into download mode, saving his phone. The only problem for this plan is [stompy] didn’t have any resistors on hand. Instead, he came up with a wonderful MacGyverism using a piece of paper, a bit of graphite, and a pair of paper clips.

The process of unbricking a Captivate requires a 300 or 330 kΩ resistor across pins 4 and 5 of the mini USB port. This can be done with a few resistors, but [stompy] only had a multimeter lying around. After scribbling a good bit of pencil lead on a piece of paper, he attached two paper clips to make a variable resistor, dialed it in to about 300 kΩ, and cut up an old Nokia charger for its USB plug.

Not bad for a very easy fix that didn’t cost [stompyonos] a dime, and certainly better than a $500 paperweight.

Help Computer Vision Researchers, Get A 3d Model Of Your Living Room

Robots can easily make their way across a factory floor; with painted lines on the floor, a factory makes for an ideal environment for a robot to navigate. A much more difficult test of computer vision lies in your living room. Finding a way around a coffee table and not knocking over a lamp present a huge challenge for any autonomous robot. Researchers at the Royal Institute of Technology in Sweden are working on this problem, but they need your help.

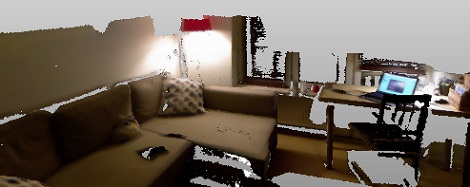
[Alper Aydemir], [Rasmus Göransson] and Prof. [Patric Jensfelt] at the Centre for Autonomous Systems in Stockholm created Kinect@Home. The idea is simple: by modeling hundreds of living rooms in 3D, the computer vision and robotics researchers will have a fantastic library to train their algorithms.

To help out the Kinect@Home team, all that is needed is a Kinect, just like the one lying disused in your cupboard. After signing up on the Kinect@Home site, you’re able to create a 3D model of your living room, den, or office right in your browser. This 3D model is then added to the Kinect@Home library for CV researchers around the world.