Dyson Engineers’ Hacks Traverse Robot Obstacle Course

2012-dyson-challenge

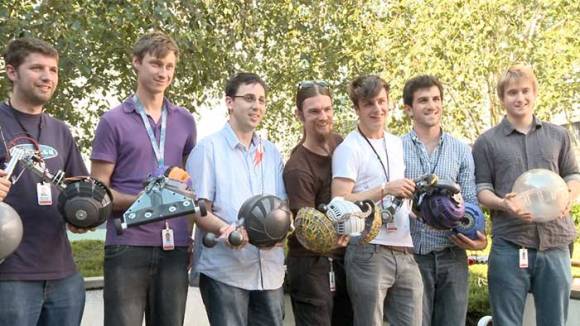
These guys are all engineers who are employed by Dyson. They’re holding remote control creations made from Dyson parts. This time around the object of the challenge was to build a bot based on a the Dyson ball and race it through an obstacle course.

This sort of thing is right up our alley, but unlike the last time Dyson engineers shrugged off the daily grind to hack their own hardware, this doesn’t show off nearly enough of the festivities. Sure the pair of videos embedded after the break make a great trailer for the event, but we would love to have seen 90 seconds devoted to each of the entries. Alas, you do get to see most of the winning unit’s obstacle course run which includes a distance route, navigating through rough terrain, and negotiating a high path where falling off the edge is a real threat.

Maybe the engineers themselves will post details about their own builds like the contestants in Sparkfun’s autonomous vehicle contest do.

Continue reading “Dyson Engineers’ Hacks Traverse Robot Obstacle Course”

Gadgeteer Plant Monitor Wants It Wet And Photogenic

gadgeteer-plant-monitor

[Christian] is growing a tomato plant on his desk and wanted to capture some time-lapse images of its progress. To that end he built a rig that monitors moisture levels and snaps images at regular intervals.

The hardware he’s using is part of the Gadgeteer family. These run a .NET micro framework and are modular which makes for easy assembly. A laser-cut plywood stand helps to position the camera module for the best shots. Its takes a picture of the seedling once every ten minutes. There is a quartet of RGB LEDs surrounding the lens. They help illuminate the subject for each picture. But [Christian] also mentions that the red LEDs provide light the plant needs to grow (we raise an eyebrow at that claim, but in truth we have no idea if red LEDs make plants grow or not). There is also a moisture sensor which you can see inserted in the soil.

The images and moisture readings are all pushed to a server. There is an Ethernet board near the base of the rig. It uses POST to send the image, which is saved by a server-side script. The moisture data is sent via a GET command.

Christmas Light Controller Is Its Own Percussion Section

clicking-christmas-tree-controller

[Jason] and his father took advantage of a week off of work over Thanksgiving to design and build a Christmas light decoration that can flash fancy patterns. He calls it the Uno Christmas Tree. It’s sixteen strands of lights draped between a pole and the ground to form the shape of a tree. The main controller is an Arduino UNO, but what really makes this work is a mechanical relay board with sixteen channels.

Using trigonometry they figured out that the decoration would be fifteen feet tall and have a five-foot radius at the base. A pipe was installed to act as the trunk, with an old toilet flange at the top and stakes at the bottom to anchor the lights. They all make their connections at the controller box using extension cords that were labelled with channel numbers. You can see the final product in the video after the break. But you’ll also want to watch the clip on [Jason’s] blog which shares the sonic symphony created when the mechanical relays really start working.

Continue reading “Christmas Light Controller Is Its Own Percussion Section”

Inductive Charger Inside The Case Of This IPhone 4s

iphone-4s-inductive-charger

This iPhone 4s is charging without a dock connector because [Tanv28] added inductive charging hardware inside the case.

The hack is not for the faint of heart. But if you’ve got a precision soldering iron and a stead hand we bet you can pull it off. It starts with disassembly to get at the cable that connects the circuit board to the dock connector. [Tanv28] solders fine enameled wire to pins 16, 23, 25, and 27. The other end of these wires are soldered to the guts from a Powermat inductive charging system. After the connections are made there’s not enough room under the back cover of the phone for this added bulk. But laminating a second plastic frame onto the assembly will correct for the 1mm difference in thickness. The clip after the break walks through the entire process.

You can see that [Tanv28] also built the charging station into a piece of furniture. We just saw a post last week that used this technique to add Powermat hardware to a shelf.

Continue reading “Inductive Charger Inside The Case Of This IPhone 4s”

Inventing Networking Protocols For Dozens Of Arduinos

chain

When you don’t want to use I2C or SPI, and MIDI and DMX are old hat, [Scott] comes along and invents a very strange networking protocol that is just daisy chaining a few Arduinos together with serial connections.

Strange as it may seem, this networking protocol actually makes a whole lot of sense. [Scott] is working on an animatronic birdhouse in the vein of Disney’s Imagineers and needed to network a whole bunch of Arduinos without using up precious IO pins.

The networking stack [Scott] came up with capitalizes on the hardware UART in each Arduino by simply daisy-chaining several boards together. By adding an FTDI breakout at the beginning of the chain, [Scott] can control dozens of Arduinos straight from a terminal

[Scott] isn’t using off-the-shelf Arduinos for this project – a few months ago he found 100 Arduino-compatible stepper motor controllers while dumpster diving at his job, giving him more than enough nodes to come up with some pretty crazy networking protocols. It’s a great use of the hardware he has on hand, and a very clever solution to controlling dozens of microcontrollers at once.

Check out [Scott]’s demo after the break.

Continue reading “Inventing Networking Protocols For Dozens Of Arduinos”

Teaching The Speak & Spell Four (and More) Letter Words

ss

Before it became the darling of circuit benders the world over, the Speak & Spell was a marvel of modern technology. Complete with a microprocessor and voice synthesizer, the Speak & Spell was able to speak a limited vocabulary that [Furrtek] thought should include words such as, “al qaeda”, “necrosis”, and “butt”. The Speak & Spell included an expansion port for cartridges containing a larger vocabulary, and with a huge amount of effort [Furrtek] created his own Speak & Spell carts that allow it to talk like a sailor.

The Speak & Spell ROMs were stored on a very strange memory chip; instead of a parallel or serial interface, the chip reads five nybbles at a time before returning the saved data. At first, [Furrtek] thought he could get an ATtiny microcontroller, but the way this memory chip is set up made it impossible to send and receive data even on a 400kHz I2C bus.

The project eventually found some decent hardware in the form of a CPLD-based cartridge that was more than fast enough to interface with the Speak & Spell. After that, it was only an issue of converting words into something the speech synth can understand with some old Windows 3.1 software and finally burning a ROM.

The end result is a Speak & Spell with a perverse vocabulary and is much, much more interesting than a circuit bent piece of hardware with a few wires crossed. Check out the video after the break.

Continue reading “Teaching The Speak & Spell Four (and More) Letter Words”

Turning Four Smaller Helicopters Into One Larger Quadcopter

copter

There’s a reason we’ve seen a menagerie of quadcopters over the past few years – the key piece of any quadcopter build is an inertial measurement unit. Historically a very complicated and expensive piece of kit, these IMUs came down in price a few years back, allowing anyone with a few dollars in their pocket and a handful of brushless motors to build a four-bladed drone in their workshop.

[Starlino] built a few quadcopters, but he wanted to shy away from IMUs and get most of the mass of his new ‘copter over the center of the chassis. He came up with a design he calls the quadhybrid that can be built out of a quartet of those cheap 3-channel helicopter toys.

Most of the lift for [Starlino]’s quadhybrid comes from a pair of coaxial rotors from a Syma 001 3-channel helicopter toy. Anyone who has played with one of these toy helicopters knows how stable they are; if the tail rotor breaks, you’re left with a helicopter that can only go up and down.

To give his quadhybrid a few degrees of freedom, he attached four tail rotors from 3-channel helis to a few booms laid out in a cross pattern. By taking the receiver out of a 4-channel helicopter and adding his own controller board, [Starlino] made each of the tail rotors control the pitch and roll of the craft.

In the video after the break, you can see the quadhybrid is amazingly stable even without an IMU and surprisingly agile. As [Starlino]’s ‘copter can be made out of replacement parts for cheap 3-channel helis, we’ll expect a rush on these tail motors at your favorite online RC retailer very shortly.

Continue reading “Turning Four Smaller Helicopters Into One Larger Quadcopter”