A 555 Player Piano

555_timer_automatic_music_player

From simple buzzers to an Atari Punk Console, the simple 555 timer chip is the foundation of a whole lot of interesting lo-fi synth projects perfect for beginners. [Steven] put together a great tutorial for using the 555 timer in a rudimentary synth, and even went so far as to build a simple electronic player piano able to play a song from a sheet of paper with punched holes.

The basic 555 oscillator circuit is very simple – just a few caps and resistors and powered by a few batteries. [Steven] built the simplest 555 circuit, but used a line of graphite drawn on a piece of paper for the resistor controlling the frequency. It’s basically a drawdio built on a breadboard, and easy enough to build for even the most neophyte electronic tinkerer.

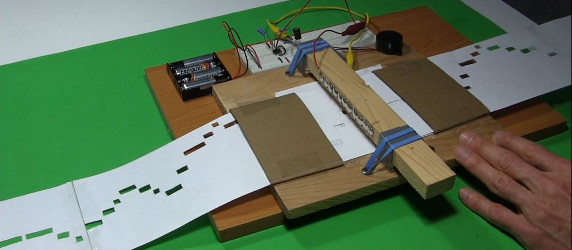
Going one step further, [Stephen] drew a long thick line of pencil graphite on a piece of paper and mounted eleven wire loops attached to the circuit over his improvised resistor. After cutting a few holes in a piece of paper, he was able to create a simple player piano with his 555 synth. It worked well enough to play Greensleeves, and is the perfect project for the budding electronics hacker.

Continue reading “A 555 Player Piano”

Hackaday Links: Sunday, June 23rd, 2013

hackaday-links-chain

Need to connect a male pinheader to male jumper wires? [Scoops] came up with a brilliant method using jumpers meant for dual-pin headers like on motherboards.

Atanua, a real-time logic simulator, was just upgraded for the first time in a few years. We’ve liked this one since way back. The changes mostly involve performance improvements.

You can see what’s inside of Google Glass without shelling out $1500 for your own hardware. [Thanks Itay]

Coding a Minecraft clone in x86 assembly is pretty impressive. We had to install nasm and qemu to get it to compile but it does work. If you don’t want to build the project just check out the demo video. There’s no sign of creepers but dig too deep and you’ll fall out of the world. [Thanks Dmitry]

Here’s a way to use multiple Google Drive accounts as a RAID array.

[Sick Sad] produced some really trippy photographs using long exposures with a laser line on a servo. The result is a photorealistic image of the subject (faces in this example) that looks like it was melted à la [Salvador Dalí]. If you’re just interested in using the laser for light painting check out Hackaday alum [Jeremy Cook’s] work in that area.

And finally, two monitors are better than one. [Bryan] put his both together in portrait orientation using a laser-cut mounting bracket of his own design.

Adding RGB Backlight To Arcade Buttons

backlit-arcade-buttons

These arcade buttons started out as illuminated buttons. But they were bulb-based which only allowed for one color. [Jon] and his friends at the Leeds Hackspace wanted to find a way to retro fit them with RGB LEDs, without changing the buttons themselves. The hack lets them replace the bulb with an addressable circuit board. The really interesting thing about it is that there is no separate interface for addressing. The communications happen on the voltage bus itself.

After deciding to include a microcontroller inside the button they built a test version using some protoboard to see if it would fit. Indeed there was enough room and the proof-of-concept led to the factory spun board which you see above. It has pads for two of the four LED module feet on either side, with the opposite end of the board fitting into the bulb receptacle. The voltage line is pulsed to send commands to the microcontroller. We’re interested in finding out exactly how that works but we’ll have to dig through the code before unlocking the secret.

Continue reading “Adding RGB Backlight To Arcade Buttons”

Raspberry Pi Bitcoin Miner

Mining bitcoins is becoming a fool’s errand, but there’s always some new piece of hardware coming out that allows those hard-core miners to keep ahead of the curve. One such piece of hardware are new custom ASIC devices that are just as fast as an FPGA while being much less expensive. A lot of these ASIC devices come in interesting packages that look just like a large USB thumb drive. Of course this is the perfect opportunity to show off what the Raspberry Pi can do by mining Bitcoins at rates comparable to the best graphics used in mining today.

The Raspberry Pi simply doesn’t have enough horsepower to mine bitcoins at any worthwhile rate. There are, however, USB ASIC devices that will mine for you at about the same speed as a high-end graphics card. Since multiple ASIC devices can be controlled through a USB hub, it’s simply a matter of plugging a USB hub into a Raspberry Pi, loading up CGminer, and letting your new PiMiner loose on a mining pool.

The Adafruit Pi Miner uses one of their really cool LCD character displays and keypad to display the current mining rate, accepted shares, and enough information for you to calculate how long it will take to break even with your Pi powered mining rig. How long that will be for this four device rig we’ll leave to the comments section.

Turning A Phone Into A Geiger Counter

geiger

We’re no stranger to radiation detector builds, but [Dmytry]’s MicroGeiger prototype is one of the smallest and most useful we’ve seen.

The idea behind the MicroGeiger comes from the observation that just about every modern smartphone can provide a small bit of power through the microphone jack. Usually this is used for a microphone, but with the right circuit it can be stepped up enough to power a Geiger tube.

[Dmytry]’s circuit uses a hand-wound transformer but keeps the part count low; there’s only a few dozen caps, resistors, and diodes in this build, making the circuit much smaller than the Geiger tube itself.

Since [Dmytry] is powering a Geiger tube with a phone, it only makes sense that he should also record clicks from the tube with an Android app. Right now, the entire project is still in the prototype stage, but everything works and his app can detect radiation from one of [Dmytry]’s sources.

The code and schematics for the MicroGeiger are available on GitHub, with a video of the project in action below.

Continue reading “Turning A Phone Into A Geiger Counter”

Kinect Full Body Scanner

kinect-full-body-scanner

Why let the TSA have all the fun when it comes to full body scanning? Not only can you get a digital model of yourself, but you can print it out to scale.

[Moheeb Zara] is still in development with a Kinect based full body scanner. But he took a bit of time to show off the first working prototype. The parts that went into the build were either cut on a bandsaw, laser cut, or 3D printed. The scanning part of the rig uses a free-standing vertical rail which allows the Kinect to move along the Z axis. The sled is held in place by gravity and moved up the rail using a winch with some steel cable looped over a pulley at the top.

The subject stands on a rotating platform which [Moheeb] designed and assembled. Beneath the platform you’ll find a laser cut hoop with teeth on the inside. A motor mounted in a 3D printed bracket uses these teeth to rotate the platform. He’s still got some work to do in order to automate the platform. For this demo he move each step in the scanning process using manual switches. Captured data is assembled into a virtual module using ReconstructMe.

The Kinect has been used as a 3D scanner like this before. But that time it was scanning salable goods rather than people.

Continue reading “Kinect Full Body Scanner”