DIY Pick And Place Just Getting Under Way

diy-pick-and-place

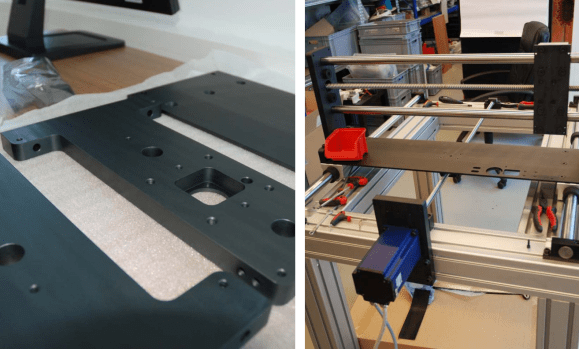
It’s not totally fair to say that this project is just getting under way. But the truth is it neither picks nor places so there’s a long road still to travel. But we’re impressed with the demonstrations of what [Daniel Amesberger] has achieved thus far. Using the simplest of CNC mills he’s finished the frame and gantry for the device. You can see some of the parts on the left after going though an anodizing process that leaves them with that slick black finish.

The demo video shows off the device by driving it with a joystick. It’s fast, which gives us hope that this will rival some of the low-end commercial pick and place machines. He’s already been working on the software, which runs on a mini ITX form factor computer. This includes a gerber file interpreter and some computer vision for a visual check on part placement. He hasn’t gotten around to building the parts feeders but we’ll keep you updated as we hear back from him.

Continue reading “DIY Pick And Place Just Getting Under Way”

Scratch Built Camera Tripod

scratch-built-camera-tripod

We’re used to seeing hacked camera mounts but [CroBuilder] mentioned to us that nobody is really making plain old tripods themselves. He loves to work in his shop so he spent about ten hours building this tripod for himself.

We’d say it’s built to last, but that comes at the cost of weighing a lot. He used square tubing for the legs, which are tripled up in order to allow them to telescope. Each leg has two pipes mounted to the central hub that he fabricated out of hexagonal pipe. A bolt and wing nut acts as hinge and clamp. On the bottom section of the leg there’s a tab spanning the two pieces and another clamping mechanism to hold the adjustable bottom portion of the leg in position.

He finished up the project with black paint on many of the pieces, with the legs themselves polished until shiny. Will rust be a problem if he doesn’t use a clear coat?

The nice thing about a quality tripod is that you can use them for more than just cameras. For instance, add some components to make your own laser level.

Multiple Raspberry Pi Boards Used To Create Video Wall

Five Rasberry Pi’s are used to drive this four-display video wall. This screenshot shows the system playing back some BBC documentaries. The sync, alignment, and video quality all seem to be spot on which makes it quite easy for your eye to assemble the images into one picture.

Each screen has its own Raspberry Pi which generates the HDMI video shown on the screen. These are fed from one central RPi board which acts as the controller. Video is pushed between the boards using the Real Time Streaming Protocol (RTSP) available through the Linux GStreamer package. Synchronization between the different video boards is taken care of using network time. [Samer] mentions that this system is scalable — each additional screen simply requires one more RPi to drive it.

The team also did some experiments with live video. They added a sixth RPi board with the camera module in order to display a live feed.

Leather Wallet Making Involves More Than You Think

01-leather-wallet

It’s not rocket science, but ending up with a beautifully crafted leather wallet like this one takes quite a bit more than you might think.

The project starts off with already tanned leather, so that definitely saves on time. The pieces are marked out on the stock before being cut with a hobby knife. There’s still a long way to go before you can start stitching though. The thickness of the edges is trimmed down and then burnished with a rotary tool. A channel is cut just inside the edges to receive the thickness of the thread. Holes are marked with a special tool, then bored using an awl. Once stitched together the edges are sanded perfectly flush before being burnished.

Just from the look of it we’d guess it’ll hold up years longer than anything you can buy at an ordinary big box retailer.

Continue reading “Leather Wallet Making Involves More Than You Think”

Mac Malware Uses Right To Left Character Exploit

right-to-left-character-malware-attack

Check out this jumbled confirmation window. At first glance the message appears to contain a bunch of gibberish, but it can actually be read if you start at the right side and read each character moving left. The text displays like this because it is prefixed by a special Right-to-Left override Unicode character. The technique is being used in malware to obscure the actual extension of the file being launched. Notice that when written backwards your eye can still pick out the string “pdf” which may be enough to trick the uninitiated into approving the launch of the file.

This confirmation screen is launched when clicking on a piece of malware found in the wild a little over a week ago. If you do choose to run it, a decoy PDF file is opened in order not to arouse suspicion. But at the same time the program — which is signed with an Apple Developer ID — is installing itself in the home directory and making a cron job to launch at each boot. Sneaky!

Animated GIFs On An Apple II

Before the Internet, computer enthusiasts needed to get their cat pictures, image macros, and animated gifs somehow. If only [Nate] was writing code back in the 80s: he created a video player for the Apple II, essentially turning the classic computer into a machine that can play one or two animated gifs.

Vintage microcomputers aren’t especially noted for a huge amount of RAM, or being very fast, so [Nate] needed to bring in some extra hardware to give his recently acquired Apple II+ a 64k RAM disk to store the gifs.

The gifs are loaded off the floppy drive after being converted on a PC with a Python script, reducing the resolution and colors to 280 x 192 pixels and an amazing rainbow of four colors. For some gifs, seen below, it’s actually slightly impressive an Apple II can pull off this trick. It’s amazing  [Nate] got this thing to work, as well.

If you have an Apple II set up, you’re awesome. You should go peruse [Nate]’s git and make your own animated gifs for your awesome classic computer.

Continue reading “Animated GIFs On An Apple II”

Complex Camera Rig Controlled With Blender 3D

blender-3d-camera-control

This is a pretty intricate camera mount. Not only does it provide pan and tilt as the subtitles state, but it moves along a track and offers zoom and focus controls. Its great, but you’ll need an equally complex set of controls to do anything meaningful with it. That’s where the real hack comes into play. The entire system is controlled by its virtual model in Blender 3D.

You probably already know that Blender 3D is an open source 3-dimensional modeling suite. It’s got a mountain of features, which include a framework for animating virtual objects. The camera rig was replicated inside of the software, and includes a skeleton that moves just like the real thing. You can make an animation of how the camera should move, then export and play back those motions on the physical hardware.

Now if you need help making 3D models of your hardware perhaps you should try scanning them.

Continue reading “Complex Camera Rig Controlled With Blender 3D”