Beautiful Touch-Sensitive Furniture

lamp

It’s taken over a year, but [tinkering techie] has finally completed his touch sensitive nightstand. At first glance, it looks like any normal piece of furniture. With the addition of an Arduino, some copper clad board, and a few LEDs, he’s turned it into a very elegant, electronic home furnishing.

The nightstand is built out of a few very nice pieces of mahogany. Underneath the top of the nightstand, three Kapton-covered copper clad boards are inset along the front and side edges. These capacitive sensing boards are connected to an Arduino Fio that reads the capacitance of these sensors and turns on a small LED under the drawer or the mains powered lamp.

The electronics are powered by a small USB charger with a battery backup all hidden underneath the top of the nightstand. Inside the drawer, a magnetic reed switch turns on an RGB LED whenever the drawer is opened.

While the nightstand itself is a wonderful piece of woodworking, we need to tip our hat for a remarkably seamless integration of fine furniture and electronics. The electronic furniture modifications we usually see are Ikea cruft, but this wonderful homemade nightstand should last decades or centuries.

Video of [techie] going over his build below

Continue reading “Beautiful Touch-Sensitive Furniture”

7-Segment Display Matrix Visualizes More Than Numbers

digit-7-segment-visualization

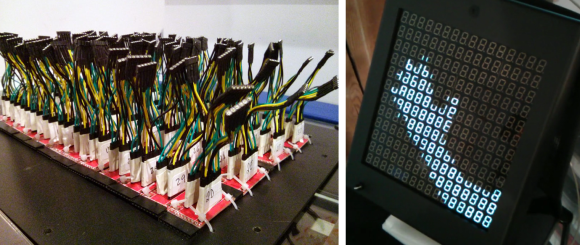
You can pretty much tell that this is an outstretched hand shown on a large grid of 7-segment displays. But the only reason you have to look twice is because it is a still photo. When you see the video below it’s more than obvious what you’re looking at… partly because the device is being used as an electronic mirror.

In total there are 192 digits in the display. To make things easier, four-digit modules were used, although we still couldn’t resist showing you the well-organized nightmare that is the wiring scheme. Each module is driven by its own discrete Arduino (driving 28 LEDs as they’re apparently not connecting the decimal point). All 48 Arduino boards receive commands from a Raspberry Pi which is running openFrameworks to generate the animations.

Now of course the project was well under way before [Peter] discovered a similar display from more than a year ago. But we’re glad that didn’t stop them from forging ahead and even building on the idea. They added a camera to the display’s frame which lets it mirror back whatever is in front of it.

What popped into our minds was one of the recent entries for the Trinket contest.

Continue reading “7-Segment Display Matrix Visualizes More Than Numbers”

Hacking Helps Bring Educational Robot Projects In For A Few Dollars

suckerbot-tedx

Meet  [Dr. Thomas Tilley] and his robot Suckerbot which looks very much like a clear-plastic six-axis controller. His presentation at this year’s TEDxChiangMai is made of the stuff that makes us feel warm inside.

[Thomas] has been using joystick hacks to bring smiles to faces of kids in his part of Thailand. The video below covers some that he has done over the years. These include racing cockpits made out of PVC or bamboo which patch into a cheap joystick to control the action on a traditional gaming console. He’s also spun a different take on multiplayer Guitar Hero by splitting up the fret and strum actuators between several different kids.

But the main topic of his presentation is Lollybot, which is an Americanized version of its original moniker: Suckerbot. This was his entry into a 2012 contest which tasked hackers to build a robot that would cost under $10 to replicate in the classroom. That’s quite a challenge but he actually did it with enough to spare for a snack afterwards. Suckerbot is so named because he added a couple of candy suckers to the analog joysticks of a knock-off PlayStation controller. They act as inverted pendulums; when the robot runs into something the suckers shake which can be read by the computer controlling the robot. Food container lids wrapped with rubber act as wheels which are spun by the vibration motors from the joystick. And there’s even a set of line-following sensors built from photoresistors and some LEDs. His calculated cost? Just $8.96!

The hope is that robot projects stemming from this contest will help produce the next generation of hackers in Africa. If this stuff gets you excited you can take part. This year’s challenge deadline has been extended.

Continue reading “Hacking Helps Bring Educational Robot Projects In For A Few Dollars”

Primer Tutorials For Arduino IR Remote Cloning And Keyboard Simulation

We’ve featured loads of IR Arduino projects and they are all exciting and unique. The projects spring from a specific need or problem where a custom infrared remote control is the solution. [Rick’s] double feature we’re sharing in this article is no exception, but what is interesting and different about [Rick’s] projects is his careful and deliberate tutorial delivery on how to copy infrared remote codes, store the codes with a flavor of Arduino and then either transmit or receive the codes to control devices.

In the case of his space heater an Arduino was used to record and later retransmit the “power on” IR code to the heater before he awakes on a cold morning. This way his room is toasty warm before he has to climb out from under the covers, which has the added benefit of saving the cost of running the heater all night. Brilliant idea if you don’t have a programmable heating system. Maybe he will add a temperature sensor someday so it doesn’t have to run on strictly time.

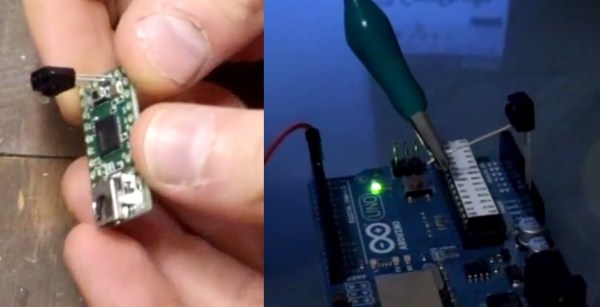
A more complicated problem was controlling DVD playback software on his computer remotely. [Rick] says he sits at a distance when watching DVDs on his computer but his computer doesn’t have a remote control like a normal TV. Arduino to the rescue again! But this time he pulls out a Teensyduino because of its added feature of being able to emulate a keyboard and of course the computer DVD playback software accepts keyboard commands. Once again he used the “IRremote.h” library to record certain button codes from an old remote control before adding the retrieved codes to a Teensyduino setup and programmed to receive and decode the remote’s IR signals. The Teensyduino then maps the IR codes to known keyboard shortcuts and transmits the simulated keyboard shortcut commands to the computer via its USB cable where the DVD playback software recognizes the key commands.

As always [Rick] shares all his libraries and sketches on his blog so follow the above links to download the files. You will not miss a single step if you follow his excellent videos below. Plus, here are some other ways and other tools for using an IR remote with your Arduino and cloning an infrared remote.

Continue reading “Primer Tutorials For Arduino IR Remote Cloning And Keyboard Simulation”

Raspis And Arduinos For FM Broadcast Streaming

radio

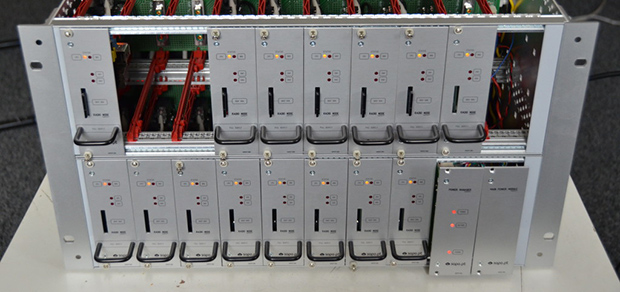
The biggest Internet provider in Portugal needed a system to turn FM broadcast stations in Angola, Cabo Verde, and Mozambique into a web stream. Like every good project, the people in charge of the engineering turned to Hackaday staples – Raspberry Pis, Arduinos, and TP-Link routers, all stuffed into an awesome modular rackmount cabinet

Each module in this gigantic rackmount system includes an Arduino, a Raspberry Pi, a Silicon Labs Si4705 FM receiver chip, and a TI USB audio capture chip that allows the Pi to turn the audio out from the radio receiver into an audio stream. All the Pis are connected to a 24 port Ethernet switch and to a separate master Raspi that converts data received from each module into an icecast stream.

The engineering behind each module is pretty impressive – they’re all hot swappable, have remote shutdown capability, and have voltage divider on the backplane to detect where in the rack it’s placed. It’s a very cool piece of engineering and a very cool example of using off-the-shelf hardware to do something that could be much, much harder.

Home Theater For One Shakes Souls, Removes Fillings

hmmmm

Sometimes an earth-shaking home theater setup just won’t do. A speaker enclosure can only fill the average sized room with so much sound. [Kevin Bastyr] has figured out a way around this. Do away with the room, and build the home theater INSIDE the speaker enclosure! [Kevin’s] creation is called Humorously Maniacal Milwaukee Makerspace Multimedia Machine, (or HMMMMMM for short). As the name implies, HMMMMMM was created at the Milwaukee Makerspace. The HMMMMMM reminds us a bit of the sensory deprivation chambers which were so popular in the 70’s. HMMMMMM’s purpose in life however, is anything but deprivation. The user (victim?) climbs through a 27” hatch and settles into a reclining position. An LCD display is mounted a comfortable distance away from the users eyes. Then movie (or brainwashing program) begins.

The sound system is what sets the HMMMMMM apart. The HMMMMMM utilises a 5.16 surround sound system. That’s 5 speakers and 16 10″ high efficiency subwoofers. We’re not sure if it would be better to call it a sound system, or a full-out frontal assault on the senses. We’re not kidding when we say senses as well. Bass this loud can be felt as much as it is heard. The HMMMMMM is has been measured at 148.6dB at 40Hz. That’s well into the hearing damage range. To be safe, HMMMMMM users must wear double hearing protection: foam earplugs and earmuffs.

[Kevin’s] graphs aren’t all smoke and mirrors either – he’s an audio engineer by trade, and made his measurements with a laboratory grade 1/2″ Bruel and Kjaer microphone. Sound pressure level testing isn’t without its dangers. During testing the 2050 watt amplifier powering HMMMMMM encountered a fan failure. The amp’s circuit board ended up scorched black with delaminated traces. The HMMMMMM however was none the worse for wear. Future plans for the HMMMMMM include RGB LEDs that flash to the beat, and a smoke machine to create that extra atmosphere when the escape hatch is opened.

Making Logic With Inductors

NOR

We’ve seen NAND and NOR logic gates – the building blocks of everything digital – made out of everything from marbles to Minecraft redstone. [kos] has outdone himself this time with a logic circuit we’ve never seen before. It’s based on magnets and induction, making a NOR gate out of nothing but a ferrite core, some wire, and a diode.

The theory of operations for this magnetic NOR gate goes as follows: If two of the input windings around the core have current passing in different directions, the fields cancel out. This could either be done by positive or negative voltages, or by simply changing the phase of the winding. To keep things simple, [kos] chose the latter. The truth table for a simple two-input, one-output gate gets pretty complicated (or exceedingly cool if you’d like to build a trinary computer), so to get absolute values of 1 and 0, a separate ‘clock’ winding was also added to the core.

One thing to note about [kos]’ gate is its innovation on techniques described in the relevant literature. Previously, these kinds of magnetic gates were built with square ferrites, while this version can work with any magnetic core.

While this isn’t a very practical approach towards building anything more complex than a memory cell, it is an exercise of what could have been in an alternate universe where tube technology and the transistor just didn’t happen.