Opentilt: Tag, You’re Out!

opentilt

Have you ever heard of the game Johann Sebastian Joust? We haven’t either, but [Juerd] has come up with an open source version of it called Opentilt, and we have to admit — it looks like a lot of fun!

Johann Sebastian Joust uses motion controllers for a game that can be played indoors or out, without a screen. Everyone gets a motion controller, and the object of the game is to make everyone else move their controller too fast. It even has a music mode that lets you move your controller relative to the speed of the music! Anyway, it had an extremely successful kickstarter, and it has been debuted at many events around the world — but it’s simply not available to the general public just yet. [Juerd] couldn’t wait that long so he decided to make a similar open source version of it, with cheap off-the-shelf parts. The biggest difference is this one doesn’t have the music.

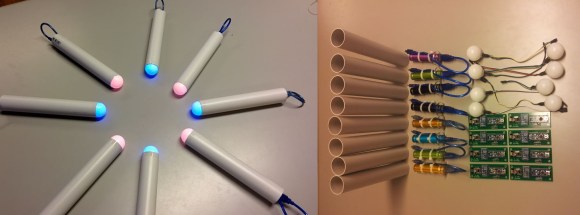
The build is quite simple and inexpensive. You’re looking at some PVC pipe, an Arduino Nano, a RGB LED, a 2.4GHz radio module, an accelerometer, a pingpong ball, a battery pack, and various other resistors and wire. Nothing to it really! All the source code, and instructions are available off of [Juerd’s] site, and he’s done a great job explaining everything, down to fixing a common problem that some people have on Arduino Nanos!

Stick around after the break to see how the original Johann Sebastian Joust game works!

Continue reading “Opentilt: Tag, You’re Out!”

$13 Homemade RC Blimp

Here’s a great little RC hack you can do with the kids this weekend — make your very own RC Blimp!

First you’ll have to hack apart one of those little 1/64 scale RC cars you can get for a few dollars, and then all you need are a few household supplies, and a helium filled balloon. [Masynmachien] says the total cost of this project can be as little as $13 — depending on where you get your supplies.

So how does it work? Well, an 11″ helium filled party balloon can lift about 10g quite easily — if you strip away the body and chassis of one those RC cars you’ll be well under that weight. The RC cars typically have one small DC motor and a steering actuator, but [Masynmachien] found you can actually connect a second DC motor to the leads for the actuator and it works just fine. Doing this you can create a main prop to drive the blimp, and a secondary tail rotor to steer it. The Instructable uses mostly recycled components, but we’re sure if you had more time you could design and build an even nicer one. When the blimp is properly trimmed it sinks slowly in the air, so the main prop is responsible for keeping it at a certain altitude — this takes a bit of getting used to but it’s an easy way to get around steering in all directions.

Looking for a more advanced project using these little cars? How about building a RC plane with them! Or if you’re feeling ambitious, you can also control them using your computer! Stick around after the break to see it in action!

Continue reading “$13 Homemade RC Blimp”

Nearspace Environmental Chamber

vacuum

If you’re going to send some hardware up to 100,000 feet, where atmospheric pressure is 1% of what we enjoy on the surface and temperatures swing down to where Fahrenheit and Celsius don’t matter anymore, you might want to do a bit of testing to make sure everything works before launch. With a few bits of PVC, though, that’s a piece of cake.

There were several environmental conditions to take into consideration; the near vacuum experienced by high altitude balloons would be replicated by a refrigerator compressor, the increased solar flux is simulated by a light bulb, and the cold temperatures provided by a chunk of dry ice.

For a proper high altitude, low temperature environmental chamber the test payload should be cooled down via radiation with tubes filled with liquid nitrogen embedded in the walls. This is the NASA way of doing things, but for the budget of $200, [arko]’s chamber simulates a high altitude environment just fine.

Continue reading “Nearspace Environmental Chamber”

Should All Quadrotors Look Like This?

In recent years, quadrotors have exploded in popularity. They’ve become cheap, durable, and can do some really impressive things, but are they the most efficient design? The University of Queensland doesn’t think so.

Helicopters are still much more efficient and powerful due to their one big rotor, and with the swashplate mechanism, perhaps even more maneuverable — after all did you see our recent post on collective pitch thrust vectoring? And that was a plane! A few quick searches of helicopter tricks and we think you’ll agree.

The new design, which is tentatively called the Y4, or maybe a “Triquad” is still a quadrotor, but it’s been jumbled up a bit, taking the best of both worlds. It has a main prop with a swashplate mechanism, and three smaller rotors fixed at 45 degree angles, that provide the counter torque — It’s kind of like a helicopter with three tails.

Regarding efficiency, the researchers expect this design could achieve an overall increase of about 25% in performance, compared to that of a standard quadrotor. So, they decided to test it and built a quad and a Y4 as similar as possible — the same size, mass, batteries, arms, and controller board. The results? The Y4 had an increased run time of 15%! They think the design could very well make the 25% mark, because in this test study, the Y4 was designed to meet the specifications of the quad, whereas a more refined Y4 without those limitations could perhaps perform even better.

Unfortunately there’s no video we can find, but if you stick around after the break we have a great diagram of how (and why) this design works!

Continue reading “Should All Quadrotors Look Like This?”

Original NES Advantage Controller Stuffed With Clone NES

famiclone-inside-NES-advantage

Like all good hackers [Osgeld] makes regular appearances at the thrift store to scavenge for raw materials. This summer he was lucky enough to come across a couple of NES clone games. These are controllers that emulate the original Nintendo Entertainment System by connecting to a television using composite video. The mechanics of the controllers were pretty much shot, but he knew he could do something with the boards inside. It was a small gamble at a dollar apiece anyway.

As you can see above, he upgraded a vintage NES Advantage controller by stuffing it full of the emulator hardware. To start he disassembled the arcade-like peripheral and gave everything a thorough cleaning. Since he was going to be soldering onto the PCBs anyway he upgraded the controller by swapping out the original switches for a different set of tactile switches. The large base provided plenty of room for [Osgeld] to fit the emulator (with included ROMs) and now he’s Playing with Power.

The NES Advantage is a very nostalgic controller. Even the Ghostbusters hacked on it!

FT230X Brings USB Charging Detection To The Serial IC Game

FT230XS-breadboard

Here’s a new chip from FTDI which brings a nice little feature to the USB-to-serial converter family: charging detection. That means that it is capable of detecting when a battery charger is connected. What does that actually mean? The top of the datasheet gives you the short version, but let’s look at the investigation [Baoshi] undertook to test the full extent of this particular feature. We agree with him that the listed capability leaves those in the know with a lot of questions:

USB Battery Charger Detection. Allows for USB peripheral devices to detect the presence of a higher power source to enable improved charging.

Obviously the chip will be able to tell when a charger is connected, alerting the device when it’s time to start lapping up the extra milliamps. But what type of chargers will actually trigger the detection circuit? After rigging up the test circuit shown above he ran through several scenarios: connected directly to the PC USB port, via externally powered and non-powered USB hubs, and with multiple wall wart chargers. Full results of the tests are included in the post linked above.

[via Dangerous Prototypes]

20 Android Tablets Form An Interactive Photo Collage

You might not have a small army of unused tablets lying around, but if you did, you should try turning them into what Minn calls a “Giant Interactive Photo Array Display:” A Giant IPAD. Har har.

[Minn’s] first step was to hit eBay, hoping to find a score of low-priced, broken-yet-easily-repairable tablets. The only ones available (and for cheap), however, were resistive touch screens with narrow viewing angles. After waiting patiently for nearly half a year, [Minn] hit the capacitive touch jackpot: snagging a pile of 10″ and 7″ Android tablets. The frame is custom made to provide a solid surface for mounting and enough depth for the tablets to fit correctly. Rather than form his own brackets to hold each device, [Minn] re-purposed some IKEA cupboard handles, screwing them into the MDF backboard and clamping the tablets to them with bolts that press against the case. An adhesive rubber bumper stuck to the top of the bolts prevents any damage.

Providing power to the diverse collection required another custom solution; two 5V 10A supplies and one 9V 16A supply fit into an accompany box safely deliver the needed juice. [Minn] chose an app that will grab photos from cloud storage so he can update the collection without having to dig around inside the frame. See the result in a video below! Want to try this project but only have one tablet to spare? The in-wall tablet mount might help.

Continue reading “20 Android Tablets Form An Interactive Photo Collage”