Fail Of The Week: CAN-Bus Attached HUD For Ford Mustang

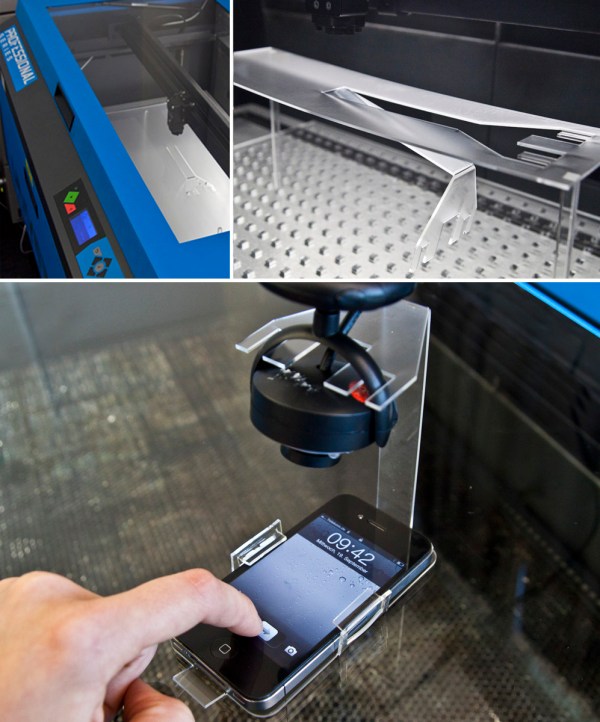
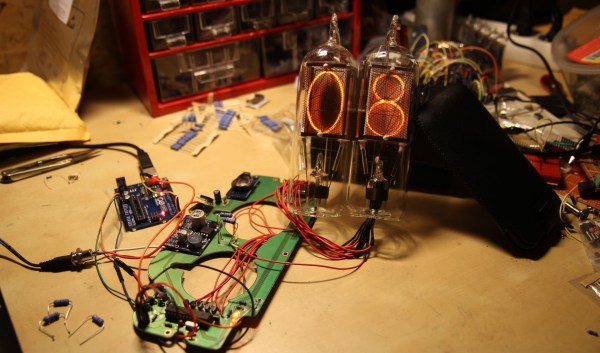
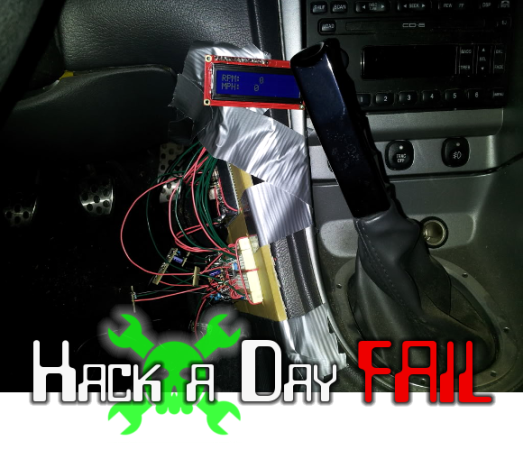
This edition of Fail of the Week is nothing short of remarkable, and your help could really get the failed project back on track. [Snipor Bob] wanted to replace all of the dashboard readouts on his Mustang and got the idea of making the hacked hardware into a Heads-Up Display. What you see above is simply the early hardware proof of concept for tapping into the vehicle’s data system. But there’s also an interesting test rig for getting the windshield glass working as a reflector for the readout.

Continue reading “Fail Of The Week: CAN-Bus Attached HUD For Ford Mustang”

InFORM: MIT’s Morphing Table

Have you ever wished your dinner table could pass the salt? Advancements at MIT may soon make this a reality — although it might spill the salt everywhere. Enter the inFORM: Dynamic Physical Affordances and Constraints through Shape and Object Actuation.

While the MIT paper doesn’t go into much detail of the hardware itself, there are a few juicy tidbits that explain how it works. There are 900 individually actuated white polystyrene pins that make up the surface, in an array of 30 x 30 pixels. An overhead projector provides visual guidance of the system. Each pin can actuate 100mm, exerting a force of up to 1.08 Newtons each. To achieve the actuation, push-pull rods are utilized to maximize the dense pin arrangement as seen, making the display independent of the size of the actuators. The actuation is achieved by motorized slide potentiometers grouped in sets of 6 using custom PCBs that are driven by ATMega2560s — this allows for an excellent method of PID feedback right off the actuators themselves. There is an excellent image of the entire system on page 8 of the paper that shows both the scale and complexity of the build. Sadly it does not look like something that could be easily built at home, but hey, we’d love for someone to prove us wrong!

Stick around after the break to see this fascinating piece of technology in action. The video has been posted by a random Russian YouTube account, and we couldn’t find the original source for it — so if you can, let us know in the comments!

Continue reading “InFORM: MIT’s Morphing Table”

Laser Origami!

One of our tipsters just sent us a link to some fascinating videos on a new style of rapid prototyping — Laser Origami!

The concept is fairly simple, but beautifully executed in the included videos. A regular laser cutter is used to cut outlines of objects in clear lexan, then, by unfocusing the laser it slowly melts the bend lines, causing the lexan to fold and then solidify into a solid joint. It becomes even more interesting when they add in a servo motor to rotate the workpiece, allowing for bends of angles other than 90 degrees!

Depending on the part you are designing, this method of rapid prototyping far exceeds the speeds of a traditional 3D printer. The part shown in the included image could be printed in about 4 hours, or using the laser, cut and folded in 4 minutes flat!

Stick around after the break to see this awesome demonstration of the technology!

Continue reading “Laser Origami!”

Homemade Nixie Tubes

Do you love Nixie Tubes? Upset that they aren’t really manufactured anymore, and the cost of old ones is rising? Why not make your own? That’s exactly what [Dalibor] of the Czech Republic is up to, including blowing the glass tubes himself!

He’s chosen the Z568 nixie tubes to copy, as they are his favorite style of nixie. To create the display he has etched the digits and housing out of 0.3mm stainless steel sheet — which potentially means if he gets the hang of making the tubes, he could actually produce them to sell! To perform the glass blowing, he scored a Heathway glassblowing lathe off eBay — but unfortunately he hasn’t documented much of anything on making the glass tubes, which is too bad because we think that would be equally fascinating as the nixie displays themselves. On his first attempt with a properly sealed tube, the nixie worked and he even recorded striking voltage values very similar to industry tubes — not bad for something made in a backyard shed!

He has since then continued refining this art and is entering a glass-art contest called “When Prague Meets Shanghai” with a beautiful entry dubbed the ShanghaiTime Nixie Clock.

If this post seems vaguely familiar, it’s because this isn’t the first time we’ve posted an article about homemade nixie tubes, but we think [Dalibor’s] is by far the most elegant! Stick around after the break to see one of his first test videos — You might even think he’s cheating, the tubes look so professional!

Continue reading “Homemade Nixie Tubes”

Guitar Amp Turned Tool Cabinet

amp cabinet

While HANDMADE.hackaday was a rather ephemeral experiment, we still come across some mighty fine examples of handmade projects that we think deserve to grace the pages of Hack a Day. As is the case with this beautifully repurposed guitar amp turned tool cabinet.

After gutting the original amp, [Max] set to bending some 22ga steel plate into drawers. He enjoys using that particular gauge because its fairly easy to cut and bend, while still being rigid enough for most applications. Once content with the bending jobs, he attached ball bearing roller slides to the sides and installed the drawers. Making use of the original amp face for the top drawer he cleaned up all the edges and gave it some new paint — it’s a beautifully crafted example of what you can do with a bit of sweat and elbow grease!

And for the audiophiles, don’t worry — the amp wasn’t functional before it was cannibalized for its casing.

[Via Reddit]

Plotterbot Hangs On Your Wall To Work

illuminatedposter

Looking for a fun and easy to do project to begin your foray into the fun-filled world of Arduinos? How about your very own drawing robot, aptly named, the Plotterbot!

We first heard word of this project when [Jay] submitted a giant plotted version of the Hack A Day logo for our Trinket contest, and we liked the Plotterbot so much we had to give it a featured article!

It’s a very simple design that uses an Arduino, 2 stepper motors, a servo motor (for pen lifting), some fishing line and various odds and ends you can probably find around the house. Realistically it will cost around $100 to build, but if you can salvage some parts from an old printer or scanner, even less!

[Jay] is currently releasing a series of detailed posts on his blog explaining the process of building one, but if you’re excited to start right away, you can always check out his FAQ for more juicy details.

Augmented Reality Breadboarding

[Scott] sent in this tantalizing view of the what could be the future of bread boarding. His day job is at EquipCodes, where he’s working on augmented reality systems for the industrial sector. Most of EquipCodes augmented reality demos involve large electric motors and power transmission systems. When someone suggested a breadboard demo, [Scott] was able to create a simple 555 led blinker circuit as a proof of concept. The results are stunning. An AR glyph tells the software what circuit it is currently viewing. The software then shows a layout of the circuit. Each component can be selected to bring up further information.

The system also acts as a tutor for first time circuit builders – showing  them where each component and wire should go. We couldn’t help but think of our old Radio Shack 150 in 1 circuit kit while watching [Scott] assemble the 555 blinker. A breadboard would be a lot more fun than all those old springs! The “virtual” layout can even be overlayed on real one. Any misplaced components would show up before power is turned on (and the magic smoke escapes).

Now we realize this is just a technology demonstrator. Any circuit to be built would have to exist in the software’s database. Simple editing software like Fritzing could be helpful in this case. We’re also not sure how easy it would be working with a tablet between you and your circuit. A pair of CastAR glasses would definitely come in handy here. Even so, we’re excited by this video and hope that some of this augmented reality technology makes its way into our hands.

Continue reading “Augmented Reality Breadboarding”