Guitar Amp Turned Tool Cabinet

amp cabinet

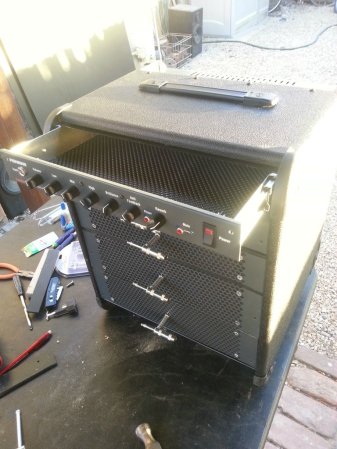
While HANDMADE.hackaday was a rather ephemeral experiment, we still come across some mighty fine examples of handmade projects that we think deserve to grace the pages of Hack a Day. As is the case with this beautifully repurposed guitar amp turned tool cabinet.

After gutting the original amp, [Max] set to bending some 22ga steel plate into drawers. He enjoys using that particular gauge because its fairly easy to cut and bend, while still being rigid enough for most applications. Once content with the bending jobs, he attached ball bearing roller slides to the sides and installed the drawers. Making use of the original amp face for the top drawer he cleaned up all the edges and gave it some new paint — it’s a beautifully crafted example of what you can do with a bit of sweat and elbow grease!

And for the audiophiles, don’t worry — the amp wasn’t functional before it was cannibalized for its casing.

[Via Reddit]

Plotterbot Hangs On Your Wall To Work

illuminatedposter

Looking for a fun and easy to do project to begin your foray into the fun-filled world of Arduinos? How about your very own drawing robot, aptly named, the Plotterbot!

We first heard word of this project when [Jay] submitted a giant plotted version of the Hack A Day logo for our Trinket contest, and we liked the Plotterbot so much we had to give it a featured article!

It’s a very simple design that uses an Arduino, 2 stepper motors, a servo motor (for pen lifting), some fishing line and various odds and ends you can probably find around the house. Realistically it will cost around $100 to build, but if you can salvage some parts from an old printer or scanner, even less!

[Jay] is currently releasing a series of detailed posts on his blog explaining the process of building one, but if you’re excited to start right away, you can always check out his FAQ for more juicy details.

Augmented Reality Breadboarding

[Scott] sent in this tantalizing view of the what could be the future of bread boarding. His day job is at EquipCodes, where he’s working on augmented reality systems for the industrial sector. Most of EquipCodes augmented reality demos involve large electric motors and power transmission systems. When someone suggested a breadboard demo, [Scott] was able to create a simple 555 led blinker circuit as a proof of concept. The results are stunning. An AR glyph tells the software what circuit it is currently viewing. The software then shows a layout of the circuit. Each component can be selected to bring up further information.

The system also acts as a tutor for first time circuit builders – showing  them where each component and wire should go. We couldn’t help but think of our old Radio Shack 150 in 1 circuit kit while watching [Scott] assemble the 555 blinker. A breadboard would be a lot more fun than all those old springs! The “virtual” layout can even be overlayed on real one. Any misplaced components would show up before power is turned on (and the magic smoke escapes).

Now we realize this is just a technology demonstrator. Any circuit to be built would have to exist in the software’s database. Simple editing software like Fritzing could be helpful in this case. We’re also not sure how easy it would be working with a tablet between you and your circuit. A pair of CastAR glasses would definitely come in handy here. Even so, we’re excited by this video and hope that some of this augmented reality technology makes its way into our hands.

Continue reading “Augmented Reality Breadboarding”

Classic 80’s Stereo Receiver Enjoys A Second Life As RadioduinoWRT

radio2
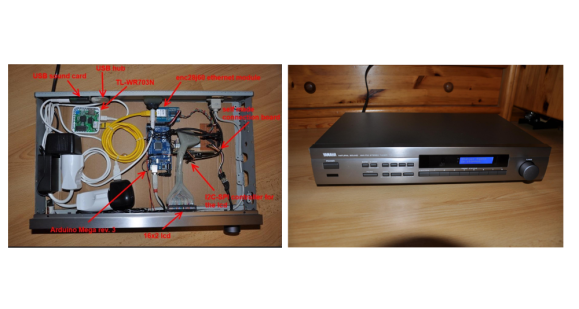
[Raffael] had an old Broken Yamaha natural sound receiver lying around. Rather than throw it out, he built himself a slick web radio. He calls it RadioduinoWRT. [Raffael] started by removing all the internals – though he kept the front panel controls.  He then added an Arduino Mega to handle the front panel controls, including a 16×2 character LCD module. The Arduino also takes commands via IR remote. An enc28j60 Ethernet module allows the Arduino to communicate with a the brains of the operation, a TL-WR703N mini router.

A micro USB hub expands the single USB port on the WR703, allowing both a USB sound card and a 4 gig USB stick to be mounted. We’d like to add that the TL-WR703 is a must in this application – the amazon link [Rafael] provides brings up the TL-WR702 as a top link. Only the TL-WR703 has a USB host connection.

The real magic is in [Raffael’s] software setup. The WR703 is running OpenWRT.  He added modules for the USB sound card, as well as expanding the file system onto the USB stick. Once that was complete [Raffael] added Music Player Daemon (MPD) and MPC, a console app to drive MPD. Lighttpd, a light web server provides an interface for the Arduino as well as a web front end to the entire radio.All this allows [Raffael] to control his radio in several ways. He can log in via any web browser on his network. He can use the front panel controls. He can use an IR remote. Since he is running MPD, any client (there are literally hundreds out there) will also drive the radio.

While a low-end USB sound card in a home stereo application does make our inner audiophile cringe a bit, the quality does seem to be pretty good. [Rafael’s] design would make it simple to swap out a higher quality USB sound card if the need arises.

Continue reading “Classic 80’s Stereo Receiver Enjoys A Second Life As RadioduinoWRT”

A Cortex M4 Based Platform With ETH, USB, BT And Many On-board Peripherals

Here is a very time consuming project that I worked on during last summer: an ARM Cortex M4 based platform with plenty of communication interfaces and on-board peripherals. The particular project for which this board has been developed is not really HaD material (one of my father’s funny ideas) so I’ll only describe the platform itself. The microcontroller used in the project is the ATSAM4E16C from Atmel, which has 1Mbyte of flash and 128Kbytes of SRAM. It integrates an Ethernet MAC, a USB 2.0 Full-speed controller, a sophisticated Analog to Digital Converter and a Digital to Analog Converter (among others).

Here is a list of the different components present on the board so you can get a better idea of what the platform can do: a microphone with its amplifier, a capacitive touch sensor, two unipolar stepper motors controllers, two mosfets, a microSD card connector, a Bluetooth to serial bridge, a linear motor controller and finally a battery retainer for backup power. You can have a look at a simple demonstration video I made, embedded after the break. The firmware was made in C and uses the Atmel Software Framework. The project is obviously open hardware (Kicad) and open software.

Continue reading “A Cortex M4 Based Platform With ETH, USB, BT And Many On-board Peripherals”

The Raspberry Pi Becomes A Form Factor

Despite the cries for updated hardware, the Raspberry Pi foundation has been playing it cool. They’re committed to getting the most out of their engineering investment, and the current board design for the Raspi doesn’t support more than 512Mb of memory, anyway.

What you see above isn’t a Raspberry Pi, though. It’s the Carrier-one from SolidRun. All loaded out, it has a system-on-module with a quad core ARM Cortex-A9, 2GB of RAM, 1000 Mbps Ethernet, USB host ports, eSATA, and LVDS display connector, a real time clock, and everything else you get with a Raspberry Pi, header pins included. It’s all the awesomesauce of the newer ARM boards that will still work with all your Raspberry Pi hardware.

If you’re thinking this is a product announcement, though, think again. The folks at SolidRun are merely using this Raspberry Pi form factor board as a prototyping and development platform for their CuBox-i device, In its lowest configuration, the CuBox-i1 is still no slouch and would be more than able to keep up with the most demanding Raspberry Pi applications.

Still, though, a hugely powerful board with lots of I/O is something we’d all love, and if SolidRun gets enough complaints praise, it seems like they might be willing to release the Carrier-one as an actual product.

Hackerspacing In Europe: Conclusion

Wow! What a trip. In just over one week we travelled nearly 2000 km and visited 13 hackerspaces in 10 different cities in Germany, Belgium and The Netherlands. However that was only the tip of the iceberg — there were dozens more hackerspaces in the area, and we wish we had the time to visit them all! The hospitality of the hackerspaces was amazing. Thank you so much to all the spaces we visited! If you missed some of tours, you can see the them all here.

  1. Chaosdorf (Dusseldorf, Germany)
  2. Garage Lab (Dusseldorf, Germany)
  3. ACKspace (Heerlen, The Netherlands)
  4. HSBXL (Brussels, Belgium)
  5. Whitespace (Gent, Belgium)
  6. Void Warranties (Antwerp, Belgium)
  7. Open Garage (Antwerp, Belgium)
  8. MadSpace (Eindhoven, The Netherlands)
  9. De Ontdekfabriek (Eindhoven, The Netherlands)
  10. Revelation Space (The Hague, The Netherlands)
  11. Technologia Incognita (Amsterdam, The Netherlands)
  12. Hack42 (Arnhem, The Netherlands)
  13. Stratum0 (Brunswick, Germany)

Did you enjoy these tours? Is there anything you’d like to see more of? The style of the tour? Other things to focus on? Let us know in the comments!