Raspberry Pi Emulates An Amiga 500 Floppy Drive

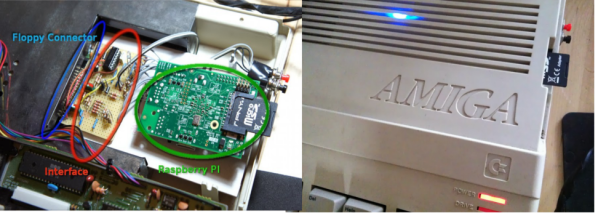
[Maurizio] loves using his Amiga 500. His classic piece of hardware has been serving him well for years, except for the floppy drive, which recently gave out on him. No problem for [Maurizio], he just cracked his case open and added a Raspberry Pi as a real-time floppy emulator. [Maurizio] didn’t want to make any permanent changes to his A500 case, and more importantly he wanted to use the Amiga’s original floppy drive interface. The latter placed some rather stringent timing requirements on his design.

The interface hardware is relatively simple. Most of the circuit is dedicated to level shifting from the 5v Amiga 500 to the 3.3V Raspberry Pi. A 74LS06 Hex inverter converts the signals to the open collector outputs the A500 requires. [Maurizio] powered his Raspberry Pi from the floppy power connector of the Amiga. His model A Raspberry Pi works fine, but a model B would pull a bit more power (700ma) than the Amiga floppy power supply is capable of providing (550ma). The user interface side of the equation is simple: Two buttons, one used to switch disks, and one to “Write to SD”. Live disk images are stored in the Raspberry Pi’s ram, so the user needs to hit the “Write to SD” button to store any changes to disk before swapping floppies.

The software is perhaps the most interesting portion of this build. [Maurizio] is emulating a floppy drive in real-time – this means emulating MFM encoding in real time. Calls have to be made with a timing accuracy of 2 microseconds. The Pi’s stock Linux Operating system was just not going to cut it. [Maurizio] coded his drive emulator “bare metal”, directly accessing the Arm Processor on the Raspberry Pi. This gave him access to the entire processor, and allowed him to meet the hard timing requirements of the floppy interface.

Continue reading “Raspberry Pi Emulates An Amiga 500 Floppy Drive”

Retrotechtacular: WWII Paraset Spy Radio Used By French Resistance


[Robert Sumption] a.k.a [W9RAS] takes on the daunting challenge of building a WWII spy radio called the Paraset as the topic of this week’s Retrotechtacular. It was originally a tube based CW (Morse code) transmitter/receiver used by the French underground to communicate with the Allies. Many of these radios were dropped behind enemy lines and could run on European AC or 6 V DC with the added advantage of being able to use most anything for an antenna, including fence wire. These small, low power and highly mobile radios tuned in the 3 to 8 MHz range were instrumental in the resistance. But they still make for a really fun scratch-built radio project.

Continue reading “Retrotechtacular: WWII Paraset Spy Radio Used By French Resistance”

Quadcopters Go Inverted By Reversing Their Motors

Inverted Quadcopter? That generally means a crash is soon to follow. Not so for a new crop of quadcopter fliers. These new quadcopters are capable of sustained inverted flight. We’ve seen inverted quadcopters before here on hackaday. However, previous inverted quadcopters always used collective pitch to control the thrust produced by the blades. Collective pitch on a quadcopter is much simpler than it is on the main rotor of a traditional helicopter. R/C and full-scale helicopters mix collective and cyclic pitch to articulate the main rotor blades. A quadcopter only needs the collective portion, which is similar to a traditional helicopters tail rotor mechanism, or a variable pitch prop on an airplane.

These new quadcopters are using a much simpler method of flying inverted: Spin the motors backwards. Quadcopters control their flight by quickly varying the speed of rotation of each motor. Why not completely reverse the motor then? Today’s brushless outrunner motors have more than enough power to quickly reverse direction. The problem becomes one of propellers. Standard propellers are designed to create thrust in one direction only. Every quadcopter uses two clockwise rotation and two counterclockwise rotation propellers. Propellers will generate reverse thrust if they are spun backwards, however they will not be as efficient as they would when spinning the direction they were designed for. The quad fliers have found a partial solution to this problem: Remove the curve from the blade. R/C propeller blades are sold by diameter and blade pitch. The pitch is a measure of the angle of attack of the blades. R/C blades also have an airfoil style curve molded into them. Removing this curve (but not changing the pitch) has helped the problem.

This final problem is control systems. Since quadcopters already are relying on computer control for basic flight, it’s simply a matter of loading custom firmware onto your flight board to support motor rotation reversal. Speed controls also have to be capable of reverse rotation, which means new firmware as well. We’re curious to see how the quadcopter community settles on the control systems for inverted flight. The R/C helicopter community went through several iterations of control systems over the years. At one point they were using “Invert switches” which reversed controls as well as handled the collective pitch changes. As time went on, these switches fell out of favor and are now known as “Crash switches” due to the result of accidentally hitting one while flying, or before engine start.

Continue reading “Quadcopters Go Inverted By Reversing Their Motors”

Amateur Radio Transmits 1000 Miles On Voice Power

Many of us tried the old “Two tin cans connected by a string” experiment as kids. [Michael Rainey, AA1TJ] never quite forgot it.  Back in 2009, he built “El Silbo”, a ham radio transmitter powered entirely by his voice. El Silbo is a Double Side Band (DSB) transmitter for 75 meters. While voice is used to excite the transmitter, it doesn’t actually transmit voice. El Silbo is a CW affair, so you should bone up on your Morse Code a bit before building one. Like many QRP transmitters El Silbo’s circuit is rather simple. A junk box loudspeaker is installed at the bottom of the can to convert voice power to electrical power. The signal is passed through a step up transformer, and used to excite a 75m crystal. Two NPN transistors (in this case MPS6521) pass the signal on through a second transformer. The signal is then routed through an LC network to the antenna.

Back in 2009, [Michael] brought El Silbo to the Maine coast in an attempt to make a transatlantic contact. This isn’t as far-fetched as it sounds – [Michael] has “crossed the pond” on less power. While the attempt wasn’t successful, [Michael] has made connections as far as 1486km, or 923 miles. That’s quite a distance for simply yelling into a tin can! One of [Michael’s] favorite El Silbo stories is a 109KM conversation (QSO) he had with W1PID. [Michael] found that the signal was so good, he didn’t have to yell at all. He reduced power by dropping to his normal speaking voice for the “dits and dahs”. The two were able to converse for 17 minutes with [Michael] only using his speaking voice for power. We think this is an amazing achievement, and once more proof that you don’t need a multi-thousand dollar shack to make contacts as a ham.

Continue reading “Amateur Radio Transmits 1000 Miles On Voice Power”

Laser Wire Stripping

laser wire stripping

Do you find yourself needing to strip many ribbon cables? Isn’t it frustrating? Well, if you happen to own a laser engraver, this cool guide one of our tipsters sent us might just be up your alley.

The typical way to strip these is one by one, with a lot of swearing. Or, if you do it often, you might actually have the proper tool to strip them in one go. There is actually a third solution, and as it turns out, it’s one of the commercial ways it is done for accuracy, and it’s quite impressive. Here’s an entire imgur gallery of what some of the fancy stripping lasers are capable of — we particularly like number 3.

Anyway, if you do happen to have a laser cutter, it’s as simple as engraving a few lines, and setting up a jig to hold your ribbon. Take a pass on each side, and pull it off! There’s a video after the break, but it’s pretty self-explanatory. We can see this being super handy if you happen to be mass producing anything that requires ribbon cables!

Continue reading “Laser Wire Stripping”

How Hacker News Page Rankings Really Work

Page rankings are the secret sauce of websites that automatically aggregate user submissions. The basic formula used by Hacker News was published a few years back. But there are several pieces of the puzzle that are missing from that specification. [Ken Shirriff] recently published an analysis that digs deeper to expose the article penalization system used by Hacker News’ ranking engine.

One might assume that the user up and down votes are what determine a page’s lifespan on the front page. But it turns out that a complex penalization system makes a huge difference. It takes into account keywords, and domain names but also weighs controversy. It’s a bit amusing to note that this article on the topic was itself penalized, knocking it off of the front page.

You can get the full details of the system from his post, but we found his investigation methods to be equally interesting. He scraped two pages of the news feed every minute using Python and the Beautiful Soup package (a pretty common scraping practice). This data set allowed him to compare the known algorithm with actual results. What was left were a set of anomalies that contained enough sense for him to reverse engineer the unpublished formulas being used.

The Making Of The WaterColorBot

water color bot

Remember the WaterColorBot? Ever wonder what goes into manufacturing a kit like it? Well the folks over at Evil Mad Scientist just spilled the beans.

It’s a great insight on how these kits are typically made in a manufacturing environment, especially if you happen to be the founders of a rather successful Kickstarter project like the WaterColorBot by [SuperAwesomeSylvia]. The article goes into great detail on minimizing material waste during CNC routing, mass producing laser engravings using a jig, hardware assembly, and finicky assembly of some of the more complex components. Not to mention boxing, storing, and packaging the finished products!

We’re happy to hear the WaterColorBot is officially shipping now, and available for purchase — Seems like they were only off by a month or so for their kickstarter delivery goals. Remember our recent post about one of these WaterColorBots out in the wild? One was used to create art using inputs from driving a real car!