A hot glue gun with a revolving stick holder on the back

Quick Reload For Your Glue Sticks: The Glue Gun Six Shooter

They say that the two essential items in any toolbox are WD-40 and duct tape: one thing to make stuff move and another thing to stop stuff from moving. Many hackers would argue that the third essential tool should be hot glue — it stops stuff from moving, but still allows you to move it later if you decide that’s better after all. It also works on loads of stuff ranging from macaroni to microcontrollers. And let’s be honest: who hasn’t done the “pew pew” thing with their glue gun?

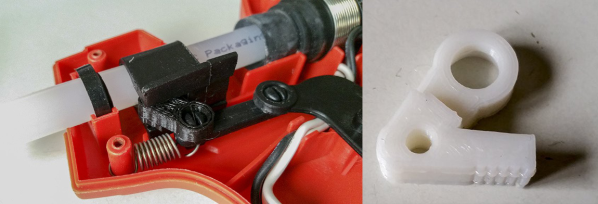
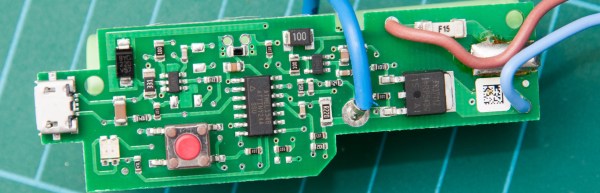
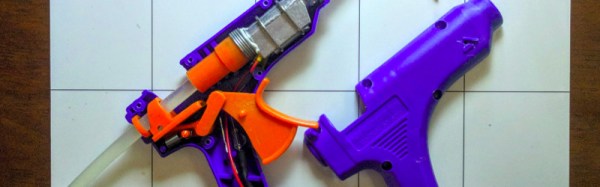
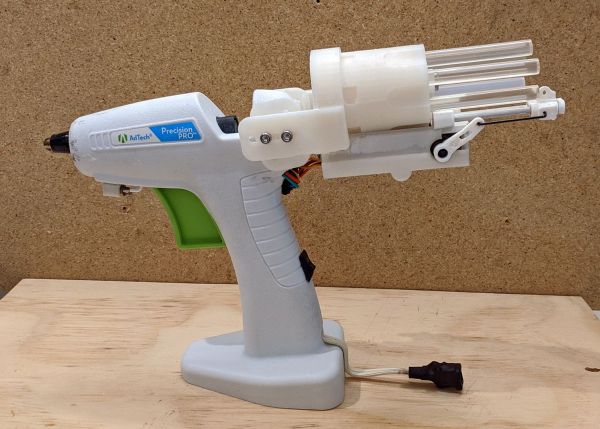
[Vije Miller] decided to give his hot glue dispenser a bit of a western vibe and built himself a Glue Gun Six Shooter. Like an Old West revolver, it has a rotating cylinder with six rounds of ammunition that lets you continue gluing right away even if your glue stick runs out in the middle of a job. A tiny switch on the side of the barrel starts the reloading sequence: one servo rotates the cylinder, then another one chambers a round. Both are controlled by an Arduino Nano, which is powered by a 5 V USB power supply hidden in the grip.

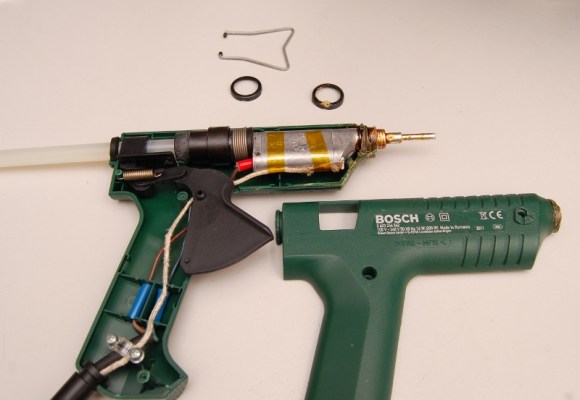
A red laser below the barrel gives the user a better aim, as well as a bit more “pew pew” ability. The rest of the gun is pretty standard, similar to what we’ve seen before in a teardown. If you’re looking for something more high-tech, check out [Ben Heck]’s ultimate glue gun.

Continue reading “Quick Reload For Your Glue Sticks: The Glue Gun Six Shooter”

3D Printering: Printing Sticks For A PLA Hot Glue Gun

When is a hot glue stick not a hot glue stick? When it’s PLA, of course! A glue gun that dispenses molten PLA instead of hot glue turned out to be a handy tool for joining 3D-printed objects together, once I had figured out how to print my own “glue” sticks out of PLA. The result is a bit like a plus-sized 3D-printing pen, but much simpler and capable of much heavier extrusion. But it wasn’t quite as simple as shoving scrap PLA into a hot glue gun and mashing the trigger; a few glitches needed to be ironed out.

Why Use a Glue Gun for PLA?

Some solutions come from no more than looking at two dissimilar things while in the right mindset, and realizing they can be mashed together. In this case I had recently segmented a large, hollow, 3D model into smaller 3D-printer-sized pieces and printed them all out, but found myself with a problem. I now had a large number of curved, thin-walled pieces that needed to be connected flush with one another. These were essentially butt joints on all sides — the weakest kind of joint — offering very little surface for gluing. On top of it all, the curved surfaces meant clamping was impractical, and any movement of the pieces while gluing would result in other pieces not lining up.

An advantage was that only the outside of my hollow model was a presentation surface; the inside could be ugly. A hot glue gun is worth considering for a job like this. The idea would be to hold two pieces with the presentation sides lined up properly with each other, then anchor the seams together by applying melted glue on the inside (non-presentation) side of the joint. Let the hot glue cool and harden, and repeat. It’s a workable process, but I felt that hot glue just wasn’t the right thing to use in this case. Hot glue can be slow to cool completely, and will always have a bit of flexibility to it. I wanted to work fast, and I wanted the joints to be hard and stiff. What I really wanted was melted PLA instead of glue, but I had no way to do it. Friction welding the 3D-printed pieces was a possibility but I doubted how maneuverable my rotary tool would be in awkward orientations. I was considering ordering a 3D-printing pen to use as a small PLA spot welder when I laid eyes on my cheap desktop glue gun.

Continue reading “3D Printering: Printing Sticks For A PLA Hot Glue Gun”

Repairs You Can Print: Broken Glue Gun Triggers Replacement

Picture this: you need to buy a simple tool like a glue gun. There’s usually not a whole lot going on in that particular piece of technology, so you base your decision on the power rating and whether it looks like it will last. And it does last, at least for a few years—just long enough to grow attached to it and get upset when it breaks. Sound familiar?

[pixelk] bought a glue gun a few years ago for its power rating and its claims of strength. Lo and behold, the trigger mechanism has proven to be weak around the screws. The part that pushes the glue stick into the hot end snapped in two.

It didn’t take much to create a replacement. [pixelk] got most of the measurements with calipers and then got to work in OpenSCAD. After printing a few iterations, it fit well enough, but [pixelk] saw a chance to improve on the original design and added a few teeth where the part touches the glue stick. The new part has been going strong for three months.

We think this entry into our Repairs You Can Print contest is a perfect example of the everyday utility of 3D printers. Small reproducible plastic parts are all around us, just waiting to fail. The ability to not only replace them but to improve on them is one of the brightest sides of our increasingly disposable culture.

Still haven’t found a glue gun you can stick to? Try building your own.

Glue Gun Teardown Reveals Microcontroller Mystery

[electrobob] got a Bosch GluePen cordless hot glue gun. The thing has some nice features — it heats up in fifteen seconds, and charges via USB, and is generally handy for those small and quick jobs that hot glue guns were made to perform. At first glance it seems like a huge improvement over the plug-in varieties, which seem to take forever to heat up when all you need is a quick dab of glue.

As cool as the product sounded, [bob] did what any right-minded hacker would do and opened it up to see how that sucker work and found an ATtiny24A inside. What’s most interesting is that there appears to be no temperature regulation or sensing capability, with the exception of the thermistor in the battery-charging circuit. It’s an intriguing mystery.

The ATtiny controls a power MOSFET that brings the heating element to “approximately 170 degrees” according to the manual. [bob] could find no temperature regulation of the hot end, which measures a steady 12 V at the gate of the transistor then entire time the glue gun is powered on.

That ATtiny24A that runs the whole thing packs 12 GPIO pins, 4 PWM channels, and 2 KB program memory. It appears a bit overpowered for a glue gun controller. [bob] found one of the Tiny’s pins connected the heating element and another to the charging circuit. Maybe a shutoff in case the battery catches fire?

Without a clear shot of the back of the board, it’s a bit of a guessing game, but eight of the twelve GPIO pins appear to be in use. Leave your theories in comments. And if you’ve got any bright ideas about what to do with the remaining four GPIO pins, have at it!

For another of [bob]’s tool hacks, check out his constant current sink we posted earlier this year.

Teardown Of A Cheap Glue Gun

A hot glue gun is one of those standard tools of the hardware hacker’s bench, called upon to provide adhesion between an astonishing range of materials, and to provide a handy filler and strain relief in the form of blobs of polymer glue. We’ve all got one, but how many of us have taken a look inside it?

[Andrew Lorimer] bought a super-cheap eBay glue gun, and subjected it to a teardown. As you might expect, he found it to be a pretty simple device with only a trigger mechanism and a dumb heating element, but his write-up is of passing interest because he’s characterised its heating element. It has a positive temperature coefficient, which means that its resistance increases from around 2.5 kΩ at room temperature to about 7 kΩ at its 150 ºC operating temperature. This limits the current, and provides a very simple thermostat action.

The build quality is surprisingly good for such a cheap appliance, and he notes a surfeit of screws holding its shell together. But the quality of the insulation and strain relief leaves a lot to be desired, and he wonders whether it truly qualifies for its double-insulated logo. The LED pilot light is simply fed from the 240 V mains supply through a 250 kΩ resistor which he replaces with a 12 kΩ component for a brighter result.

We cover plenty of teardowns here at Hackaday. Often they are of extremely expensive and complex devices, but sometimes they are of much simpler subjects.

PID Controlled Glue Gun

Internals of a glue gun controlled with a PID controller

Hot glue falls into the same category of duct tape and zip ties as a versatile material for fixing anything that needs to be stuck together. [Ed]’s Bosch glue gun served him well, but after a couple of years the temperature regulation stopped working. Rather than buying a new one, he decided to rip it apart.

With the old temperature regulation circuit cooked, [Ed] looked around for something better on eBay. He came across a cheap PID temperature controller, and the Frankengluegun was born.

A thermocouple, affixed with some kapton tape and thermal paste, was used to measure the temperature of the barrel. Power for the glue gun was routed through the PID controller, which uses PWM to accurately controller the temperature. All the wiring could even be routed through the original cord grips for a clean build.

Quality glue guns with accurate temperature control are quite pricey. This solution can be added on to a glue gun for less than $30, and the final product looks just as good.

[Ben Heck] Builds The Ultimate Glue Gun

glue

For how many can be found on the workbenches and in the toolboxes of makers and hackers the world over, finding a glue gun that does more than just heat up and drip glue everywhere can be a challenge. [Ben Heck] finally solved this problem with a hot glue gun that’s more like an extruder from a 3D printer than a piece of junk you can pick up at Walmart for a few dollars.

By far, the most difficult part of this project was the glue stick extruder. For this, [Ben] used a DC motor with a two-stage planetary gear system. This drives a homemade hobbed bolt, just like the extruder in 99% of 3D printers. The glue stick is wedged up against the hobbed bolt with a few 3D printed parts and a spring making for a very compact glue stick extruder.

The electronics are a small AVR board [Ben] made for a previous episode, a thermistor attached to the hot end of the glue gun, a solid state relay for the heater, and analog controls for speed and temperature settings. After finishing the mechanics and electronics, [Ben] took everything apart and put it back together in a glue gun-shaped object.

The finished product is actually pretty nice. It lays down constistant beads of hot glue and thanks to a little bit of motor retraction won’t drip.

You can check out both parts of [Ben]’s build below.

Continue reading “[Ben Heck] Builds The Ultimate Glue Gun”