Putting An Arcade Cabinet Inside Of An NES Controller

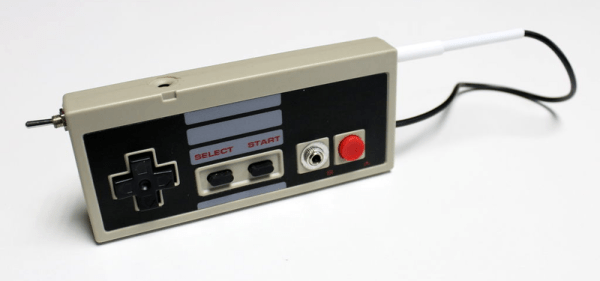
The arcade game shoehorned into an original Nintendo Entertainment System controller from [Taylor Burley] is certainly made slightly easier by its starting with one of those miniature cabinets that are all the rage now, but since he’s still achieved the feat of an entire arcade game in a controller we still stand by the assessment in our title.

In fact, he’s put not one but four arcade games into the controller. The board that [Taylor] liberated from the miniature game system can actually be switched between the onboard games by shorting out different pads on the PCB. Normally this would be done during manufacture with a zero-ohm resistor, but in this case, he’s wired the pads out to a strip of membrane keypad liberated from an LED remote control. By holding a different button while powering on the system, the user can select which of the games they want to boot into.

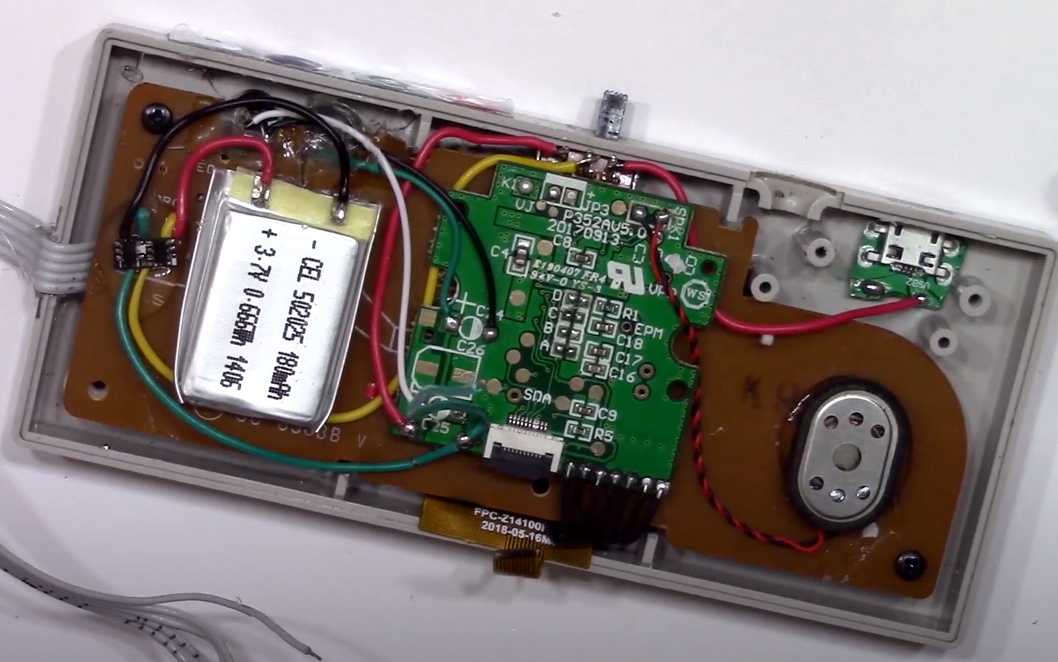
The original buttons and directional pad have been preserved, and in the video after the break, [Taylor] shows how he wires them into the arcade PCB. The Start and Select buttons had to go since that’s where the tiny color LCD goes now, but they wouldn’t have been used in any of these games anyway. With the addition of a small battery pack and charge controller, this build is a clever way to take several classic arcade titles with you on the go.

With the growing popularity of these tiny arcade cabinets, we’ve seen a number of hackers tearing into them. The work that [wrongbaud] has done in modifying them to run other ROMs is not to be missed if you’re looking at building a project using one of these little bundles of nostalgia.

Continue reading “Putting An Arcade Cabinet Inside Of An NES Controller”

NES Controller Slider-Based Light Theremin

Having never use a 555 before, [lonesoulsurfer] decided that his first foray into the world’s most popular and versatile IC would be to use a 555 to make beautiful chiptunes. For that, we commend him. He found [Dean Segovis]’ Slidersynth light-based Theremin and got to work building his own version it and stuffing it into a (knockoff!) NES controller.

For the uninitiated, a Theremin is a touch-less synthesizer that uses human capacitance and a pair of antennae to control oscillation and amplitude. In a light-based Theremin such as this one, the oscillation is controlled by the intensity of photons from a white LED and their interaction with a light-dependent resistor, also known as a photocell or ‘squiggly resistor’.

The oscillations themselves are created by wiring up the 555 as an astable oscillator, and the pitch is controlled with a potentiometer mounted on the back. It has a small built-in speaker, but [lonesoulsurfer] replaced the B button with a 3.5 mm audio jack so he can plug it into a powered speaker and really rock out. We’ve got his demo tape queued up after the break.

We love pocket instruments around here. If you prefer brass and woodwinds, this pocket woodwind MIDI controller just might draw your lips into an O.

Continue reading “NES Controller Slider-Based Light Theremin”

Giant Solderless LEGO NES Controller Gives Everyone Tiny Hands

If you were thinking “I should spend $130 on LEGO bricks and build a giant USB NES controller just to see what that would be like,” but you were afraid of spending that much money, [BrownDogGadgets] has you covered. He built a giant NES controller out of LEGO. The controller is designed in LEGO Digital Designer, which lets you create a virtual model, then get a full list of parts which can be ordered online.

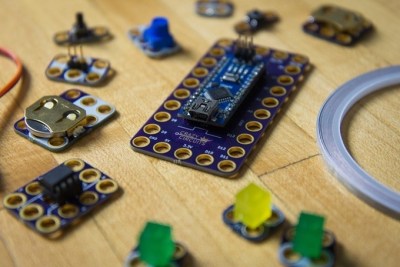
The electronics are based on a Teensy LC programmed to appear as a USB keyboard, and the buttons are standard push buttons. The insides are wired together with nylon conductive tape. LEGO was an appropriate choice because the Teensy and switches are built on top of LEGO compatible PCBs, so components are just snapped in place. The system is called Crazy Circuits and is a pretty neat way to turn electronics into a universal and reusable system.

If that controller is too big, they’ve also used the same circuit with some laser cut parts for your own controller. If you do want to go even bigger, take a look at [Baron von Brunk’s] LEGO NES controller, which used the electronics from a real controller.

Continue reading “Giant Solderless LEGO NES Controller Gives Everyone Tiny Hands”

Craft Bead NES Controller

NES Controller Made Out Of Fused Craft Beads

Close your eyes and think back, far back when you were a wee kid. Remember those colored beads that a child would populate on a small plastic peg board, arranged in some sort of artsy pattern, then ironed to fuse the beads together into a crafty trinket? They were fun for kids but what good are they to us adults nowadays? Well, [Lalya] has shown that they can be used to make a unique and interesting NES Controller.

First, the controller’s front panel was laid out on the pegboard, remembering to lay it out in reverse so the melted side of the beads was facing into the controller. Holes were left in the top panel for the D-pad and B/A buttons. The sides, back and bottom panels of the controller were made the same way. Hot glue holds the case panels together.

Craft Bead NES Controller

Inside the case is an Arduino and breadboard with three through-hole momentary buttons. These are wired up to the Arduino inputs and a sketch emulates keystrokes when connected to a computer. Unfortunately, the D-pad’s functionality is just a button right now. [Lalya] uses the project to control iTunes.  Maybe the next revision will be more video game friendly.

Having your own NES controller recreation might not be high on your list. But you have to admit that this s a pretty simple and inexpensive way to make custom enclosures.

LEGO NES Controller

Large NES Controller Made From LEGOs

If LEGO are cool, and abnormally large NES controllers are cool, then what [Baron von Brunk] has created is pretty dang cool. It’s a super large functional NES game controller…. made out of LEGO! Yes, your favorite building blocks from the past (or present) can now be use to make an unnecessarily large game controller.

lego-nes-internals
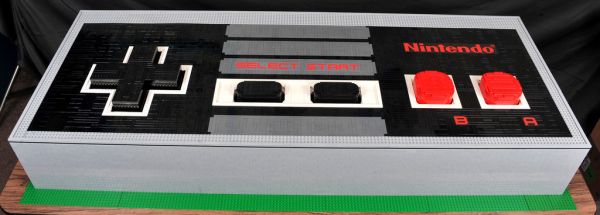
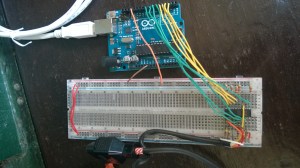
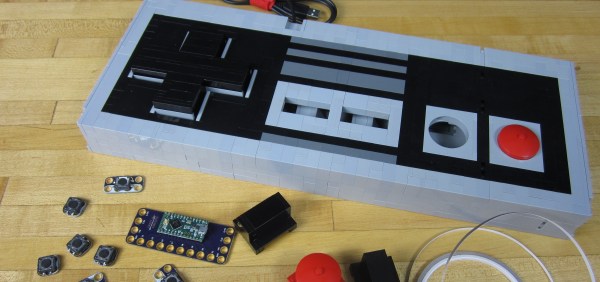
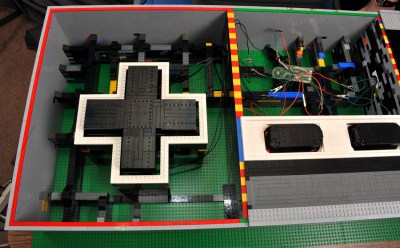
The four main sides of the controller case are standard stacked grey LEGO bricks. The inside of the case is mostly hollow, only with some supporting structures for the walls and buttons. The top is made from 4 individual LEGO panels that can be quickly and easily removed to access the interior components. The large LEGO buttons slide up and down inside a frame and are supported in the ‘up’ position care of some shock absorbers from a Technic Lego set. The shocks create a spring-loaded button that, when pressed down, makes contact with a momentary switch from Radio Shack. Each momentary switch is wired to a stock NES controller buried inside the large replica. The stock controller cord is then connected to an NES-to-USB adapter so the final product works with an NES Emulator on a PC.

[Baron von Brunk] is no stranger to Hackaday or other LEGO projects, check out this lamp shade and traffic light.

Continue reading “Large NES Controller Made From LEGOs”

Kinect4NES

Using Kinect To Play Super Mario Bros 3 On NES Ensures Quick Death

Why do only the new game consoles get all the cool peripherals? Being a man of action, [Paul] set out to change that. He had a Kinect V2 and an original Nintendo and thought it would be fun to get the two to work together.

Thinking it would be easiest to emulate a standard controller, [Paul] surfed the ‘net a bit until he found an excellent article that explained how the NES controller works. It turns out that besides the buttons, there’s only one shift register chip and some pull up resistors in the controller. Instead of soldering leads to a cannibalized NES controller, he decided to stick another shift register and some resistors down on a breadboard with a controller cable connected directly to the chip.

Kinect4NES wiring

An Arduino is used to emulate the buttons presses. The Arduino is running the Firmata sketch that allows toggling of the Arduino pins from a host computer. That host computer runs an application that [Paul] wrote himself using the Kinect V2 SDK that converts the gestures of the player into controller commands which then tells the Arduino which buttons to ‘push’. This is definitely a pretty interesting and involved project, even if the video does make it look very challenging to rescue Princess Toadstool from Bowser and the Koopalings!

If you’d like to help the project or just build one for yourself, check out the source files on the Kinect4NES GitHub page.

Continue reading “Using Kinect To Play Super Mario Bros 3 On NES Ensures Quick Death”

Tetris Duel With The Raspberry Pi

Tetris Duel

Building a multiplayer network game with multiple Raspberry Pis can be very difficult. Doing it in assembly is outright insane! This is exactly what a group of first year students at Imperial College London did; they created a network based multiplayer Tetris game for the Raspberry Pi.

[Han], [Piotr], [Michal], and [Utsav] have created this entire game from bare metal assembly, and it only consists of 4000 lines of code! The code is well documented, so be sure to look through their Github repository. This project is a great reference for those looking to learn bare metal assembly and networking. They even chose to use the old NES controllers, a very nice touch. While we have featured what seems like a million different Tetris games in the past, this is the first multiplayer version. See Tetris Duel in action in the video after the break!

This is a shout-out to all of you students out there. Take the time to create quality documentation for your class project, and upload it to the internet. Not only is it a great resume boost, but it could very well end up on Hackaday!

Continue reading “Tetris Duel With The Raspberry Pi”