Snowden Immortalized As Bond Villain In Edge-Lit Acrylic Poster

snowfall_smaller

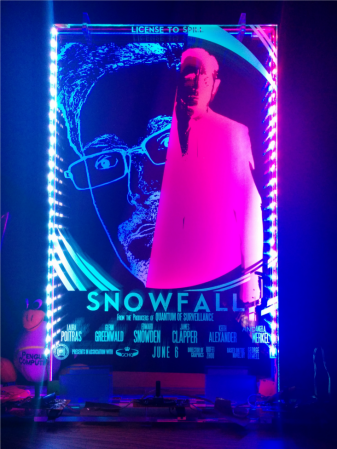
[Wilywyrm] needed to come up with a final project for art class that commented on a social issue. Healthcare, schmealthcare, he said, and busted out this movie poster about the NSA spying scandal instead.

The circuit uses three extended-duty astable 555 timers to control the brightness of the 5050 RGB common-anode LED strips that run up the sides of the 24″ x 12″ x 1/4″ acrylic panels. Each of the three panels was laser-engraved at 600 DPI on an Epilog laser engraver and features a different aspect of the poster. There’s one for Snowden, one for Daniel Craig, and one for the text.

[Wilywyrm] tied the color channels together in the first panel to output white light. He used red for the second panel and blue for the third. A complete list of parts with build notes is available on his Google Drive. [Wilywyrm]’s notes include improvement ideas, like making all the RGB strips color-adjustable with more 555s or a microcontroller and timers.

Perhaps [Wilywyrm] could get into the clear whiteboard business after college.

Cryophone: A Dry Ice-Powered Musical Installation

cryophone

[Dmitry] is a bit of an industrial artist / hacker, and he’s recently finished this interesting and interactive audio exhibit called the Cryophone.

As you know, dry ice is terribly fun. When placed in water, it sublimates from its solid to gaseous phase rapidly, releasing carbon dioxide gas and causing a drastic (and sometimes violent) temperature change. [Dmitry’s] project attempts to amplify the sounds of these reactions and create music(?) using data from sensor inputs in the system. He uses piezo elements, temperature sensors, and an Arduino to generate an algorithmic composition from the various sensors, which a Mac Mini then synthesizes and outputs as audio in 6 channels.

The result is an eerie collection of noises that would do well in a haunted house or a horror movie. Take a listen for yourself after the break, and if you missed it, check out another unique, audio-based art installation: ‘conus.’

Continue reading “Cryophone: A Dry Ice-Powered Musical Installation”

Analog Drum Machine

Drum Machine Schematic

This analog drum machine project synthesizes a kick and snare drum that are clocked to a beat. It pulls together a few analog circuits to do the timing and synthesis.

The beat timing is a product of a hysteretic oscillator used to create a ‘shark wave,’ which is a friendly term for the output of a relaxation oscillator. This waveform can be compared to a set point using a comparator to create a slow square wave that clocks the drum beat.

The kick drum is synthesized using another hysteretic oscillator, but at a higher frequency, creating a triangle-like waveform at 265 Hz that provides a bass sound. The snare, however, uses white noise provided by a BJT’s P-N junction, which is reverse biased and then amplified. You can spot this transistor because its collector is not connected.

The resulting snare and kick drum wave forms are gated by two transistors into the output. Controlling these gates allows the user to create a drum beat. After the break, check out a video walk-through and a demo of the build.

Continue reading “Analog Drum Machine”

Retrotechtacular: Films Used To Be Recorded On Film

retrotechtacular-movie-film-photo-finishing

We’re sure that this title makes some readers itch because there are still a number of well-respected directors who insist on shooting with film rather than digital, but the subject of this week’s Retrotechtacular shows a portion of the movie industry that has surely been relegated to life-support in the past few decades. Photo finishing, once the stronghold of chemical processes used by all to develop their photographs, has become virtually non-existent. This is the story of how film and photo finishing drove cinema for much of its life.

The reels seen above are negative and positive film. The negative film goes in the camera and captures the images. After developing and fixing the negative film, the process is repeated. Light shines through the fixed negative in order to expose a fresh reel of film. That film is finished and fixed to create the reel which can be used in a projector. This simple process is covered near the beginning of the clip found below. The 1940 presentation moves on to discuss the in-depth chemistry techniques used in the process. But you’re really in for a treat starting about half-way through when the old manual methods are shown, which have been replaced by the “modern laboratory”. We love those huge analog dials! The video concludes by showing the true industrialization of the film developing process.

We’re running out of Retrotechtacular topics. If you know of something that might be worth a feature please send in a tip!

Continue reading “Retrotechtacular: Films Used To Be Recorded On Film”

Fubarino Contest: Game Boy Printer

fubarino-contest-gameboy-printer

[Dave] has a Game Boy Printer and loves the Mario-themed Easter egg that prints while holding the feed button during power-up. When he heard that Microchip gave us some Fubarino boards for our Easter Egg Contest, this hardware immediately came to mind and he set out to add a Hackaday Easter egg to the printer.

To tinker with the hardware, [Dave] built on the work of [Furrtek]—featured here a few years ago—which simplified the process of printing directly from an Arduino board. Connecting the TX and RX lines of the Arduino triggers the new Easter egg. He demonstrates printing both of the hidden messages in the video below.

Continue reading “Fubarino Contest: Game Boy Printer”

Fixing Christmas Lights And Shocking Yourself Silly

Tazer

As [Medhi] was setting up his Christmas tree, he found a string with a few broken lights. Because he’d bought a cheap string of lights wired in series, of course one bulb was burnt out, rendering the entire string useless. His original game plan was to search through the entire strand for the broken bulb, but that’s the easy way out. His backup plan was to zap the broken bulb out of the string. After a few hours of figuring out what that meant, he came up with a way to fix a broken string of lights.

When a bulb burns out, the filament breaks creating an air argon gap between the two electrodes. By sending a huge voltage down the string, it should fire an arc through that gap, illuminating the burnt-out bulb for a brief time.

Experiments with socks and low humidity commenced, but it wasn’t until [Medhi] stuck his finger in a lighter that he found a better source of high voltage sparks. [Mr. Brows] connected the piezoelectric element to the plugs on his string of lights and… nothing happened. At least until he plugged the lights back in. Then, strangely, they worked. The reddit thread for the video says this behavior is due to an anti-fuse built into the bulb. When enough voltage goes through this anti-fuse, a thin sheet of insulator breaks down and allows dead bulbs to short themselves.

Hackaday head honcho [Mike] just got this method of finding dead Christmas lights to work, replacing 14 bulbs in a string of 100 lights. This leads us to an interesting question: why isn’t this simple method of fixing a string of Christmas lights common knowledge? You would think something this useful wouldn’t be introduced to the world via a YouTube video where someone  repeatedly burns and shocks himself. You can, of course, buy something that does the same thing, but this is far too simple of a solution for a classic problem to pass under our noses for this long.

Continue reading “Fixing Christmas Lights And Shocking Yourself Silly”

Particle System Busy Box Keeps Baby Occupied

Busybox

Any child born today has a bright future ahead of them—mostly consisting of watching glowing rectangles for 80 or 90 years. To give his progeny a jump-start on a lifetime of watching LEDs flicker, [Dan] created a busy box. It’s really just an Arduino, RGB LED matrix, and a programmed particle system, but if we’re fascinated by it, it will probably blow an infant’s mind.

The idea for this busy box originated with an earlier Hackaday post that used an 8×8 matrix of RGB LEDs to create a moving color cloud. [Dan] took this project as a jumping off point and created an infant’s busy box with four modes that are sure to be entertaining.

Inside the is a Rainboduino: an Arduino compatible board capable of driving an 8×8 RGB LED matrix. Also stuffed inside the busy box is a 9V battery, rocker switch for the power, and four arcade buttons that cycle through each mode. The first mode is some sort of ‘plasma cloud’ simulation, the next is a ‘painter’ light display. The final two modes spell out [Dan]’s spawn’s name, and all the numbers and letters of the alphabet.

Continue reading “Particle System Busy Box Keeps Baby Occupied”