Repurposing A Ceiling Fan Into A Pottery Wheel

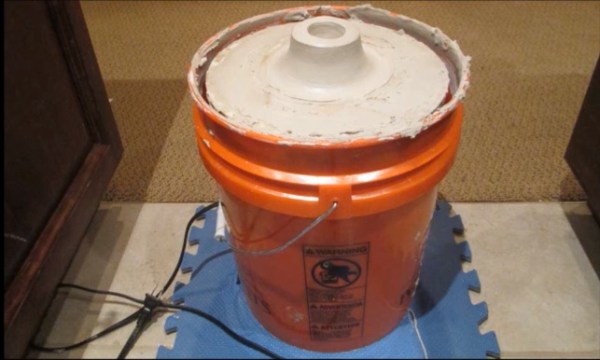
The wheel goes round and round as does [Lou Wozniak]. He’s come back to us, this time hacking together a pottery wheel from a cheap ceiling fan. This is a great use for a discarded or inexpensive fan and the build should cost less than $50. As you watch the video you learn that repurposing the ceiling fan was no simple feat. Lucky for us [Lou] spins through detailed construction procedures and doesn’t fail to cover every tip and trick. He really does think outside the box or should we say inside the bucket and peanut butter jar. The fan gets dismantled as well as rewired inside a 5 gallon bucket which is used as the pottery wheel housing and stand. A plastic peanut butter jar was used as a makeshift electrical junction box inside the bucket. He remounted the motor’s string operated speed switch on the side of the jar and routed the pull string out the side of the bucket. The fan motor should have three or four switch speed settings which might be enough control. If continuous variable speed control is desired he could add in a controller similar to [Ben Krasnow’s] AC controller using one pin on a microcontrollerUPDATE: [AKA the A] tells us in a comment below that this controller won’t work with a ceiling fan, but we still really like [Ben’s] project so we’re leaving this link here.

Most potters use significant amounts of water to wet the clay while they throw, so we have reservations about having the high voltages and open motor design directly under the wheel with no shielding. We know [Lou] could easily hack in a splash pan and of course always plug into a ground fault protected receptacle when using electrical appliances around water.

We do get to see the wheel in operation at the end of the video, which you can watch after the break. However, [Lou] makes no claims at being a pottery artisan.

Continue reading “Repurposing A Ceiling Fan Into A Pottery Wheel”

Organizing Transistors

SAMSUNG

Late last year, [matseng] set up an interesting challenge for himself: design a new PCB every week, send it off to a fab house, and build a new project. It’s a grueling endeavor, but some of these projects are actually very useful and cool. One of the best so far is the TraId – a board that identifies a transistor type and pinout with a nice LED interface.

This build was partly inspired by Dangerous Prototypes’ Part Ninja, a board that determines the pinouts and values of transistors, resistors, caps, and diodes. The TraId is a much more cut down version usable only for transistors, displaying the orientation of the pins and type of transistor on a set of 8 LEDs.

Although the design is very sparse, we could imagine something like this being very useful in a hackerspace, lab, or anywhere else the gremlins of chaos come to reorganize parts drawers. If you’d like to build your own, all the required files are up on the gits.

A 23 Feet Tall Pyramid With 0.31 Mile Of LED Strips

This year the Disorient Camp at Burning Man built a 7m tall pyramid with over half a kilometer of LED strips. For this special occasion several artists had developed patterns for this massive LED display, animating the parties happening every night in front of this build.

To handle the dusty environment, a Toughbook was running the pyramid’s main code, which was rendering the animation frames to 24-bit bitmaps and sending them over UDP to the network. For each face of the pyramid, a $45 BeagleBone Black running a dedicated program was slicing the images into the individual panels. Finally, each panel composed of eight WS281x LED strips was driven by a Teensy 3.0 microcontroller, receiving the piece to display by USB from the BeagleBone. To power the pyramid, 5V 40A power supplies were used for the tall panels, 5V 30A power supplies for the smaller ones.

Unsurprisingly, many of the power supplies failed due to the heat and dust.  The adhesive holding the LED strips also failed, and some screw terminals rattled loose from the 25KW sound system, requiring constant maintenance. Nevertheless, the sixteen thousand LEDs sure made quite an impression.

If anyone attending Burning Man managed to capture video of this thing in action we’d love to see it. Leave a link in the comments.

Students Build A 3D Printed Plane

3d printed plane

A student team has successfully designed, built, and flown a 3D printed RC plane using only $16 of plastic with a consumer-grade 3D printer (Makerbot), plus the necessary electronics and motor.

The folks over at the Wright Brothers Institute (WBI) have a great program called the AFRL Discovery Lab which brings teams of students, businesses, researchers, and government together to work on a specific challenge or opportunity.

One of the programs this year was the Disposable Miniature Air Vehicle, or DMAV for short. The student interns [Nathan, Ben, and Brian] spent the first 5 weeks at Tec^Edge designing the plane. The team went through 5 revisions before they settled on a design they believed could fly. The final plane weighed 1.5 pounds, and on its first flight… plummeted into the ground. Good thing they printed a second copy! After some more practice [Stephen] got the hang of it and was able to fly and land the plane successfully.

According to the WBI, this is the first functional aircraft that has been fully 3D printed (sans electronics) using FDM technology, and the first low wing 3D printed plane to be flown. Hate to burst their bubble, but 3D printed quadcopters have been around for quite a while!

Test flight video is after the break.

Continue reading “Students Build A 3D Printed Plane”

A Bitcoin Vending Machine

bitcoinVendingMachine

Accessibility is one of the biggest hurdles facing the Bitcoin revolution, so [Mathias] found a way to give BTCs some market penetration by converting an old condom vending machine. The machine was 30 years old and required some clean up. [Mathias] also worked in a plywood adapter that attaches to the mount on the back so it can install on a wider variety of surfaces. This is an electricity-free alternative to selling coins: the machine is purely mechanical and it vends custom-made vouchers rather than the coins themselves, which you then redeem on the Kondocoin website.

The transaction isn’t as instant or snazzy as the Bitcoin briefcase converter from Defcon this year, but it still provides the advantage of an up-to-date exchange rate, as the vouchers themselves are valued at amount of Euros spent rather than a set amount of coins. The exchange rate is consulted later, when you punch in your voucher key. [Mathias] wants to share the wealth, too, and offers up the server software on github along with a detailed explanation of the process.

Ask Hackaday: Can We Do Better Than Phonebloks?

Our tips line is on fire with suggestions for us to cover the modular cell phone concept named Phonebloks. The phone’s designer states the problem as follows:

A phone only lasts a couple of years before it breaks or becomes obsolete. Although it’s often just one part which killed it we throw everything away since it’s almost impossible to repair or upgrade.

His solution is the above pictured phone, with modular components for each feature: wifi, camera, battery, etc. Rather than upgrade your entire phone, upgrade just the parts you need. A wave of followers have thrown their support behind this concept, and perhaps their hearts are in the right place hoping to reduce waste and cost. Behind the scenes here at Hackaday, however, the response has been a unanimous facepalm. The primary objection (other than design implausibilities) should be obvious: dividing the phone into exchangeable bits does not inherently reduce waste. Those bits have to go somewhere.

Now, don’t rush to the comments section to identify additional problems; there’s a juicy Reddit thread for that. Instead, we want to take the high road: Can we do better? Can we make a phone for the future that is less wasteful to produce, more easily recycled, and possibly upgradable? What would be included in its features, and how would we do it? Check out a video of the concept phone and tell us your alternatives after the break.

Continue reading “Ask Hackaday: Can We Do Better Than Phonebloks?”

Adding A Display To A USB Digital Scale

arduino_scale

[Oleg] found himself in possession of a Stamps.com Model 510 5lb digital scale.  It’s a great scale, but only works as a USB HID device. In other words, it’s a digital scale without a digital display. He decided he wanted it to be more standalone, so he added a Toshiba HD44780 (compatible) display. An Arduino UNO and USB Host shield were used to make it happen. His sketch simply polls the scale and outputs the weight on the display.

In this case, he used the USB Host Shield from Circuits at Home, but a brief look shows they use the same MAX3421 controller chip as Sparkfun and other versions of the board. You might also be able to pull off the same functionality with an AVR running V-USB, though admittedly it wouldn’t be so easy.

We haven’t found a great way to add USB host mode to projects other than shields like the one [Oleg] used. If you know of a better way, share your ideas in the comments.

Of course, if this isn’t hardcore enough for you, forget using a consumer scale – make your own from scratch!