Pong Playing T-Shirt

pong playing tshirt

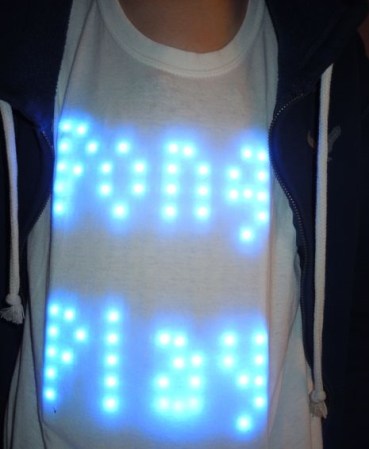
One of our younger hackers just finished off this awesome Instructable on his flexible 14 x 15 pixel, pong playing t-shirt!

[GenAap] has been working on this on and off for the past year, and finally debuted it at a few Halloween parties last month — it was a hit. He’s made the screen out of RGB LED strips, cleverly soldered together into a large flexible panel of 14 by 15 full colour pixels.

An Arduino Mega takes care of the logic to run the game, which [GenAap] wrote all himself! There’s also a cleverly designed controller using a slide-potentiometer and single button. To play back, the computer AI uses about 15 lines of code, which for pong, is more than enough. He’s also made the whole thing removable so you can still wash the shirt. Finally, the batteries and the “Magic Box” go into a pocket for simplicity’s sake.

If you’re interested in making your own, he also has a Github repository of everything you needStick around after the break to see a demonstration of the shirt by [GenAap] himself!

Continue reading “Pong Playing T-Shirt”

Raspberry Pi Smart TV

[Tony] decided his “smart” LED TV wasn’t quite smart enough. So he stuffed a Raspberry Pi in it.

Upon opening the case of his 40″ Hisense Smart LED TV, he discovered that the logic board actually had two unused USB pads — what luck! He tapped off of them to get 5V @ 500mA to power the Pi… Later on he realized this wasn’t the ideal solution — when the TV turned off, it cut the Pi’s power too. So he pulled out his multimeter and probed the board, this time finding a 5V source that remained on while the unit was plugged in.

Next up was the placement of the Raspberry Pi. The included speakers on this particular TV weren’t that good, and since [Tony] uses a surround sound system anyway, he decided to make use of their space better. Cutting out the grill and removing the whole assembly left him with more than enough room to store the Pi and mount a 3D printed LAN and USB port cover!

He’s running Raspbmc which lends the TV tons of functionality. If you don’t mind voiding your warranty, this is a great hack!

DIY Coolsculptor Freezes Fat With Cryolipolysis

You’re probably wondering why [Eddy], pictured above, decided to clamp two CPU cooling blocks to his torso. We were a bit concerned ourselves. As it turns out, [Eddy] has managed to construct his own Cryolipolysis device, capable of delivering targeted sub-zero temperatures to different parts of the body using a technique more popularly known as “Coolsculpting.”

Cryolipolysis is a non-surgical method of controlled cooling that exposes fat cells to cold temperatures while also creating a vacuum to limit blood flow to the treated area. [Eddy’s] challenge was to discover exactly how cold to make the treatment surfaces—a secret close-guarded by the original inventors. After digging through the original patent and deciding on a range between -3C and 0C, [Eddy] began cobbling together this medical masterpiece and designing a system capable of controlling it.

His finished build consists of a simple three-button interface and accompanying LCD screen, both wired to an Arduino, allowing the user to adjust temperatures and keep tabs on a session’s time. Unfortunately, results can take several months to appear, so [Eddy] has no idea whether his creation works (despite having suffered a brush with frostbite and some skin discolorations, yikes!) You can pick through a gigantic collection of photos and detailed information over at [Eddy’s] project blog, then stick around for a video from an Australian news program that explains the Coolsculpting process. Need some additional encouragement to experiment on yourself? You can always strap some electrodes to your head and run current through them. You know, for science.

Continue reading “DIY Coolsculptor Freezes Fat With Cryolipolysis”

Da Vinci’s Viola Organista

hurdy gurdy

Leonardo Da Vinci had many unfinished projects, not unlike many hackers here. Lucky for us though, he was a bit better at writing down his ideas than we are. This is his Viola Organista, as recreated by [Slawomir Zubrzycki] — a mechanical work of art, that sounds good too!

If you’re familiar with a Hurdy gurdy, this is basically the same thing — but on a much bigger scale. It is the combination of an organ, a harp, and a viola. Instead of a hammer hitting the 61 steel-strings, spinning wheels of horse-hair (similar to a bow) caress each string via input from the keyboard and the pedal powered crankshaft. The result is a very unique sound, which is reminiscent to each of the instruments it combines.

The designs for the instrument were found in Da Vinci’s Codex Atlanticus, a 12-volume collection of many of his manuscripts and designs, documenting everything from his flying machines to weaponry. [Slawomir] spent three years and over 5000 hours perfecting his version of it.

Stick around after the break to hear it in action! Don’t forget to turn on the subtitles though, unless you’re fluent in Polish!

Continue reading “Da Vinci’s Viola Organista”

Retrotechtacular: [Zoltán Bay’s] Moon Bounce Coulometer Signal Amplifier

coulometers and antenna

In the years before World War II it was theorized that shortwave radio waves could propagate through the ionosphere relatively undisturbed and allow for a signal to be bounced off the moon and returned. [Zoltán Bay] calculated that the return signal would be too faint to be detected above background noise with the radio receiving equipment of the day. To overcome this receiver dilemma he devised a new receiving element consisting of 10 coulometers sharing a common tank of a water solution. Each of the coulometers had a separate electrical connector and when current flowed through the electrode, hydrogen bubbles would form in an attached glass capillary column. By periodically sweeping through all 10 coulometers using a rotating switch attached to the radar receiver, any radar echo as well as random background noise would be readable by the amount of bubbles in the capillary columns. A single radar echo would be indistinguishable from random background noise in the columns of bubbles, but if the sweep is continued for 30 minutes any periodic radar echo would show as an increased accumulation of bubbles in a respective column. By reading these coulometers and knowing the switching period you could determine that you were receiving a true radar echo from the moon.

What an amazing apparatus to amplify a periodic signal above background noise! Nowadays we would call this a long-time integrator or persistence measurement and it’s a relatively simple task. You can download and read [Zoltán Bay’s] paper on “Reflection of Microwaves From the Moon” dated 1946 in PDF form. His integrator apparatus details start on page 17.

It took some years but in 1946 [Zoltán Bay’s] receiving apparatus was tested and did confirm reception from moon bounce. However, U.S. Army Signal Corps with better crystal frequency stabilized equipment was able to perform the same task earlier as seen in the below video without the use of an integrator. Even though the U.S. Army equipment was superior for this task [Zoltán Bay’s] apparatus enjoyed years of service in the field of planetary radar observation where such a high sensitivity scheme was still necessary.

Continue reading “Retrotechtacular: [Zoltán Bay’s] Moon Bounce Coulometer Signal Amplifier”

Interview: Mill CPU For Humans Parts 3 And 4

Welcome back to the conclusion of our interview on Mill CPU architecture with [Ivan Godard]. If you missed yesterday’s offering you can watch the preview video or go back and read the original article. Above is the third part, with the final installment found after the break.

We’d like to address some concerns from the comments of yesterday’s post. Several readers noted that Mill is only in the simulation phase. [Ivan] is very up-front about that… there is no silicon. But that doesn’t mean we should disregard a company that looks to build on successes from the current generation of processors while avoiding their drawbacks. It is incredibly costly to design silicon from scratch. This is why we don’t see new architectures sprouting up on a monthly basis.

We simply think it’s exciting to see what kinds of changes may be coming and how designers plan to accomplish advances in processing power while reducing power consumption at the same time.

Continue reading “Interview: Mill CPU For Humans Parts 3 And 4”

Posterior Posture Videogame Controller

Normally we see some crazy mad science projects coming from [Ben Krasnow’s] laboratory. This week [Ben] changes gears a bit and hacks his Xbox controller to interface with his bathroom scale and function as a posture controlled input device. You may want to take a moment for that to tumble around in your noggin before we trying to explain. What this means is you sit catawampus on a bathroom scale and when you lean forward your game character moves forward, lean back your character backs up and lean side to side for strafe left and right.

A modern digital bathroom scale has four pressure point transducers — one in each corner — which are read by the central controller and summed to generate the weight of the object setting on the scale. To use the scale as a controller input [Ben] removed the central scale controller and created two amplified Wheatstone bridge differential circuits, one for each diagonal axis between load cells. After adding an offset potentiometer to fix the resting point at 0.8 volts, the amplified differential voltage signals are fed directly into an Xbox controller’s thumb stick input for game control.

Additionally, to add rotation to his new game controller he hacked a an old ball type mouse and added a bit of rubber tubing that contacted and tracked the base of a  Lazy Susan platter. The scale sits on the Lazy Susan and allows for the partial rotation of your torso to controlled game rotation. However, [Ben] still needed a regular mouse interfaced with the game for full 360° rotation control.

There is more after the break, plus the build and demonstration video.

Continue reading “Posterior Posture Videogame Controller”