DIY Coolsculptor Freezes Fat With Cryolipolysis

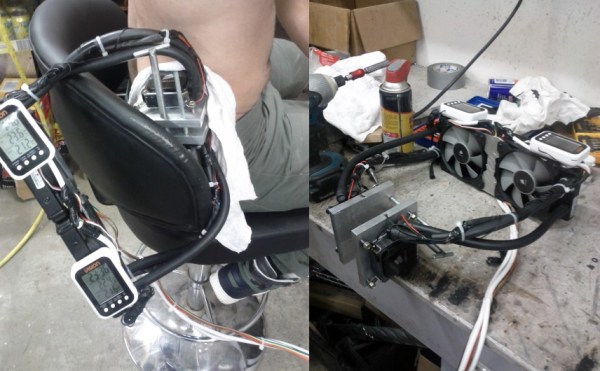
You’re probably wondering why [Eddy], pictured above, decided to clamp two CPU cooling blocks to his torso. We were a bit concerned ourselves. As it turns out, [Eddy] has managed to construct his own Cryolipolysis device, capable of delivering targeted sub-zero temperatures to different parts of the body using a technique more popularly known as “Coolsculpting.”

Cryolipolysis is a non-surgical method of controlled cooling that exposes fat cells to cold temperatures while also creating a vacuum to limit blood flow to the treated area. [Eddy’s] challenge was to discover exactly how cold to make the treatment surfaces—a secret close-guarded by the original inventors. After digging through the original patent and deciding on a range between -3C and 0C, [Eddy] began cobbling together this medical masterpiece and designing a system capable of controlling it.

His finished build consists of a simple three-button interface and accompanying LCD screen, both wired to an Arduino, allowing the user to adjust temperatures and keep tabs on a session’s time. Unfortunately, results can take several months to appear, so [Eddy] has no idea whether his creation works (despite having suffered a brush with frostbite and some skin discolorations, yikes!) You can pick through a gigantic collection of photos and detailed information over at [Eddy’s] project blog, then stick around for a video from an Australian news program that explains the Coolsculpting process. Need some additional encouragement to experiment on yourself? You can always strap some electrodes to your head and run current through them. You know, for science.

Continue reading “DIY Coolsculptor Freezes Fat With Cryolipolysis”

Da Vinci’s Viola Organista

hurdy gurdy

Leonardo Da Vinci had many unfinished projects, not unlike many hackers here. Lucky for us though, he was a bit better at writing down his ideas than we are. This is his Viola Organista, as recreated by [Slawomir Zubrzycki] — a mechanical work of art, that sounds good too!

If you’re familiar with a Hurdy gurdy, this is basically the same thing — but on a much bigger scale. It is the combination of an organ, a harp, and a viola. Instead of a hammer hitting the 61 steel-strings, spinning wheels of horse-hair (similar to a bow) caress each string via input from the keyboard and the pedal powered crankshaft. The result is a very unique sound, which is reminiscent to each of the instruments it combines.

The designs for the instrument were found in Da Vinci’s Codex Atlanticus, a 12-volume collection of many of his manuscripts and designs, documenting everything from his flying machines to weaponry. [Slawomir] spent three years and over 5000 hours perfecting his version of it.

Stick around after the break to hear it in action! Don’t forget to turn on the subtitles though, unless you’re fluent in Polish!

Continue reading “Da Vinci’s Viola Organista”

Retrotechtacular: [Zoltán Bay’s] Moon Bounce Coulometer Signal Amplifier

coulometers and antenna

In the years before World War II it was theorized that shortwave radio waves could propagate through the ionosphere relatively undisturbed and allow for a signal to be bounced off the moon and returned. [Zoltán Bay] calculated that the return signal would be too faint to be detected above background noise with the radio receiving equipment of the day. To overcome this receiver dilemma he devised a new receiving element consisting of 10 coulometers sharing a common tank of a water solution. Each of the coulometers had a separate electrical connector and when current flowed through the electrode, hydrogen bubbles would form in an attached glass capillary column. By periodically sweeping through all 10 coulometers using a rotating switch attached to the radar receiver, any radar echo as well as random background noise would be readable by the amount of bubbles in the capillary columns. A single radar echo would be indistinguishable from random background noise in the columns of bubbles, but if the sweep is continued for 30 minutes any periodic radar echo would show as an increased accumulation of bubbles in a respective column. By reading these coulometers and knowing the switching period you could determine that you were receiving a true radar echo from the moon.

What an amazing apparatus to amplify a periodic signal above background noise! Nowadays we would call this a long-time integrator or persistence measurement and it’s a relatively simple task. You can download and read [Zoltán Bay’s] paper on “Reflection of Microwaves From the Moon” dated 1946 in PDF form. His integrator apparatus details start on page 17.

It took some years but in 1946 [Zoltán Bay’s] receiving apparatus was tested and did confirm reception from moon bounce. However, U.S. Army Signal Corps with better crystal frequency stabilized equipment was able to perform the same task earlier as seen in the below video without the use of an integrator. Even though the U.S. Army equipment was superior for this task [Zoltán Bay’s] apparatus enjoyed years of service in the field of planetary radar observation where such a high sensitivity scheme was still necessary.

Continue reading “Retrotechtacular: [Zoltán Bay’s] Moon Bounce Coulometer Signal Amplifier”

Interview: Mill CPU For Humans Parts 3 And 4

Welcome back to the conclusion of our interview on Mill CPU architecture with [Ivan Godard]. If you missed yesterday’s offering you can watch the preview video or go back and read the original article. Above is the third part, with the final installment found after the break.

We’d like to address some concerns from the comments of yesterday’s post. Several readers noted that Mill is only in the simulation phase. [Ivan] is very up-front about that… there is no silicon. But that doesn’t mean we should disregard a company that looks to build on successes from the current generation of processors while avoiding their drawbacks. It is incredibly costly to design silicon from scratch. This is why we don’t see new architectures sprouting up on a monthly basis.

We simply think it’s exciting to see what kinds of changes may be coming and how designers plan to accomplish advances in processing power while reducing power consumption at the same time.

Continue reading “Interview: Mill CPU For Humans Parts 3 And 4”

Posterior Posture Videogame Controller

Normally we see some crazy mad science projects coming from [Ben Krasnow’s] laboratory. This week [Ben] changes gears a bit and hacks his Xbox controller to interface with his bathroom scale and function as a posture controlled input device. You may want to take a moment for that to tumble around in your noggin before we trying to explain. What this means is you sit catawampus on a bathroom scale and when you lean forward your game character moves forward, lean back your character backs up and lean side to side for strafe left and right.

A modern digital bathroom scale has four pressure point transducers — one in each corner — which are read by the central controller and summed to generate the weight of the object setting on the scale. To use the scale as a controller input [Ben] removed the central scale controller and created two amplified Wheatstone bridge differential circuits, one for each diagonal axis between load cells. After adding an offset potentiometer to fix the resting point at 0.8 volts, the amplified differential voltage signals are fed directly into an Xbox controller’s thumb stick input for game control.

Additionally, to add rotation to his new game controller he hacked a an old ball type mouse and added a bit of rubber tubing that contacted and tracked the base of a  Lazy Susan platter. The scale sits on the Lazy Susan and allows for the partial rotation of your torso to controlled game rotation. However, [Ben] still needed a regular mouse interfaced with the game for full 360° rotation control.

There is more after the break, plus the build and demonstration video.

Continue reading “Posterior Posture Videogame Controller”

Hacking A Cheap Toy Quadcopter To Work With Arduino

Building your own quadcopter is an expensive and delicate ordeal. Only after you navigate a slew of different project builds do you feel confident enough to start buying parts, and the investment may not be worth your effort if your goal is to jump right into some hacking. Fortunately, [Dzl] has a shortcut for us; he reverse engineered the communication protocol for a cheap toy quadcopter to work with an Arduino.

The cheap toy in question is this one from Hobbyking, which you can see flying around in their product demonstration video. [Dzl] cracked open the accompanying control handset to discover which transceiver it used, then found the relevant datasheet and worked out all the pin configuration involved in the SPI communication. Flying data is transmitted as 8 byte packets sent every 20 mS, controlling the throttle, yaw, pitch and roll.

[Dzl] took the build a step further, writing an Arduino library (direct Dropbox download link) that should catch you up to speed and allow you to skip straight to the fun part: hacking and experimenting! See his quick video after the break, then convince yourself you need a quadcopter by watching this one save its creator, [Paul], the trouble of walking his son to the bus stop.

Continue reading “Hacking A Cheap Toy Quadcopter To Work With Arduino”

Wireless SNES Controller For Logitech Receiver

SNES

A while back, Logitech introduced their version of a wireless interface for keyboards, mice, and other human-oriented peripherals. Yes, they could have used Bluetooth, but that’s neither here nor there. What we do know, though, is that it’s now possible to stuff one of these Logitech transmitters into a Super Nintendo controller, allowing it to operate with your fancy-schmancy wireless keyboards and mice.

[Warrior_Rocker] wanted to retain as much of the stock appearance of the original controller as possible. To do this, he salvaged the Logitech transmitter from an old handheld Logitech keyboard/touchpad combo. The membrane of the keyboard connected directly to the transmitter, meaning tracing out the connections of the membrane to each pin was required to get a button mapping that made sense.

Once the lines of the SNES controller were wired up to the transmitter, [Warrior] needed a way to power his new wireless controller. The old keyboard used a pair of AA cells wired in parallel. With two AA cells, the keyboard had about a year of battery life, so with a single AAA cell, [Warrior]’s SNES controller should last a few months or more.

Except for a switch and a missing cable, [Warrior]’s wireless controller looks exactly like a stock controller. Pretty impressive, given this build is the product of stuff he just had lying around.