Stylish Cafe Battlestation Spoils Customers

Cafe Battlestation

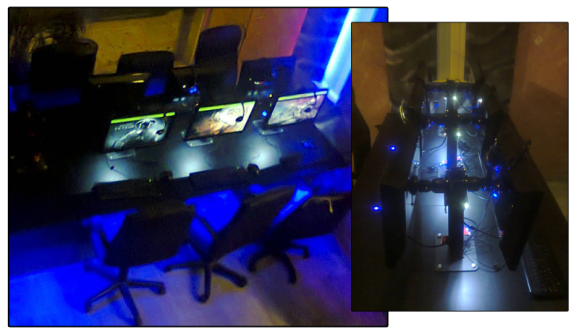
[Tasos] sent us this tip about the custom battlestation he’s been working on for his Internet café. (Greek; Translated). The desk started from humble enough beginnings: a simple frame from what appears to be MDF with cabinets to secure the PCs. The goal with this build was to provide an aesthetically pleasing and user-friendly construction. [Tasos] was dissatisfied with the limitations posed by off-the-shelf monitor mounts, so he fabricated his own, more adjustable alternatives, through which he ran the necessary cords.

[Tasos] gave each monitor stand a thorough sanding, priming and painting for a finished result that exudes metallic perfection, then he attached a large pushbutton for booting the computer and some LEDs to provide soft backlight. Under the hood, [Tasos] fitted the PCs’ innards into a custom enclosure of sorts. Though he’s yet to provide full details on this part of the construction, we suspect more images are forthcoming. You can find more details in his forum post.

Wind Tunnel Testing Now Available To The Common Man

DIY Wind Tunnel

If you are in the market for a DIY wind tunnel the folks over at sciencebuddies.org have got you covered. They have done a great job documenting how they built their own wind tunnel. Most of the structure is made of plywood with the test chamber is made of plexi-glass so that the operator can visually observe what is happening during a test. A common gable-mount fan provides the air flow, you may have one installed in your attic to keep it cool. The only non-widely available components are the force sensors that feed data to a computer for logging.

Continue reading “Wind Tunnel Testing Now Available To The Common Man”

My First Robot: A Dad’s Journey In Robotics For His Daughter

My first robot

[Joel Miller] wants to get his daughters into electronics early (his oldest is only 3), so he’s decided to foray into the wonderful world of robotics as a fun way to get them interested. As bonus to us and all other would-be robotics enthusiasts out there, he’s keeping track of the project on his blog!

He started by sketching out some ideas about what he wanted his robot to be capable of — it should be able to move around, be remote controlled, have sensors for experiments, and even have some personality — expression capable eyes maybe? Oh and it should be able to automatically charge itself, and have tank treads!

It’s been a few weeks since he started scheming up ideas… and he already has a prototype complete! Talk about a productive father! He decided to try 3D printing a continuous tank tread using ABS, but unfortunately it was a bit too stiff, so he’s opted to use a tried and true Lego system instead — although maybe he should try printing in two materials, like we just saw with the FlexyDualie extruder!

Continue reading “My First Robot: A Dad’s Journey In Robotics For His Daughter”

The Smallest ATtiny85 Based USB Board

Nanite 86

“Possibly the smallest ATtiny85 based ‘duino derivative”. Indeed! When Olimex announced the Olimexino 85s as the smallest Arduino ever, [Tim] took that as a challenge. His very small Arduino based USB devboard is quite a bit smaller than the Olimexino!

The Nanite 85 was carefully designed to be both small and functional. Not only is it 20% smaller than the Olimexino, but also sports a reset button! One of the coolest aspects of this design is that it has the same pinout and size as a DIP ATtiny85. This means that you can use the Nanite 85 for developing your code with the USB bootloader, and then you can directly replace it with a standard (pre-programmed) ATtiny85. The major downside to using this device over the aforementioned devices, is that it does not include a voltage regulator for powering the device via USB (or battery), the device is simply hooked directly to the 5V rail from the USB connector.

We can’t help but be impressed with this well-thought-out design. It is also easy to assemble since it uses larger surface mount components. If smaller components were used, even more features (such as a regulator) could be included. Do you have an even smaller USB Arduino? The race is on for the smallest Arduino ever!

DIY Ultra Wideband Impulse Synthetic Aperture Radar And A MakerBot

state

What could possibly be better than printing out a few low-resolution voxels on a MakerBot? A whole lot of things, but how about getting those voxels with your own synthetic aperture radar? That’s what [Gregory Charvat] has been up to, and he’s documented the entire process for us.

The build began with an ultra wideband impulse radar we saw a while ago. The radar is built from scraps [Greg] picked up on eBay, and is able to image a scene in the time domain, creating nice linear sweeps on a MATLAB plot when [Greg] runs in front of the horns.

With an impulse radar under his belt, [Greg] moved up the technological ladder to something that can produce vaguely intelligible images with his setup. The synthetic aperture radar made from putting his radar horns on the carriage of a garage door opener. The horns slowly scan back and forth along the linear rail, taking single impulse readings and adding them together in an image. In the video below, [Greg] is able to image a few pieces of copper pipe only a few inches in diameter. The necessary equipment for this build only cost [Greg] a few hundred bucks at the Dayton Hamvention, and a similar setup could be put together for even less.

If building an X band impulse synthetic aperture radar isn’t impressive enough. [Greg] also 3D printed one of his radar images on a MakerBot. That’s just applying stlwrite to the 2D radar image and feeding it into MakerWare. Gotta have that blog cred, doe. It also makes for the best headline I’ve ever written.

Continue reading “DIY Ultra Wideband Impulse Synthetic Aperture Radar And A MakerBot”

The Hackaday Prize: Thinking Really, Really Big

Dome

In case you’ve been living under a rock for a few weeks, we’re giving away a trip to space for the best, most grandiose connected hardware project. [coxrandy], a.k.a. [Phillip Cox] realized the best way to build something awesome was to think big, and his plan for building a 1km dome (yes, 1000 meters) is the most ambitious project we’ve ever seen.

The BuckyBot, as [Phil] is calling his build, relies on the ideas of the great [Buckmister Fuller] and his idea to build a huge geodesic dome covering all midtown Manhattan. [Fuller] didn’t have the resources to build a structure this large in the 1950s, and to be honest, we don’t have the resources to build it nowIt would be a ludicrous effort to build something like this one beam at a time, and [Phil] concludes that to build something this big, we need to think small.

Instead of thousand ton cranes and several thousand vehicles trucking in building supplies, [Phil]’s idea uses small “BuckyBots” – a combination 3D printer and robot – that builds one structural cell of a giant dome at a time. These BuckyBots climb around the structure, build the internal and support structure, slowly climbing to the skies on their fractal-inspired creation.

The Hackaday Prize contest will end far before [Phil]’s BuckyBots will have the ability to build a kilometer-wide dome, so the current plans are to modify his RepRap Mendel to crawl. Once that’s done, he’ll have his newly built BuckyBot build a 2 meter hemisphere in his garage. From there, construction moves to the back yard where a 10 meter dome will be built.

Even if this project never makes it past the planning stages, it’s an awesome example of thinking big, something you’re going to need if you’re trying to win a trip to space.

Plug And Play Portable Console Saves Space So You Don’t Have To!

Plug and Play console

Remember all those fun plug and play consoles they used to make? Usually just one offs with a few games here and there, typically designed to get poor old grandmothers to try buying them instead of the official Nintendo or SEGA systems for their grandchildren…

Anyway, some of the games were actually pretty good! But who wants to store a system for every individual game? [Sharon] decided to make the ultimate portable console — and jammed every plug and play console… into cartridges for safe keeping!

Wait what? [Sharon] took 12 of the plug and play consoles, hacked them to pieces, and managed to stuff the guts into custom game cartridges she made herself. She then made the HandyPNP, a “base console” with buttons and controls, video output and an LCD screen. She meticulously mapped out every consoles’ controls, and wired them accordingly, so when you plug the cartridge into the HandyPNP, it’s like your playing the original system.

It’s probably one of the most impressive handheld console hacks we’ve seen in a while, just considering the amount of work required to convert one console, let alone 12, to a standard connection for the HandyPNP to communicate with. Stick around after the break to hear [Sharon] explain the project herself!

Continue reading “Plug And Play Portable Console Saves Space So You Don’t Have To!”