Repairing A Nikon D3

headless

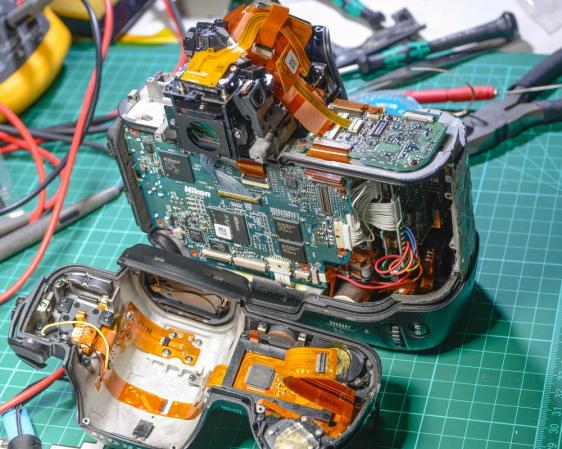
There are few products out there as electronically and mechanically complex as a modern DSLR. Between the sensor, shutter, various LCD screens, and Flexible Printed Circuit boards (FPC) running everywhere, it’s enough to make even the most organized DIY repair person quake in fear. [TiN] over at the EEVblog forums wasn’t scared off though, as he bought a broken Nikon D3 on eBay in hopes of repairing it.

The D3 was Nikon’s top of the line professional camera in 2008. With a 12 Megapixel Full frame sensor and a host of other features, used models still command a good portion of the original $5000 USD price. [TiN’s] camera was described as having been dropped, and was dead on arrival, exactly as it had been described on eBay. The battery door was destroyed, so [TiN] connected an external supply. The camera was still dead, so it was time to dig in. Thanks to the internet, [TiN] was able to find a service manual for the camera. He decided to check the power supply board next. A TO225 package transistor with an obvious hole blown in the front was a good starting point.

[TiN] replaced the transistor and the camera sprang to life. The main LCD showed the live sensor view, and it would take pictures. All was not perfect though, as the two auxiliary LCDs were still dead, and the D3’s mirror would get stuck every other shot, leading to an error display.

Click past the break for the rest of [TiN’s] story.

Continue reading “Repairing A Nikon D3”

[Ben Krasnow] And His 8 KJ Ruby Laser

[youtube=https://www.youtube.com/watch?v=ZUevWmUViJM&w=580]


We were again pleased to find another person who attended Maker Faire just to show off the awesome and not to hawk some goods. In our mind [Ben Krasnow] represents the highest echelon of hardware hacking (apparently Google[x] agrees because they just snatched him up) . But [Ben] always makes a point to explain how he does what he does so that others may learn and someday achieve a similar type of greatness. This time around it’s a functional ruby laser which is backed by a capacitor bank that stores a whopping 8 kilojoules of energy. This is what allows the laser to cut through steel plate. He sure has come a long way since he first showed off the project in January.

Unfortunately we didn’t get to [Ben’s] booth until late on Sunday. His previous demonstrations burned through some seals and left him with a non-functional laser. But he’s a trustworthy guy so we believe him and look forward to him posting a video about the laser and hopefully about the failure. He also mentions that he may make an attempt at lunar laser ranging with this device; bouncing the laser off of reflectors on the moon and measuring the delay. This can then be used to calculate the distance to the moon.

By the way, it was super difficult not to crack a joke when he says the words “Ruby Rod“.

Homemade Liquid Nitrogen

As far as DIY cryogenics are concerned, dry ice is easy mode. You can get frozen carbon dioxide at WalMart, or from a nozzle that screws onto a CO2 tank. It’s all very ordinary, and not really special at all. Want to know what’s cool? Making liquid nitrogen at home.

[imsmooth] is getting his nitrogen from a standard tank, sending the gas through a CO2 and H2O scrubber, compressing it, putting the compressed gas in an ice bath, and slowly diffusing the compressed, cooled gas into a vacuum reservoir. When the cold compressed gas is released into the reservoir, Boyle’s law happens and liquid nitrogen condenses in a flask.

As far as materials and equipment are concerned, [imsmooth] is using a PVC tower filled with zeolite to filter out the CO2 and H2O, a SCUBA compressor (no oil), and an almost absurd amount of stainless steel tubing for the precooler and regenerative cooling tower. Except for a few expensive valves, dewar, and the SCUBA compressor, it’s all stuff you could easily scrounge up from the usual home improvement stores.

[imsmooth] is producing about 350cc/hr of liquid nitrogen,  or more than enough for anyone who isn’t running an industrial process in their garage. Check out the video of the build below.

Continue reading “Homemade Liquid Nitrogen”

The Pi CNC Controller

pi

Back in the olden days, the latest and greatest CNC machines had minicomputers bolted onto their frames, replete with paper tape readers and seven segment displays. For the home CNC machinist of today, these hulking electronic brains are replaced with something a little more modern – desktop computers with parallel ports. Having a box filled with computers and motor drivers is just too cool though, and this tiny Raspberry Pi CNC controller fits the bill quite nicely.

The controller uses a Raspberry Pi as the brains of the device, but there aren’t too many options out there for stepper motor control in Pi land. There are, however, dozens of CNC shields or the Arduino. The Pi AlaMode board is able to provide voltage level conversion between the CNC shield and the pi, and also has the nice bonus of a battery-backed real time clock.

With some proper connectors, lighted buttons, and a beautiful cable sleeving job, this Pi CNC controller would be well suited for any of the desktop CNC  or engraving builds we see from time to time.


CastAR And Holographic Print Preview For 3D Printers!

CastAR and 3D printing

Google glasses this, Oculus rift that, CastAR… With all these new vision devices coming out, the world of augmented reality is fast becoming, well, a reality!

Here’s a really cool concept [Ryan Smith] came up for 3D printing. Using [Jeri Ellsworth’s] CastAR, [Ryan Smith] has created a really cool technical illusion to demonstrate visual prototyping on his Makerbot. Using a laser cutter he’s perforated the front plastic panel of the Makerbot, which allows a semi-transparent overlay that when you use the CastAR’s projector it gives you a holographic visual effect.

The glasses track the reference object (in this case, the gear) and then project interfacing gears in an animation over-top of the existing part. [Ryan] sees this as the next step in 3D printing for artists and makers because it can help give you a 3D preview of your part, for example if you’re not fully sure what scale you want it to print at, you could actually put a mating object, or your hand, behind the screen and visually see the interface!
Continue reading “CastAR And Holographic Print Preview For 3D Printers!”

Canadian Space Robot Will Repair Itself

The video above shows an animation of what the Canadian Space Agency hopes will be the first successful self-repair of the Mobile Servicing System aboard the ISS. The mobile servicing system is basically a group of several complicated robots that can either perform complicated tasks on their own, or be combined into a larger unit to extend the dexterity of the system as a whole.

The most recent addition to the servicing system is the Special Purpose Dexterous Manipulator, otherwise known as Dextre. Dextre is somewhat reminiscent of a human torso with two enormous arms. It is just one of the Canadian Space Agency’s contributions to the station. It was installed on the station in 2008 to perform activities that would normally require space walks. Dextre’s very first official assignment was successfully completed in 2011 when the robot was used to unpack two pieces for the Kounotori 2 transfer vehicle while the human crew on board the ISS was sleeping.

Dextre is constructed in such a way that it can be grabbed by the Canadarm2 robot and moved to various work sites around the Space Station. Dextre can then operate from the maintenance site on its own while the Canadarm2 can be used for other functions. Dextre can also be operated while mounted to the end of Canadarm2, essentially combining the two robots into one bigger and more dexterous robot.

One of the more critical camera’s on the Canadarm2 has started transmitting hazy images. To fix it, the Canadarm2 will grab onto Dextre, forming a sort of “super robot”. Dextre will then be positioned in such a way that it can remove the faulty camera. The hazy camera will then be mounted to the mobile base component of the Mobile Servicing System. This will give the ISS crew a new vantage point of a less critical location. The station’s human crew will then place a new camera module in Japan’s Kibo module’s transfer airlock. Dextre will be able to reach this new camera and then mount it on the Canadarm2 to replace the original faulty unit. If successful, this mission will prove that the Mobile Servicing System has the capability to repair itself under certain conditions, opening the door for further self-repair missions in the future.

A view inside the Novena Open Hardware laptop

Bunnie Talks To Us About Novena Open Hardware Laptop

[youtube=https://www.youtube.com/watch?v=G9mjDt-4XIM&w=580]


We made a point to stop by the Freescale booth at Maker Faire where [Bunnie Huang] was showing off the Novena laptop. His past accolades (Wikipedia page) and the rabid success of the crowd funding round — which nearly tripled its goal — meant we had to make multiple attempts to speak with him. But the third time’s a charm and it was worth the wait!

Several things struck me about seeing the hardware in person. First off, I like that there’s a little bit of room inside but the case is still reasonably small. This really is a laptop aimed at hardware hacking; I would anticipate that the majority of backers intend to roll their own hardware for it. Second, [Bunnie] showed off several expansion boards as examples which use a standard 80-pin header to get at the onboard components. The example of a man-in-the-middle attack for the flash chip on a thumb drive was extremely tasty. But it was also interesting to hear about an SDR board which will ship to original backers since the campaign made its stretch goals.

If you don’t know much about this project, you can get some background from our post when the crowd funding went live. Open design info is available from the Novena page.