Hacking An Old Parallel Port Webcam To Work With A Gameduino 2

connecting parallel port web camera to gameduino 2

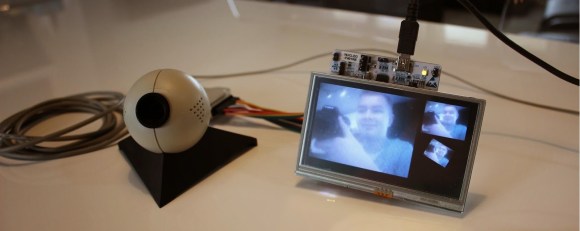
[Andrew] couldn’t pass up a 20ish year old parallel port based webcam he saw on the shelf at a thrift store. It’s a Connectix QuickCam and was the first webcam that did not require a separate video input card to interface with your computer. Due to this feature, the webcam was extremely popular, so popular that Logitech ended up buying Connectix and marketing the camera for themselves.

It’s tough to find a newer computer that still has a parallel port, but using an old computer wasn’t [Andrew]’s plan anyways. After thinking about it, he decided to try to get the camera’s image to display on a Gameduino 2.

The hardware list is fairly minimal. The cam’s parallel connector is plugged straight into STM32 Nucleo development board by way of several jumpers. The Gameduino 2 is connected to the dev board and a USB to PS/2 adapter was made to power the camera.

Continue reading “Hacking An Old Parallel Port Webcam To Work With A Gameduino 2”

Hyperspectral Imaging With A DSLR

It’s a relatively simple task to find evidence of helium by just looking at the sun; all you need is a prism, diffraction grating, and a web cam. DIY spectrometers have been around for ages, but most of them only produce a spectrum, not a full image complete with spectral data. Now it’s possible to take an image of an object, complete with that objects spectra using a DSLR, some lenses, a PVC pipe, and the same diffraction grating from your DIY interferometer.

The idea behind a hyperspectral imager is to gather the spectral data of each pixel of an image. The spectral data is then assembled into a 3D data cube, with two dimensions dedicated to the image, and the third dimension used to represent wavelength. There are a surprising number of applications for this technique, ranging from agriculture and medicine to some extremely creepy surveillance systems.

The authors of this paper (freakin’ huge PDF) used a piece of PVC pipe, three camera lenses, a diffraction grating, and a small paper aperture to construct their hyperspectral imager. Images are captured using a standard, multi exposure HDR method, assembling the raw data from the camera into a hyperspectral image with MATLAB.

There’s a ton of awesome info in the PDF, covering how the authors calibrated their system for different lighting conditions, interpreted the RGGB Bayer sensor in the camera, and a few examples of what kind of image can be constructed with this kind of data. That’s a recommended read, right there.

Thanks [Yannick] for the tip.

A Raspi Ambilight With HDMI Input

With the Raspberry Pi now most famously known as a $30 media PC, it only makes sense that the best uses for the GPIO pins on the Pi are used for an Ambilight. [Great Scott Labs] put up a great video on using the Pi as a uniquely configurable Ambilight with Hyperion and just about any video input imaginable.

This isn’t the first Ambilight clone [Great Scott] has put together, but for the first version the Ambilight functioned only under Raspbian and not any random HDMI input. The new version solves this by using an HDMI splitter box, feeding into an HDMI to composite converter, and finally into a USB composite capture dongle attached to the Raspi.

With the software in the instructions, the Raspi effectively mirrors the video coming from the video capture dongle. The Pi is running Hyperion to control a strip of WS2801 RGB LEDs, making the back of any TV glowey and blinkey.

Since [Great Scott] is using a component video signal as an input, the adapters necessary to have any device work with this Ambilight are readily available. We’d honestly like to see this build working with the old Commodore disk access screen border going nuts, so be sure to send that in if you ever get that working.

Continue reading “A Raspi Ambilight With HDMI Input”

A Ring Of Colored Pencils

Colored Pencil Ring

[Peter] proved he has equal parts prowess, patience, and perseverance with this colored pencil ring (imgur link). The ring is made from a cross-section of several colored pencils. The idea seems simple. The build process IS simple. As always though, the devil is in the details.

[Peter] started with a cheap pack of colored pencils. They have to be hexagonal pencils, as round ones won’t work well for this build. [Peter] used two nails to align the  pencils, and medium thickness Cyanoacrylate glue to bond them together. Cyanoacrylate (aka super glue) is a very strong but inflexible bond. We’re curious if a different adhesive might have worked better for this task.

Once the block of glued pencils was dry, [Peter] drilled a hole approximately his ring size. He used a band saw to cut a rough ring blank around the hole, then headed to the wood lathe. He mounted the ring with a jam chuck, which is a piece of wood turned to an interference fit with the workpiece. The problem was that the jam chuck cracked the ring as it was being installed. [Peter] was able to glue the ring back together, and turn it down on his lathe.

Click past the break for more on [Peter’s] ring.

Continue reading “A Ring Of Colored Pencils”

carbon nanotube being turned into aerogel sheet

Artificial Muscles Use Carbon Nanotube Sheets

Light as air, stronger than steel and more flexible than rubber. Sound like something from the next installment of the Iron Man series? [Tony Stark] would certainly take notice of this fascinating technology. Fortunately for us, it does not come from the studios of Hollywood, but instead the halls of the NanoTech Institute at the University of Texas.

Professor [Ray Baughman] and his team of scientists at the NanoTech Institute have developed a type of artificial muscle through a process of making aerogel sheets by growing carbon nanotubes in a forest like structure. Think of a vertical bamboo forest, with each bamboo stem representing a single carbon nanotube. Now imagine that the individual bamboo stems were connected together by much smaller horizontal threads. So that if you dislodge the bamboo and began to pull, the threads would pull the others, and you would get this sheet-like structure.

These aerogel sheets of carbon nantubes have some truly science fiction like properties. They can operate from 1,600 degrees centigrade to near absolute zero. If you inject a charge, each nanotube will be repulsed from one another, expanding some 220% of the sheet’s original size. Your muscles do this at roughly 20 – 40%. Stick around after the break for a video demonstration of these carbon nanotube aerogel sheets being made and demonstrated.

Thanks to [Steven] for the tip!

Continue reading “Artificial Muscles Use Carbon Nanotube Sheets”

These Trackpad Winamp Visualizations Really Whip The Llama’s Ass

As much as we like a good clean Model M specimen, those curly-corded clicky behemoths are somewhat lacking for certain flavors of gaming. There aren’t any blank keys to override, and there sure isn’t a full-color trackpad that you can write apps for. [Gus] has such a keyboard: the Razer Deathstalker Ultimate which features the SwitchBlade UI. He made himself this sweet audio visualizer for it that extends Winamp visualizations to the Switchblade UI.

[Gus]’s hack is built on the Tiny3D visualization framework. It does what you might expect—reads the visualization values, sets them up for display on the trackpad, and renders them to said trackpad. [Gus] uses some of the 10 programmable keys to change colors on the fly, and the result is pretty awesome. As [Gus] points out, this is just the beginning of what the plugin can do. You’ll need the Razer SDK to get started, and you can get the other ingredients from [Gus]’s repo. Once you’re done with this, you could try auto-dimming your keyboard backlight.

Of course there are demo videos after the jump. Come on.

Continue reading “These Trackpad Winamp Visualizations Really Whip The Llama’s Ass”

Johnny Mnemonic, Broken Columns, And Pinball Repair

johnny

[Quinn Dunki] has come to realize the pinball machines of her youth aren’t the lame games she remembered. They’re actually quite marvelous in terms of electronics, mechanics, engineering and the all important hackability. Wanting to pick up a 90s dot matrix display pinball machine and being a [William Gibson] fan, [Quinn] picked up an old Johnny Mnemonic machine. She’s already looked into replacing the incandescent bulbs with LEDs, and has just wrapped up troubleshooting a broken plasma dot matrix display.

dots
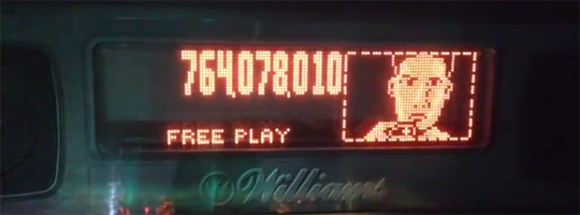
The neon dot matrix displays in pinball machines of this era are finicky devices with a lot of stuff that can go wrong. On powering the display up, [Quinn] noticed a few columns on the left side of the display weren’t working. These machines have great diagnostic menus, so running a test that displays a single column at a time revealed two broken columns. However, when a solid fill test was run, all the columns work, save for a few dots in the upper left corner. This is an odd problem to troubleshoot, but after more tests [Quinn] realized dots in column five and six only work iff both adjacent dots in the same row are lit.

The power supply seemed okay, leaving the problem to either a logic problem, or something wrong in the glass. With a meter, [Quinn] deduced there was a short between the two broken columns, and tracing every thing out revealed a problem in the hermetically sealed display filled with noble gasses. A replacement display was ordered.

While [Quinn] was replacing the display, she decided it would be a good time to rehab the almost-but-not-quite out of spec driver board for the display. The power resistors had scorched the PCB, but didn’t damage any traces. Replacing the parts with modern components with a higher power rating brought the board back to spec with components that should last longer than the 20-year-old parts previously inhabiting the driver board.

It was a lot of effort, but now [Quinn] has a brand new display for her pinball machine and is ready to move on to the next phase of her restoration.