How A Maker Proposes

proposal

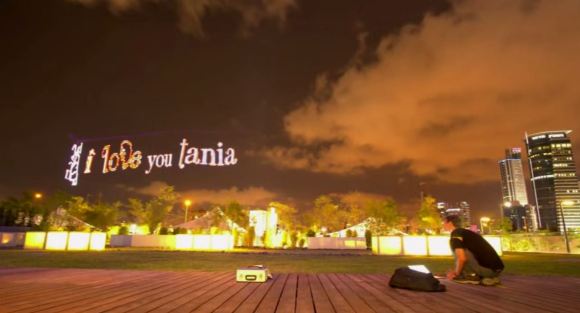
[Sefi Attias] just sent us a heartwarming little video of how he proposed to his girlfriend [Tania] — using a little help from technology and other makers.

As a maker, [Sefi] was always building things which impressed [Tania], so he thought it was only fitting to make the proposal a one-of-a-kind maker experience.

He started by designing the engagement ring himself, to be 3D printed. It’s an amazingly complex little thing made up of the repeating words of the quote “I will betroth you to me forever”. It was almost too complex in order to print — but they managed to do it in wax, which allowed them to create a mold and then cast the final part in white gold. Once complete, they set a diamond in place to cap it all off.

The second step was the proposal, which was made possible using a quadrotor, a strip of RGB LEDs, and a long camera exposure. To show it off in real-time to [Tania] they setup a projector and screen on the side of the street, providing a surreal window into the park behind them. It was all made possible with the help from over 20 people from the XLN Makerspace and SkyLens (the quadrotor people).

Oh yeah, and she said yes.

Continue reading “How A Maker Proposes”

Designing And Printing A Custom Enclosure

enclosure

So you know how to design a circuit board, assemble the parts, and have a functional device at the end of a soldering session. Great, but if you want to use that device in the real world, you’re probably going to want an enclosure, and Tupperware hacked with an Exacto knife just won’t cut it. It’s actually not that hard to design a custom enclosure for you board, as [Glen] demonstrates with a custom 3D printed project box.

[Glen]’s board, a quad RS-422 transmitter with a PMOD connector, was designed in Eagle. There are a vast array of scripts and plugins for this kind of mechanical design work, including the EagleUP plugins that turn an Eagle PCB into a 3D object that can be imported into SketchUp.

Taking measurements from Eagle, [Glen] designed a small project box that fits the PCB. A few standoffs were added, and the board itself was imported into SketchUp. From there, all he needed to do was to subtract the outline of the connectors from the walls of then enclosure for a custom-fit case. Much better than Tupperware, and much easier than designing a laser cut enclosure.

Once the enclosure was complete, [Glen] exported the design as an STL, ready for 3D printing or in his case, sending off to Shapeways. Either way, the result is a custom enclosure with a perfect fit.


Industrial Light Painting Steps It Up A Few

industrial light painting

What would you do if you had access to an industrial ABB IRB 6640 robot? We’d probably make a giant 3D printer, but if you’re [Jeff Crossman] and [Kevyn McPhail], you’d make one of the most advanced light painting setups we’ve ever seen.

The setup itself is really quite simple — a single RGB LED is connected to a Teensy microcontroller on a tool-head for the robot — controlling the robot is the hard (fun?) part. To create the images, [Jeff] had several students come in to have their photographs taken using a Microsoft Kinect. This allowed him to create an RGB point cloud for the robot to recreate.

Using Rhino he created the tool paths required for the robot to build up a floating 3D image of the students for the camera taking the long exposure. Each demonstration made use of ~5000 points, which takes the robot arm about 25 minutes to place.

It’s a fascinating video, and yes it does seem like a bit of overkill, but hey — why not?

Continue reading “Industrial Light Painting Steps It Up A Few”

Android Based Wireless ECG

ECG

The title of [Nuclearrambo’s] post says it all, “Android based wireless ECG monitoring (Temperature sensor and glucometer included).” Wow! What a project!

The project is built around the HC-06 bluetooth module and the Stellaris LaunchPad from TI, an inexpensive ARM developer kit. Building an ECG is a great way to learn about instrumentation amplifiers, a type of differential amplifier used for its extremely high common mode rejection ratio (CMRR). Please be sure to keep in mind that there are a myriad of safety issues and regulation concerns for medical device, and there is no doubt that an ECG is considered a medical device. Sadly, [Nuclearrambo’s] post does not include all of the code and design files you need to build the system, which is understandable considering this is a medical device. That being said, he provides a lot of information about building high-quality ECG instrumentation and the web interface.

It would be great if [Nuclearrambo] could post the Android application code and Stellaris LaunchPad code. Even with these omissions, this post is still worth reading. Designing medical devices requires a lot of know-how, but who knows, maybe your next project can save your life!

OLED display, blue LED and Smartcard

Developed On Hackaday: We Have Final Prototypes!

The last few weeks have been quite tense for the Mooltipass team as we were impatiently waiting for our smart cards, cases and front panels to come back from production. Today we received a package from China, so we knew it was the hour of truth. Follow us after the break if you have a good internet connection and want to see more pictures of the final product

Mooltipass final prototype

Continue reading “Developed On Hackaday: We Have Final Prototypes!”

The Megascroller, For Video Games In The Round

megascroller

The folks at NYC Resistor have a thing for circular displays, it seems. Their earlier Hexascroller was a ceiling mounted display with six 30×7 displays – good enough to display the time and a few textual message in six directions. The Octoscroller bumped up the display capability with eight 16×32 RGB LED panels. Now the Megascroller, a 32-sided 512×64 display is hanging in the hackerspace, complete with 360° Mario and Pong.

The Megascroller is one of [Trammell Hudson]’s projects, constructed out of sixty-four 32×16 RGB LED matrices. That’s an impressive amount of controllable LEDs, that required a lot of processing power: namely, the BeagleBone-powered LEDscape board used in their earlier Octoscroller

As far as applications go, they naturally have Pong, but a more interesting application is the side-scrolling Mario that requires you to move around the display as you play. You can check out a video of that below.

If you’d like to see the Megascroller in person, as well as a whole bunch of other crazy blinking interactive projects, NYC Resistor is holding a an interactive show this weekend, beer provided.

Continue reading “The Megascroller, For Video Games In The Round”