New To The Store: Teensy 3.1

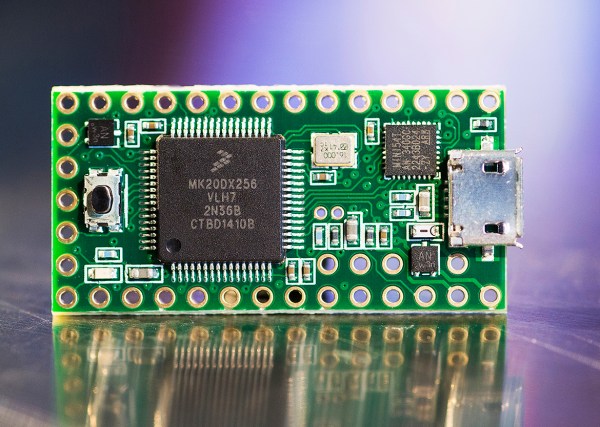
New today in the Hackaday Store is the Teensy 3.1. This development board blows away most others in its class. The board plays nicely with the Arduino IDE, but embedded developers who are hardcore enough have the option of bare metal programming for the Coretex-M4 chip.

Why would we say this blows most others away? In our minds, the 64k of RAM and 72 MHz clock speed place this far outside of what you would normally see hanging out in the Arduino ecosystem. That may be changing with new players like the Edison, but the Teensy 3.1 doesn’t require a host board and comes in just under $20 compared to the Edison’s $50 price tag.

[Paul Stoffregen], the developer of the Teensy, is a hacker’s hacker and is known to be found round these parts. All year [Paul] has been developing an Audio Library that takes advantage of the Teensy 3.1’s powerful processor (including its DMA features; we’ve been pestering him to write an article for us on that topic). We covered the library back in September and are stocking the audio add-on board in the store as well. Quite frankly, the quality of sound that this puts out is astonishing. If you’re working on a project that calls for playback of recorded sound this is one of the least-complicated ways to get there.

Reverse Engineering Altium Files

Several times in the last few weeks, I’ve heard people say, ‘this will be the last PCB I design in Eagle.’ That’s bad news for CadSoft, but if there’s one thing Eagle has done right, its their switch to an XML file format. Now anyone can write their own design tools for Eagle without mucking about with binary files.

Not all EDA softwares are created equally, and a lot of vendors use binary file formats as a way to keep their market share. Altium is one of the worst offenders, but by diving into the binary files it’s possible to reverse engineer these proprietary file formats into something nearly human-readable.

[dstanko.au]’s first step towards using an Altium file with his own tools was opening it up with a hex editor. Yeah, this is as raw as it can possibly get, but simply by scrolling through the file, he was able to find some interesting bits hanging around the file. It turns out, Altium uses something called a Compound Document File, similar to what Office uses for Word and PowerPoint files, to store all the information. Looking through the lens of this file format, [dstanko.au] found all the content was held in a stream called ‘FileHeader’, everything was an array of strings (yeah, everything is in text), and lines of text are separated by ‘|’ in name=value pairs.

With a little bit of code, [dstanko] managed to dump all these text records into a pseudo plain text format, then convert everything into JSON. You can check out all the code here.

[Peter] And The Amazing Technicolor Phone Wire Bracelet

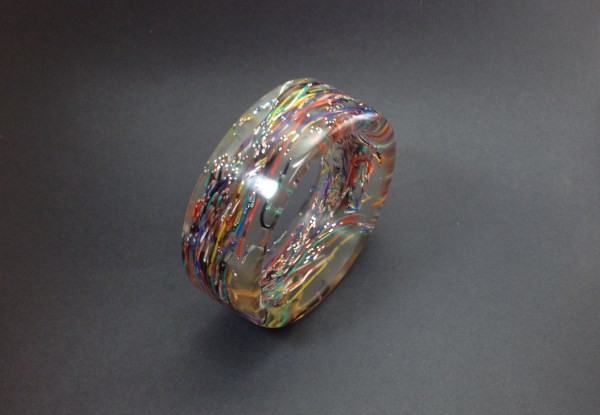
When a job left him with some extra phone wire, [Peter] didn’t toss it in the scrap pile. He broke out the casting resin and made an awesome bracelet (Imgur link). [Peter] is becoming quite an accomplished jeweler! When we last checked in on him, he was making rings out of colored pencils.

Casting the wire in resin was as simple as building a square form, placing the wires, then filling the form with appropriate amounts of epoxy and hardener. Once the epoxy cured, [Peter] drilled out the center with a sharp Forstner bit. A band saw brought the corners of the block closer to a cylinder.

From there it was over to the lathe, where [Peter] used a jam chuck to hold the bracelet in place. Once he shaped the bracelet [Peter] started wet sanding. It took Lots and lots of sanding both inside and out to finish the bracelet. The result is a mirror smooth finish, with bits of insulation bright copper just popping out of the resin.

One might think that the bracelet would be rough with all that copper, but [Peter] mentions on his Reddit Thread that it feels like plastic, though the bits of copper were “very pokey” before sanding. We’d recommend tossing on a clear coating to protect the exposed copper. Worn on a wrist, all that exposed metal would start oxidizing in no time.

This hack gives us lots of ideas for casting wearable circuits. Some WS2812’s and a teensy would make for a pretty flashy setup! Got an idea for a project? Tell us about in the comments, or post it up on Hackaday.io!

Continue reading “[Peter] And The Amazing Technicolor Phone Wire Bracelet”

Digital “Crystal” Breathes New Life Into Old Radio

[Bill Meara] of the Soldersmoke Podcast has a nice old Drake 2B radio, and wanted to use it for the 12 meter amateur band. These old radios normally make switching tuning bands easy — you just swap out one frequency crystal for another and you’re set.

Only [Bill] didn’t have the 21 MHz crystal that he needed. No problem, because he had a junk crystal, a hacksaw, and a modern direct-digital synthesis (DDS) chip sitting around. So he takes the donor crystal, cuts it open, and solders the two wires directly from the DDS to the crystal’s pins. Now he’s got a plug-in replacement digital oscillator that doesn’t require modifying the nice old Drake receiver at all. A sweet little trick.

The video’s a little bit long, but the money shot comes in around 5:00.

Now, one might worry about simply plugging a powered circuit (the DDS) in place of a passive element (the crystal), but it seems to work and the proof of the pudding is in the tasting. We wonder how far this digitally-controlled-analog-receiver idea could be extended.

Margarita Drip Infuser!

Margarita Drip Infuser Ensures A Perfect Mix

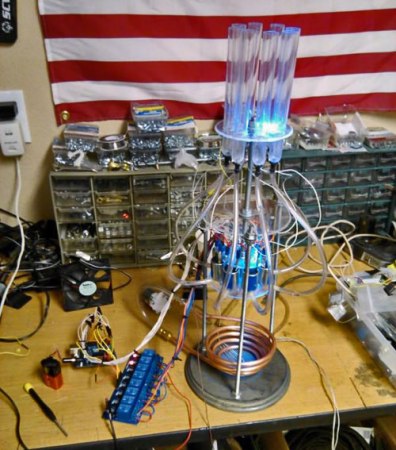
In order to get a margarita just right, the various ingredients need to be mixed together quite vigorously to over-come the different viscosity of the fluids. Looking to create his own barbot of sorts, [TVMiller] decided to make a Margarita Drip Infuser to help make margaritas a bit easier.

Using various chem lab supplies, [TVMiller] has cobbled together something pretty awesome. The Infuser can take up to 8 different ingredients into its test tube reserves, and after the drink ingredients are programmed on the computer, the magic begins.

An Arduino Uno controls a bank of 8 relays which control small fluid solenoids, with each control pulse releasing just a single droplet of fluid. An LED for each valve is run in parallel adding a bit of a light show to the mixing experience. If that’s not enough, he’s also created a copper cooling coil to chill the drink as it is poured.

Continue reading “Margarita Drip Infuser Ensures A Perfect Mix”

Homer Smart Remote

Homer Robot Ensures You Don’t Miss An Episode

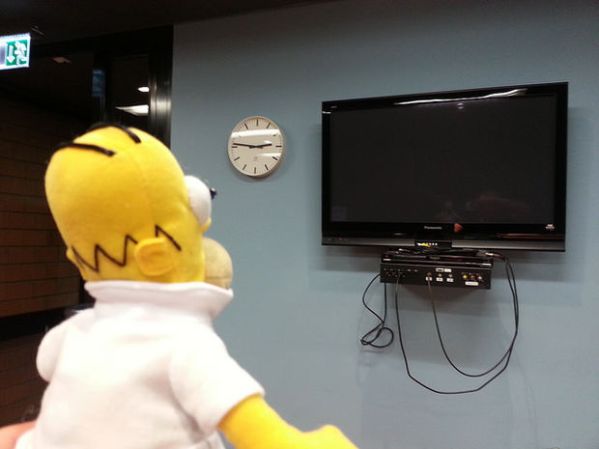
With our busy lives, who has time to pay attention to TV show schedules? [Tamberg] certainly didn’t and that is why he came up with the web-enabled TV remove he calls the Smart Homer. This miraculous device knows when ‘The Simpsons’ is being broadcast, turns on the TV and switches to the appropriate channel.

Like the real Homer, not too much is going on up in this toy’s noggin. A couple of IR emitters are mounted in place of pupils and the associated wires are run down into his body. Right between a pink donut and a Krusty burger resides an Arduino and ethernet shield. This electronic duo acts as a web server and looks out to the ‘net for an online script. The script polls an online TV Program Guide and if ‘The Simpsons’ are on at that time, it sends a signal back to the Arduino to turn the TV on.

Homer Smart Remote   Jolly Homer

DIY Auto Fish Feeder

DIY Auto Fish Feeder Feeds Fish Automatically

[Brian] has a fairly large 400 liter aquarium and loves the fish that call it home. Unfortunately, sometimes life gets in the way of keeping those fish fed on a regular basis. There are automatic fish feeders out there on the market and [Brian] gave one a try. Although it worked, it dropped one huge clump of food in at a time (rather than sprinkling it in), the food hopper held a very small amount of food and the unit drained a new set of batteries in less than a week. Fifty euros were spent on purchasing that auto feeder and in the end it wasn’t any more convenient than just feeding the fish.

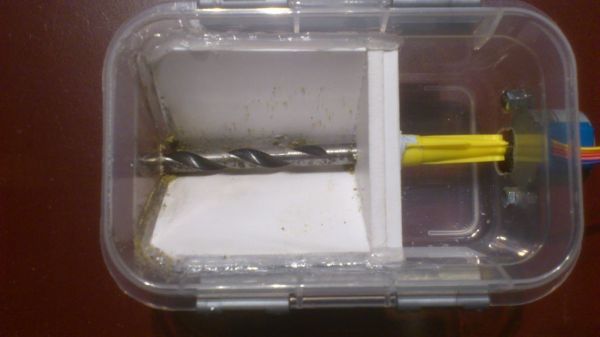
Faced with a tough decision on whether or not to buy another product he may not be happy with, [Brian] decided to make his own automatic fish feeder system out of parts anyone can find lying around the house. The main housing is a small Tupperware bin, inside of which 3 pieces of plastic were glued together to make a v-shaped hopper. The fish food is loaded into the hopper and as it falls to the bottom it meets a reverse-spinning drill bit that acts like an auger, pushing the food out of the container. The drill bit is powered by a small stepper motor connected to the drill bit by an improvised coupling made from a silicone sealant cap!

The control system is an Arduino and a stepper motor driver chip. Through trial and error [Brian] figured out that 100,000 half steps of the motor dumped a good amount of food into the tank. The drill bit delivery method even sprinkles the food nicely for total fish enjoyment. To keep the food flowing at regular intervals, an AC timer unit controls how often the Arduino is powered on and subsequently feeds the fish.

Continue reading “DIY Auto Fish Feeder Feeds Fish Automatically”