Robot Controller More Fun Than An Actual Wii-U

wii-u-bot-controller

Okay, that’s probably not fair since we never gave the Wii-U a try at all. But doesn’t this seem like a much better idea for controlling a robot than playing a gaming console?

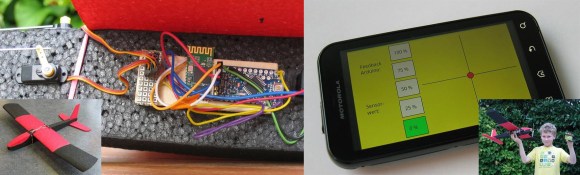
The photo above is a bit deceiving because the unit actually has quite a bit of depth. Despite that, the cleanliness of the build is very impressive. [Alec Waters] started off with a backup monitor meant for automotive use (we’d estimate 7″). There’s a radio receiver, two analog joysticks where your thumbs line up when holding the controller, and an Arduino to pull it all together. If you haven’t figured it out already, this displays the wireless video from the robot he’s controlling. He’s also include an auxiliary port which lets you bypass the radio receiver and plug in a video feed directly.

Still convinced you need Nintendo’s consumer controller with a built-in screen. Yes, that can be hacked to work with all your projects. But seriously, this is way more fun.

Garage Clicker Dashboard Integration

garagedoor-opener-in-dash

Vehicles with the highest level of trim package sometimes come with the ability to learn garage door opener codes. Less costly offerings lack that feature as well as others bells and whistles, leaving blank plates where fancy buttons would have been. [JiggMcFigg] makes the best of this situation by gutting his garage remote and hiding it behind a button blank.

One thing that raised an eyebrow is the coin cell battery holder you can make out on the size-check image shown to the left. But really, these remotes must drain their batteries at a rate nearly the same as an unused battery so why complicate the hack? A holder was soldered onto the board, and jumper wires were soldered to the push button added to the blank plate. This type of utilitarian button is much more satisfying to use than those fancy-pants silk-screen molded-plastic types anyway!

Of course you could go the other way with this hack. [JiggMcFigg] started out with the problem of losing the remotes in the mess of the car. You could retrofit it with a huge button to make it harder to misplace.

Light Your Way To The Correct Resistor

click-and-see

Who doesn’t have issues with component storage (seriously, tell us your secret in the comments)? IF you can get your spare parts organized, it’s still quite difficult to figure out where you actually squirreled them away. Labeling drawers is one thing, but what if you have hundreds or thousands of drawers (we’re looking at you, every Hackerspace that’s been around for more than a few months). This project adds a digital cue to well-organized parts storage by lighting up the component drawer for stock selected from your computerized inventory (translated).

The idea is that all of your parts are assigned a drawer space on the computer. When you go into the index and select a part, the assigned drawer is illuminated by an LED. The setup here is a breakout board for an I2C LED driver which interfaces with a Raspberry Pi, but the concept should be easy to implement with just about any system.

Need help getting to the point where you’re organized enough to implement this? So do we. Maybe revisiting this storage roundup will help.

Hanging Glass Speakers Look Super Cool

FWXDXNDHRCK3KUJ.MEDIUM

Looking for a modern way to spice up your apartment? Well if you’re not too much of an audiophile, these hanging glass speakers look awesome!

First off, we know the question you’re already asking — how do they sound? Well, to be honest, not that bad! You could describe it as being glassy (ha ha), but you would be surprised how nice the bass comes through. The speakers suffer when it comes to treble though as it comes out a bit muffled. This could be corrected with a few strategically placed hidden tweeters though!

So how do they work? Well, like any speaker, the sound comes from vibration — in this case, the glass is vibrated to produce the sound. To achieve this, [Evan] is using a pair of HiWave HIAX32C20-8 tactile transducers, which are actually designed to turn most surfaces into speakers. The tricky part of this build is how to hang them.

Having limited space in his room, [Evan] opted to hang the speakers from the ceiling with wire — the only problem is drilling glass isn’t that easy. He shares a few tips, and eventually succeeded using a Dremel tool. From there it was just a matter of installing some hooks in the ceiling, and stringing it all together.

Check out the following video to hear them in action!

Continue reading “Hanging Glass Speakers Look Super Cool”

An Easy Way To Power Flyback Transformers

FJISRREHR3EF3OP.LARGE

Let’s be honest. Playing with high voltage is awesome. Dangerous, but awesome — well, as long as you handle it properly. Flyback transformers are a great way to make a nice big electrical arc, but powering them isn’t that easy — or is it?

First off, for those that may not know, a flyback transformer is the type of transformer most commonly found in old TVs and CRT monitors. They typically can put out anywhere from 10kV to 50kV — the problem is, they aren’t that easy to power. Common methods include using a transistor style driver, or zero voltage switching (ZVS) — which is how [Skyy] cooked some s’mores at 50,000V.

As it turns out there’s another much easier and straight forward method. All you need is a fluorescent light ballast. Use the output on the ballast as the input on the primary winding of the flyback transformer — which can be found using a multimeter, just find the highest resistance between pins to identify it. Now because you’re working with such high voltages, you may want to insulate the flyback transformer by submerging it in mineral oil as to not short it out. That’s it.

Now it’s time to make some sparks.

Continue reading “An Easy Way To Power Flyback Transformers”

An Android Controlled Arduino Drone

Drone

Who among us has not wanted to create their own drone? [Stefan] wrote in to tell us about a project for high school students, where a Styrofoam glider (translated) is converted into an Android (or PC) controlled drone.

[Stefan] tells us that the inspiration for this project comes from 100 years ago, when “steam-engines were THE thing” and children became introduced to modern technology with toy engines. “Today, mechatronic designs are all around us and this is an attempt to build the equivalent of the toy steam engine.” This project showcases how modern tools make it easy for kids to get involved and excited about hardware hacking, electronics, and software.

At the heart of the glider is an Arduino Pro Mini which communicates with either a computer or an Android phone via Bluetooth. It is especially interesting to note that the student’s used Processing to create the Android app, rather than complicating things by using Eclipse and Android Development Tools (ADT). While the more detailed PDF documentation at the end of the project page is in German, all of the Processingand Arduino code needed to build the project is provided. It would be awesome to see more Bluetooth related projects include a simple Android application; after all, many of us carry computers in our pockets these days, so we might as well put them to good use!

Do you have any well documented projects that introduce young and budding engineers to hardware or software hacking? Let us know in the comment section or send us a tip!

Valentine’s PCBs To Make Your Heart Melt

valentines

Have you ever sat in bed, staring at a bottle of Iron III Chloride, and thought “I should do something with that…”? [Tobias] has. He wanted to use his tinkering skills to make his girlfriend happy, so he decided to make this beautiful etched PCB that professes his love to her.

The cool thing about this project is that [Tobias] has never etched a PCB, or even worked with SMD parts before! After designing the PCB layout on his computer, he printed it out on an inkjet transparency film and applied it to his PCB. After 14 minutes of exposure he then put the board into development fluid for about 60 seconds — it was starting to look good already! He then pulled out his trusty bottle of Iron III Chloride and began the etching process.

Once the board was etched, he soldered 18 red PLCC-2 LEDs in place, each with its own 330Ohm resistor. Not content with a simple on/off switch, [Tobias] decided to program a Trinket with a voltage regulator and mosfet to have it pulse on and off, similar to a beating heart! The finished project looks great, and we’re sure his girlfriend will love it.

Another bonus to doing something geeky like this for your loved ones means it will increase their acceptance of tools laying about, and half-finished projects that aren’t quite as pretty!