Hackaday Prize Entry: Synthetic Aperture Multispectral Imaging

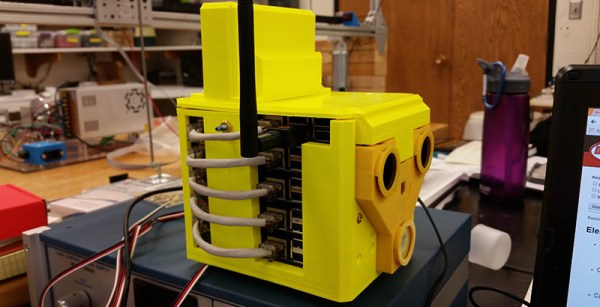
[Conrad] was tasked with building a synthetic aperture multispectral imaging device by his professor. It’s an interesting challenge that touches on programming, graphics, and just a bit of electrical engineering.

Tucked inside a garish yellow box that looks like a dumb robot are five Raspberry Pis, a TP-Link Ethernet switch, three Raspberry Pi NOIR cameras, and a Flir Lepton thermal camera. With three cameras, different techniques can be used to change the focal length of whatever is being recorded – that’s the synthetic aperture part of the build. By adding different filters – IR pass, UV, visual, and thermal, this camera can record images in a huge range of wavelengths.

[Conrad] has come up with a completely modular toolbox that allows for a lot of imaging experiments. By removing the filters, he can track objects in 3D. With all the filters in place, he can narrow down what spectra  he can record. It’s a mobile lab that’s completely modular, and we can’t wait to see what this little box can really do.


The 2015 Hackaday Prize is sponsored by:

Hardware Store CNC Machine Is Remarkably Precise

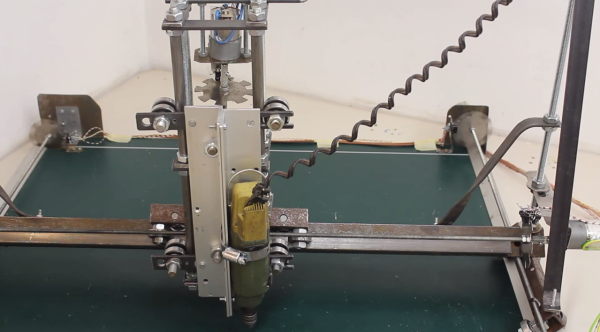
A vise, a hacksaw and file, some wrenches – the fanciest tools [HomoFaciens] uses while building his DIY hardware store CNC machine (YouTube link) are a drill press and some taps. And the bill of materials for this surprisingly precise build is similarly modest: the X- and Y-axes ride on cheap bearings that roll on steel tube stock and aluminum angles; drives are threaded rods with homemade encoders and powered by small brushed DC gear motors; and the base plate appears to be a scrap of ping-pong table. The whole thing is controlled by an Arduino and four H-bridges.

The first accuracy tests using a ball point pen for tooling are quite impressive. [HomoFaciens] was able to draw concentric circles eyeball-accurate to within a few tenths of a millimeter, and was able to show good repeatability in returning to a point from both directions on both the X- and Y-axis. After the pen tests, he shows off a couple of other hardware store tooling options for the Z-axis – a Proxxon rotary tool with a burr for engraving glass; a soldering iron for cutting styrofoam; and a mini-router that works well enough to cut some acrylic gears.

We’re impressed by this build, which demonstrates that you don’t need a fancy shop to build a CNC machine. If you’re getting the itch to jump into the shallow end of the CNC pool, check out some of the builds we’ve featured before, like this PVC CNC machine, or this $250 build.

[Thanks, ThunderSqueak]

LED Organ Chimes Its Light Pipes

Light pipes are a pretty tricky feature to pull off. If the generic set on Digikey doesn’t meet your size and shape constraints, you’ll need to either find a vendor who can fabricate a specific shape for you or redesign that feature altogether. [Folker’s] LED Organ does an excellent job in piping light out from the source, and he does so in a way that’s reproducible with just a couple hours at the hand tools and a couple minutes on a laser cutter.

Hidden inside the base is a cluster of hardware that orchestrates the outer piece. 24 RGB LEDs are broken out into a ring and hidden in the base. [Folker’s] design enables control of the ring through either the LED player or LED Stamp with pattern-generation made possible by the free software, Jinx!

These days, exposed LEDs are ubiquitous enough among DIY electronics to almost be considered a hallmark of the DIY-enthusiast. Sure, “getting the project off the ground” is a great mindset to adopt when trying out some new firmware or components, but it can often leads us to a project’s finish with most of the wiring still exposed. While we’re certainly not offended by exposed LEDs, the task of concealing the shape of these components while also achieving the desired lighting effects is a challenge and rare sight to see. Our hats are off to the execution of this visual symphony.

Continue reading “LED Organ Chimes Its Light Pipes”

Better 3D Prints By Mixing Slicing Techniques

Most 3D printing projects start with a 3D model of some kind. Slicing programs transform the model into gcode. The gcode file contains the commands that actually drive your printer. There are different ways to slice a model and sometimes you want to use more than one on a single model. I’ve been working on a way to make that easier.

When you slice a 3D printing model, you can select different attributes for the resulting gcode file. For example, you might set the slicer to produce different infill density, temperatures, or print speeds. These settings can have a big impact on your printing results. For example, a piece that needs high strength might require a denser infill  than some trinket or key chain. You might want an artistic piece to have a finer layer height than some internal part for some gadget no one will ever see.

One Size Fits All?

The problem is that for most open source slicers, these settings will apply to the entire model. Cura has some plugins that can change settings at different Z heights, and Slic3r can vary layer height, but in the general case, what you set for the slicer will apply to the entire model. Of course, a gcode file is nothing more than a text file, so if you are industrious, you can manually merge two or more files into one.

A manual merge is a pain, which is why I wrote gblend. It can stitch together gcode files to get various effects. The program takes multiple gcode files in as inputs and can combine them in different ways. The most useful feature allows you to get a certain number of layers from each source file and combine them into a single print. Measurements are in millimeters, so you don’t have to worry about layer numbers. The entire process is much easier than anything else I’ve come across.

Continue reading “Better 3D Prints By Mixing Slicing Techniques”

Review: Microchip Curiosity Is A Gorgeous New 8-bit Dev Board

Microchip has unveiled a new dev board called the Curiosity Development Board. I had my first look at this at Bay Area Maker Faire back in May but was asked not to publicize the hardware since it wasn’t officially released yet. Yesterday I got my hands on one of the first “pilot program” demo units and spent some time working with it.

I requested a sample board out of my own curiosity. As you may know, Microchip is one of the sponsors of the 2015 Hackaday Prize, but that partnership does not include this review. However, since we do have this relationship we asked if they would throw in a few extra boards that we could give away and they obliged. More about that at the end of the post.

Continue reading “Review: Microchip Curiosity Is A Gorgeous New 8-bit Dev Board”

Spools Of Thread For 6,400 Pixel Color Display

This is not an LED display, it’s a thread display. The hardware artists over at Breakfast, a Brooklyn based rapid product and prototype company, built this color display that uses spools of thread for each pixel. 6,400 spools to be exact.

Serious work went into this thing, and the results couldn’t be better. Check out the video after the break to see for yourself. The trick is to increase the surface area of the spools of thread. This is done by using the spool as a pulley which guides a 5.5 foot length of “threaded fabric”. Up close, the fabric looks as if it’s just wrapped around the wooden spool, but the extra length provides enough room for 36 different colors, each blending into the next in a gradient effect. Index the location of the fabric in each pixel system and you have a wide range of color options.

The piece was commissioned by clothing retailer Forever 21 and has even been given its own website. The display pulls Instagram photos with the #F21threadscreen hashtag and displays them. You can watch a live stream for the next week, and the dedicated site has a search feature to find a recording of your own photo by username.

We must once again give credit for producing the kind of advertising we want to see. This is both interesting and awesome. It gave some talented people work producing it, and sharing the details of the build is both interesting and inspiring for us. Want to see some more interesting advertising like this? Check out that Beck’s bottle used as a phonograph cylinder, and the extreme engineering used to separate Oreos.

Continue reading “Spools Of Thread For 6,400 Pixel Color Display”

No, Mounting A Gun To A Quadcopter (Probably) Isn’t Illegal

Earlier this month, [Austin Haghwout] posted a video on YouTube of a remote controlled quadcopter armed with a semiautomatic handgun. While there are no details of this build, it’s safe to say any reasonably sized quadcopter could be armed in such a manner; just strap a pistol to the frame, add a servo, and connect the servo to the RC receiver. We don’t think this is the first time it’s been done, but has garnered the most attention.

There is nothing novel about mounting a handgun to a quadcopter. Anyone with any experience with RC flying could replicate this build, and the only interesting part of watching a video of a quad firing a gun is seeing how the flight controller reacts to the recoil. However, in the pursuit of the exploitation of a fear of technology, this video has gone viral.

The Verge calls it, ‘totally illegal’, while The Christian Science Monitor asks how it is legal. Wired posits it is, ‘most likely illegal,’ while CNET suggests, ‘surely this isn’t legal.’ In a rare break from reality, YouTube commentors have demonstrated a larger vocabulary than normal, calling the build, ‘felonious.’

With so many calling this build illegal, there should be someone who could point out the laws or regulation [Austin Haghwout] is violating. This information is surprisingly absent. In a Newsweek post, a representative from the Bureau of Alcohol, Tobacco, Firearms, and Explosives is quoted as saying:

“ATF has reviewed the video with local law enforcement and other federal agencies. It does not appear that the device violates any existing firearms regulations…”

The Associated Press reports no state laws were broken by [Austin]. With the BAFTE and Connecticut State Police both signing off on this build, the issue of jurisdiction becomes more pronounced. How, exactly, is a gun mounted on a quad illegal?

The answer, as with all things involving quadcopters, comes from the FAA. We could find no regulations explicitly banning handguns on remote controlled quadcopters, but of all stories and posts on [Austin]’s handiwork, this is the closest anyone has come to providing the framework for calling this build illegal:

No pilot in command of a civil aircraft may allow any object to be dropped from that aircraft in flight that creates a hazard to persons or property. However, this section does not prohibit the dropping of any object if reasonable precautions are taken to avoid injury or damage to persons or property.

-FAR Part 91 Sec. 91.15

That’s it. The closest anyone has come to providing a reason why a semiauto quadcopter is illegal: because the cartridge (and bullet), are ‘dropped’ from a quad. The Feds charging [Austin] with “dropping” a bullet from a quadcopter is like taking down [Al Capone] for Income Tax Evasion. The difference being that [Al] was a notorious criminal who had obviously harmed a large swath of people and [Austin] doesn’t seem to be harming anyone.

Although [Austin]’s video of a gun toting quad is only fourteen seconds long, a few reasonable assumptions can be made about his small experiment in flying firepower. The video shows the quad hovering a few feet above the ground. This is surely allowed by the recently published safety guidelines for sUAS users. The gun itself appears to be firing into an offscreen hillside – a sensible precaution. If the only justification for the FAA’s investigation of [Austin]’s video is FAR 91.15, he’s on easy street.