Google Calendar Interface For Your Internet Of Lawns

If you live somewhere where summers are hot and dry, you can instantly tell which homes don’t have automatic sprinklers installed. Or they may have them installed, but like the blinking “12:00” on that VCR of yore, the owners may not have mastered the art of programming the controller. To be fair, the UI on most residential irrigation controllers is a bit wanting, which is the rationale behind letting Google Calendar tell your sprinklers when it’s time to water.

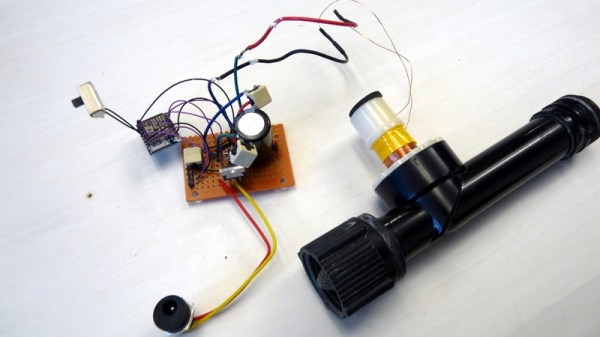
Granted, someone who is mystified by setting a digital clock is not likely to pull off [ClemRz]’s build. It’s still pretty simple stuff, though, centered around an ESP8266 as it is. And calling the result an “irrigation system” is a little bit of a stretch, given that it could only support a single zone with a solenoid valve harvested from a defunct sprinkler timer. But as a proof-of-concept, or to water a small area, it hits all the marks. The ESP8266 drives the latching solenoid valve through an H-bridge chip after reading your Google Calendar and looking for upcoming events to open or close the valve. The Google Script and the ESP8266 code default to failsafe so that a mistake doesn’t leave the valve open and run up your water bill or drain your well.

It’s easy to see how this can be expanded to control a multi-zone irrigation system and support a smartphone UI for instant control of the valves. Overrides based on weather forecasts would be a nice feature too. Or you could just read the soil moisture levels directly with backscatter sensors.

Defeat The Markup: Iphone Built By Cruising Shenzhen

[Scotty Allen] from Strange Parts, has just concluded a three month journey of what clearly is one of the most interesting Shenzhen market projects we have seen in a while. We have all heard amazing tales, pertaining the versatility of these Chinese markets and the multitude of parts, tools and expertise available at your disposal. But how far can you really go and what’s the most outrageous project can you complete if you so wished? To answer this question, [Scotty] decided to source and assemble his own Iphone 6S, right down to the component level!

The journey began by acquiring the vehemently advertised, uni-body aluminium back, that clearly does not command the same level of regard on these Chinese markets when compared to Apple’s advertisements. [Scotty’s] vlog shows a vast amount of such backings tossed as piles in the streets of Shenzhen. After buying the right one, he needed to get it laser etched with all the relevant US variant markings. This is obviously not a problem when the etching shop is conveniently situated a stones throw away, rather simplistically beneath a deck of stairs.

Next came the screen assembly, which to stay true to the original cause was purchased individually in the form of a digitizer, the LCD, back-light and later casually assembled in another shop, quicker than it would take you to put on that clean room Coverall, you thought was needed to complete such a job.

[Scotty] reports that sourcing and assembling the Logic board proved to be the hardest part of this challenge. Even though, he successfully  purchased an unpopulated PCB and all the Silicon; soldering them successfully proved to be a dead end and instead for now, he purchased a used Logic board. We feel this should be absolutely conquerable if you possessed the right tools and experience.

All the other bolts and whistles were acquired as separate components and the final result is largely indistinguishable from the genuine article, but costs only $300. This is not surprising as Apple’s notorious markup has been previously uncovered in various teardowns.

Check out [Scotty’s] full video that includes a lot of insight into these enigmatic Shenzhen Markets. We sure loved every bit of it. Now that’s one way get a bargain!

Continue reading “Defeat The Markup: Iphone Built By Cruising Shenzhen”

4.4 GHz Frequency Synthesis Made Easy

How hard is it to create a synthesizer to generate frequencies between 35 MHz to 4.4 GHz? [OpenTechLab] noticed a rash of boards based on the ADF4351 that could do just that priced at under $30. He decided to get one and try it out and you can find his video results below.

At that price point, he didn’t expect much from it, but he did want to experiment with it to see if he could use it as an inexpensive piece of test gear. The video is quite comprehensive (and weighs in at nearly an hour and a half). It covers not just the device from a software and output perspective but also talks about the theory behind these devices.  [OpenTechLab] even sniffed the USB connection to find the protocol used to talk to the device. He wasn’t overly impressed with the performance of the board but was happy enough with the results at the price and he plans to make some projects with it.

Continue reading “4.4 GHz Frequency Synthesis Made Easy”

Detect Cars Running Stop Signs (and Squirrels Running Across The Roof)

There’s a stop sign outside [Devin Gaffney]’s house that, apparently, no one actually stops at. In order to avoid the traffic and delays on a major thoroughfare, cars take the road behind [Devin Gaffney]’s house, but he noticed a lot of cars didn’t bother to stop at the stop sign. He had a Raspberry Pi and a camera, so he set them up to detect the violating cars.

His setup is pretty standard – Raspberry Pi and camera pointed outside at the intersection. He’s running OpenCV and using machine learning to detect the cars and determine if they have run the stop sign or not. His website has some nice charts showing when the violations occurred by hour and by day of the week. Also on the site are links that you can use to help train the system in noticing cars, cars that run the stop sign, determining if there’s enough of the video to determine if there’s a violation, and whether or not there’s a car going the wrong way through the intersection.

This is an interesting use of the Pi and OpenCV; there’s no guarantee that this will help the people of [Devin Gaffney]’s neighborhood, but hopefully gives them some ammunition (assuming they want something done about the intersection.) It’s a cheap and easy setup and it’s nice to let the community have a hand in training the system. For more OpenCV, check out this article on taking the perfect jump shot or this one which tries to quantify cloudiness. Cool stuff.

[via reddit]

Continue reading “Detect Cars Running Stop Signs (and Squirrels Running Across The Roof)”

Can You Build An E-ink Display From Scratch?

Modern displays are fascinating little things. In particular, the E-Ink displays employed in modern E-books achieve mesmerising paper like contrast with excellent standby power consumption.  Many of us at some point have had a go at experimenting with DIY displays, but been discouraged by the miniature scales involved. Driving them is hard enough, but building your own?

[MChel] has achieved some excellent success in building a simple E-Ink display. The account presented on this Russian electronics forum, graciously translated for us by Google Translate, outlines that the greatest barrier to pursing this in your home lab is creating the conductive layer that serve as electrodes for each pixel and depositing the thin layer of electrostatically charged ink pellets onto another transparent yet conductive film. [MChel] solution was to extract a small a portion of pre-deposited ink from a smashed and notoriously brittle E-ink display. Next, instead of attempting to build an ambitious and dense grid of electrodes, [MChel] etched a simple battery indicator on a PCB. The ink and the electrodes were then fused with some DIY graphite based conductive glue and sealed with some careful yet ingenuitive epoxy laying skills.

The DIY electrodes

The result is a working battery indicator that consumes no power, whilst reporting any remaining power.

There is something increasingly defiant and laudable about home-brewing technologies, otherwise thought to be confined to multi-million dollar factories. We have already covered how you should go about making some conductive glass and using it in your homemade LCD.

Every Tornado Siren In Dallas Hacked

Someone had some fun with the Dallas early warning tornado siren system on Friday, April 8th. All 156 tornado sirens were hacked to go off just before midnight until they were manually turned off individually, reports The Washington Post. Thousands of residents flooded 911 call centers asking if they were under attack, if there was a tornado or if the zombie apocalypse had begun. The sirens were blaring for at least an hour and was originally put down as a malfunction, however it was later revealed that it was a hack and the “hacker” must have had physical access to the siren control center.

This isn’t the first time Dallas has had problems with “hackers” breaking into their infrastructure, Only last year some unknown person/persons hacked electronic road signs (a prank we’ve seen before) in and around Dallas claiming “Work is Canceled — Go Back Home” and “Donald Trump Is A Shape-shifting Lizard!!”. Mayor Mike Rawlings claims the perpetrators will be found and prosecuted although we don’t share his confidence since last year’s attackers are still at large.

The video below is one of many on YouTube filmed by bemused Dallas residents.

UPDATE: This hack seems to have been accomplished via DTMF signals broadcast on radio frequency in the clear. Recognizing the vulnerability after the fact, the system is now using some form of encryption for the control messages. Thanks [Dan J.] for posting this in the comments below.

Continue reading “Every Tornado Siren In Dallas Hacked”

Hackaday Prize Entry: Real Hard Drives In The Raspberry Pi

‘Boy, I wish the Raspberry Pi had a SATA port’. This is the plea that echoes through the Internet, and for once, the Internet is not wrong. A SATA port — or any connector to a big, dumb spinny disk — would be a great addition to the Raspberry Pi ecosystem.

[AlanH]’s entry to the Hackaday Prize is the exact opposite of what everyone wants. The NetPi-IDE is a Parallel ATA IDE disk emulator that turns an inexpensive Raspi Zero into a big, dumb, unspinny hard drive. Drop this machine in your Windows 98 Starcraft battlestation, and you have a hard drive that you can ssh into.

As with any build involving a lot of data, bandwidth is important. The highest bandwidth interface on the Pi’s GPIO ports is the SPI interface. [AlanH] is hanging a Lattice MachXO2 FPGA off the SPI port and using that to emulate a disk. In the future, he’s going to move to the much more open Lattice iCE40HX, compatable with the Open Source IceStorm synthesis chain.

The feature set for this project includes proper IDE disk emulation with sizes ranging from 10 Megabytes to 8 Gigabytes tested so far. If you need anything bigger, you don’t need an IDE drive. A DOS redirector allows mounting any arbitrary directory to a DOS drive letter, a virtual network interface turns this project into The Cloud™, and a serial console is mapped to unused IDE registers, allowing any host system to login to the Pi without any external cables.

While it’s not what everyone wants in a Pi, this is an exceptionally cool project. PATA drives are getting old, and the systems supporting them are too. If you want to keep those retrocomputers running, we have to start planning now, and there’s no better way to do that than with cheap hardware and Open Source toolchains.