4.4 GHz Frequency Synthesis Made Easy

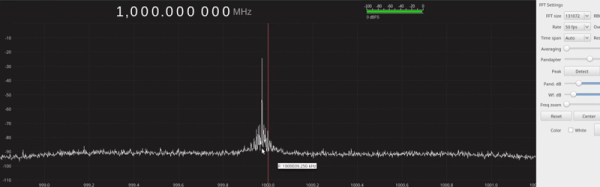
How hard is it to create a synthesizer to generate frequencies between 35 MHz to 4.4 GHz? [OpenTechLab] noticed a rash of boards based on the ADF4351 that could do just that priced at under $30. He decided to get one and try it out and you can find his video results below.

At that price point, he didn’t expect much from it, but he did want to experiment with it to see if he could use it as an inexpensive piece of test gear. The video is quite comprehensive (and weighs in at nearly an hour and a half). It covers not just the device from a software and output perspective but also talks about the theory behind these devices.  [OpenTechLab] even sniffed the USB connection to find the protocol used to talk to the device. He wasn’t overly impressed with the performance of the board but was happy enough with the results at the price and he plans to make some projects with it.

Continue reading “4.4 GHz Frequency Synthesis Made Easy”

Detect Cars Running Stop Signs (and Squirrels Running Across The Roof)

There’s a stop sign outside [Devin Gaffney]’s house that, apparently, no one actually stops at. In order to avoid the traffic and delays on a major thoroughfare, cars take the road behind [Devin Gaffney]’s house, but he noticed a lot of cars didn’t bother to stop at the stop sign. He had a Raspberry Pi and a camera, so he set them up to detect the violating cars.

His setup is pretty standard – Raspberry Pi and camera pointed outside at the intersection. He’s running OpenCV and using machine learning to detect the cars and determine if they have run the stop sign or not. His website has some nice charts showing when the violations occurred by hour and by day of the week. Also on the site are links that you can use to help train the system in noticing cars, cars that run the stop sign, determining if there’s enough of the video to determine if there’s a violation, and whether or not there’s a car going the wrong way through the intersection.

This is an interesting use of the Pi and OpenCV; there’s no guarantee that this will help the people of [Devin Gaffney]’s neighborhood, but hopefully gives them some ammunition (assuming they want something done about the intersection.) It’s a cheap and easy setup and it’s nice to let the community have a hand in training the system. For more OpenCV, check out this article on taking the perfect jump shot or this one which tries to quantify cloudiness. Cool stuff.

[via reddit]

Continue reading “Detect Cars Running Stop Signs (and Squirrels Running Across The Roof)”

Can You Build An E-ink Display From Scratch?

Modern displays are fascinating little things. In particular, the E-Ink displays employed in modern E-books achieve mesmerising paper like contrast with excellent standby power consumption.  Many of us at some point have had a go at experimenting with DIY displays, but been discouraged by the miniature scales involved. Driving them is hard enough, but building your own?

[MChel] has achieved some excellent success in building a simple E-Ink display. The account presented on this Russian electronics forum, graciously translated for us by Google Translate, outlines that the greatest barrier to pursing this in your home lab is creating the conductive layer that serve as electrodes for each pixel and depositing the thin layer of electrostatically charged ink pellets onto another transparent yet conductive film. [MChel] solution was to extract a small a portion of pre-deposited ink from a smashed and notoriously brittle E-ink display. Next, instead of attempting to build an ambitious and dense grid of electrodes, [MChel] etched a simple battery indicator on a PCB. The ink and the electrodes were then fused with some DIY graphite based conductive glue and sealed with some careful yet ingenuitive epoxy laying skills.

The DIY electrodes

The result is a working battery indicator that consumes no power, whilst reporting any remaining power.

There is something increasingly defiant and laudable about home-brewing technologies, otherwise thought to be confined to multi-million dollar factories. We have already covered how you should go about making some conductive glass and using it in your homemade LCD.

Every Tornado Siren In Dallas Hacked

Someone had some fun with the Dallas early warning tornado siren system on Friday, April 8th. All 156 tornado sirens were hacked to go off just before midnight until they were manually turned off individually, reports The Washington Post. Thousands of residents flooded 911 call centers asking if they were under attack, if there was a tornado or if the zombie apocalypse had begun. The sirens were blaring for at least an hour and was originally put down as a malfunction, however it was later revealed that it was a hack and the “hacker” must have had physical access to the siren control center.

This isn’t the first time Dallas has had problems with “hackers” breaking into their infrastructure, Only last year some unknown person/persons hacked electronic road signs (a prank we’ve seen before) in and around Dallas claiming “Work is Canceled — Go Back Home” and “Donald Trump Is A Shape-shifting Lizard!!”. Mayor Mike Rawlings claims the perpetrators will be found and prosecuted although we don’t share his confidence since last year’s attackers are still at large.

The video below is one of many on YouTube filmed by bemused Dallas residents.

UPDATE: This hack seems to have been accomplished via DTMF signals broadcast on radio frequency in the clear. Recognizing the vulnerability after the fact, the system is now using some form of encryption for the control messages. Thanks [Dan J.] for posting this in the comments below.

Continue reading “Every Tornado Siren In Dallas Hacked”

Hackaday Prize Entry: Real Hard Drives In The Raspberry Pi

‘Boy, I wish the Raspberry Pi had a SATA port’. This is the plea that echoes through the Internet, and for once, the Internet is not wrong. A SATA port — or any connector to a big, dumb spinny disk — would be a great addition to the Raspberry Pi ecosystem.

[AlanH]’s entry to the Hackaday Prize is the exact opposite of what everyone wants. The NetPi-IDE is a Parallel ATA IDE disk emulator that turns an inexpensive Raspi Zero into a big, dumb, unspinny hard drive. Drop this machine in your Windows 98 Starcraft battlestation, and you have a hard drive that you can ssh into.

As with any build involving a lot of data, bandwidth is important. The highest bandwidth interface on the Pi’s GPIO ports is the SPI interface. [AlanH] is hanging a Lattice MachXO2 FPGA off the SPI port and using that to emulate a disk. In the future, he’s going to move to the much more open Lattice iCE40HX, compatable with the Open Source IceStorm synthesis chain.

The feature set for this project includes proper IDE disk emulation with sizes ranging from 10 Megabytes to 8 Gigabytes tested so far. If you need anything bigger, you don’t need an IDE drive. A DOS redirector allows mounting any arbitrary directory to a DOS drive letter, a virtual network interface turns this project into The Cloud™, and a serial console is mapped to unused IDE registers, allowing any host system to login to the Pi without any external cables.

While it’s not what everyone wants in a Pi, this is an exceptionally cool project. PATA drives are getting old, and the systems supporting them are too. If you want to keep those retrocomputers running, we have to start planning now, and there’s no better way to do that than with cheap hardware and Open Source toolchains.

Retro Teardown: Inside An 8-Track Stereo Player

If you are a connoisseur of analogue audio, it’s probable you might have a turntable and a stack of records at home somewhere. If you are of a certain age you may even have a cassette deck, though you’re more likely to have abandoned that format some time in the 1990s. If you are old enough to have been around in the 1960s or 1970s though, you may have owned another analogue audio format. One of several that you might have found in a well-equipped home of that period was the 8-track stereo cartridge, a self-contained tape cassette format that fit four stereo tracks onto a single quarter-inch tape loop as eight parallel tracks, four each of left and right. A triumph of marketing, really, it should more accurately have been called 4-track stereo.

An 8-track stereo cartridge. Government & Heritage Library, State Library of NC (CC BY 2.0).

8-track cartridges were developed from earlier tape cartridge formats, largely to satisfy the demands of the automotive industry for interchangeable in-car entertainment. Thus if you owned an 8-track player it was most likely to have been found in your car, but it was not uncommon to find them also incorporated into home hi-fi systems. Thus we come to our subject today. Our retrotechtacular series usually highlights a video showing a bygone technology, but today we’re going to get a little more hands-on.

Some time in the early 1990s, I acquired an 8-track player, a BSR McDonald unit manufactured in the UK and dating from the early 1970s. BSR were much more well-known for their turntables, so this is something of an oddity. Where I found it has disappeared into the mists of time, but it was probably at a radio rally or junk sale. I certainly didn’t buy it because I wanted it to play 8-track tapes, instead I wanted a talking point for my hi-fi, something quirky to set it apart from everyone else’s. So every incarnation of listening enjoyment chez List for the last quarter century has had an 8-track player nestling within it, even if it has never played a tape while in my ownership. Thus we have a unique opportunity for this retro teardown.

Continue reading “Retro Teardown: Inside An 8-Track Stereo Player”

Friday Hack Chat: Open Source Silicon

This Friday, Hackaday.io will be graced with purveyors of Open Source Silicon. Join us in the Hackaday.io Hack Chat this Friday, April 14 at noon PDT (19:00 UTC) for a conversation with SiFive, an ‘Open’ silicon manufacturer.

This week, we’re sitting down with SiFive, a fabless semiconductor company and makers of the HiFive1, an Open Hardware microcontroller that you can just go out and buy. Late last year, SiFive released the HiFive1, an Arduinofied version of SiFive’s FE310 System on Chip. This SoC is a RISC-V core and one of the first microprocessors that is completely Open Source. It is an affront to Stallmanism, the best hope we have for truly Open hardware, and it’s pretty fast, to boot.

SiFive isn’t only working on Open Hardware microcontrollers — their business plan is pretty much, ‘OSH Park, but for silicon’. If you have a design for a new type of chip, they’ll work with foundries to turn your design into a cute little epoxy impregnated blob. It’s a fascinating business plan, and you’re going to hear all about it this Friday in the Hack Chat.

Here’s How To Take Part:

join-hack-chatOur Hack Chats are live community events on the Hackaday.io Hack Chat group messaging.

Log into Hackaday.io, visit that page, and look for the ‘Join this Project’ Button. Once you’re part of the project, the button will change to ‘Team Messaging’, which takes you directly to the Hack Chat.

You don’t have to wait until Friday; join whenever you want and you can see what the community is talking about.

Upcoming Hack Chats

We’ve got a lot on the table when it comes to our Hack Chats. On April 21st, we’re going to be talking magnets with Nanomagnetics. Making magnets, collecting magnets, playing with magnets, it’ll all be over on the Hack Chat.