Raspberry Pi Gets PATA/IDE Drive Via GPIO Header

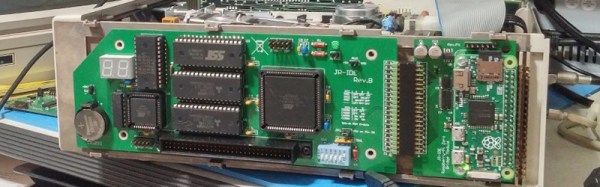
By and large, the Raspberry Pi is a computer that eschews legacy interfaces. Primarily relying on SD cards for storage and USB ports for further expansion, magnetic hard drives are a rare sight. However, [Manawyrm] decided that some 40-pin goodness was in order, and set to making a PATA IDE adapter for the platform.

To achieve the task of interfacing now-vintage IDE devices with the Raspberry Pi, [Manawyrm] elected to use the single board computer’s GPIO pins to get the job done. 23 pins are required, with 16 used for the data bus, with the rest dedicated to address lines, strobes, and other features.

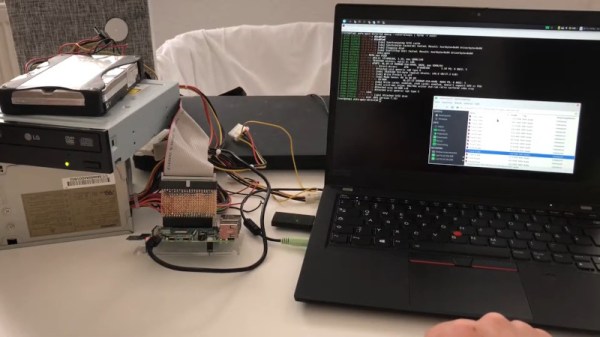
The adapter is no speed demon, netting 800 KiB/s on reads and 500 KiB/s on writes with a Raspberry Pi 4. The main bottleneck comes from relying on libgpiod, which [Manawyrm] readily admits is designed for general IO tasks, not data transfers. Despite this, it’s still fast enough to play an audio CD from an IDE CD-ROM drive without skipping. A kernel build is required, however, as Raspberry Pis are unsurprisingly not configured to use ATA disks by default.

Obviously, more serious applications would substitute a dedicated USB hard disk adapter or give the Raspberry Pi a PCI-express (PCIe) card for sata drives instead, but that doesn’t discount the fun inherent in the build. While it may be slow, it shows that talking to PATA hard disks is actually quite straightforward when you understand the basics. Of course, if you want to do the opposite, and have your Raspberry Pi emulate a PATA disk, that’s possible too. Video after the break.

Continue reading “Raspberry Pi Gets PATA/IDE Drive Via GPIO Header”

Hackaday Prize Entry: Real Hard Drives In The Raspberry Pi

‘Boy, I wish the Raspberry Pi had a SATA port’. This is the plea that echoes through the Internet, and for once, the Internet is not wrong. A SATA port — or any connector to a big, dumb spinny disk — would be a great addition to the Raspberry Pi ecosystem.

[AlanH]’s entry to the Hackaday Prize is the exact opposite of what everyone wants. The NetPi-IDE is a Parallel ATA IDE disk emulator that turns an inexpensive Raspi Zero into a big, dumb, unspinny hard drive. Drop this machine in your Windows 98 Starcraft battlestation, and you have a hard drive that you can ssh into.

As with any build involving a lot of data, bandwidth is important. The highest bandwidth interface on the Pi’s GPIO ports is the SPI interface. [AlanH] is hanging a Lattice MachXO2 FPGA off the SPI port and using that to emulate a disk. In the future, he’s going to move to the much more open Lattice iCE40HX, compatable with the Open Source IceStorm synthesis chain.

The feature set for this project includes proper IDE disk emulation with sizes ranging from 10 Megabytes to 8 Gigabytes tested so far. If you need anything bigger, you don’t need an IDE drive. A DOS redirector allows mounting any arbitrary directory to a DOS drive letter, a virtual network interface turns this project into The Cloud™, and a serial console is mapped to unused IDE registers, allowing any host system to login to the Pi without any external cables.

While it’s not what everyone wants in a Pi, this is an exceptionally cool project. PATA drives are getting old, and the systems supporting them are too. If you want to keep those retrocomputers running, we have to start planning now, and there’s no better way to do that than with cheap hardware and Open Source toolchains.

Speeding Up A ThinkPad X41 Via A SATA SSD Conversion

[Marek Walther] uses a ThinkPad x41 tablet for business on a daily basis. Since he’s on the go with the device he figures that hardware failure is eventually going to strike and with that in mind he purchased a second unit – slightly broken – to fix as a backup. He had never been excited about the speed of the tablet so he set out to find improvements. One of the options was to replace the traditional hard drive with a solid state model (translated). But simply dropping in an SSD isn’t going to make things faster. That’s because the stock drive uses a PATA interface. After a bit of snooping [Marek] discovered that the motherboard has a SATA interface that has a bridge connecting to the PATA plug. By removing the bridge and soldering a SATA cable to the board he was able to improve performance while increasing storage capacity at the same time.

Hard Drive Password Recovery

Here’s a guide for recovering protection passwords from ATA hard drives (translated). These passwords are stored in a special area of the hard disk that also contains the firmware for the device. Normally you can’t get at them but [Supersonic] walks us through a method used to grab the data off of a Western Digital Scorpio drive. Booting into a program called MHDD you are able to bypass the BIOS (which won’t allow you to read protected data) and directly drive the SATA or PATA controller on your motherboard. Once you’ve dumped the data it can be viewed with a HEX editor, and if you know where to look you can grab the passwords that are locking the disk.

This reminds us of some of the original Xbox hacks which used a variety of methods to unlock the stock hard disk.

Storage For Your Hacking Needs

Sometimes your project needs a lot of non-volatile ROM, right on cue [Matthew] let us know how to not only connect, interface, read, and write to SD cards with a PIC over serial, but also how to do the above mentioned with an old PATA HDD. For those without a PIC/serial connection don’t fret, [nada] let us know about his Bus Pirate SD card hack, of which our personal favorite part is the creative use of an old 5.25″ floppy connector as the SD card socket.

Acer Aspire One Hard Drive Upgrade


As promised, [tnkgrl] has published part two of Acer Aspire One upgrade. In part one she added Bluetooth and more RAM. This time around she focuses on the storage. The subnotebook comes from the factory with an 8GB SSD. The flash based storage readily unplugs from a small ZIF connector. [tnkgrl] replaced it with a 60GB PATA Samsung drive salvaged from an iPod. It’s a 1.8inch disk and is only 5mm thick, so it can be tucked under the motherboard. Knowing its previous use, it should prove fairly resilient. You can view a video of the swap and more photos on Flickr.

Up next is part three, where she’ll add 3G support.