The Value Of Cardboard In Product Design

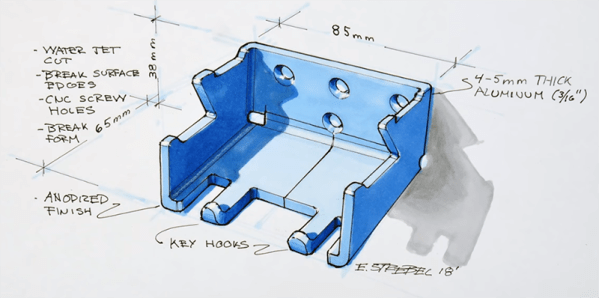
A while ago, [Eric Strebel] created a backpack hanger. The result was great — by just bolting this backpack hanger to the wall, he kept his backpack off the floor and out of the way. There was even a place for him to set his phone to charge. [Eric] is thinking about turning this idea into a product, and just posted a video on his process of making a cardboard mockup.

Since this is a study in industrial design, any mockup will need to keep in mind how the finished article will be constructed. In this case, [Eric] is going to use 4-5mm thick aluminum, cut on a water jet, bent into place, and finally anodized. The finished product will be made out of bent sheet aluminum, so this little bit of product design will use Matboard — a thick, heavy cardboard often used for mounting pictures in frames. The Matboard will substitute for the aluminum, as it is carefully cut, bent, and glued into shape.

The tools for this build are simple, just a hobby knife, razor blade, ruler, and a pen. But there are a few tricks to working with Matboard. To bend these pieces perfectly, [Eric] is painting one side with water. This loosens the fibers in the Matboard, allowing for perfect creases before one layer of the build is glued together.

Once a few layers of this Matboard are glued together, the finished product becomes less like cardboard and more like a very soft wood. This allows [Eric] to use belt sanders and countersink drill bits to give a little bit of polish to this one-off prototype. This finished article works great, and now [Eric] is looking at taking this idea into production.

Continue reading “The Value Of Cardboard In Product Design”

Hack My House: Opening Raspberry Pi To The Internet, But Not The Whole World

If you’ve followed along with our series so far, you know we’ve set up a network of Raspberry Pis that PXE boot off a central server, and then used Zoneminder to run a network of IP cameras. Now that some useful services are running in our smart house, how do we access those services when away from home, and how do we keep the rest of the world from spying on our cameras?

Before we get to VPNs and port forwarding, there is a more fundamental issue: Do you trust your devices? What exactly is the firmware on those cheap cameras really doing? You could use Wireshark and a smart switch with port mirroring to audit the camera’s traffic. How much traffic would you need to inspect to feel confident the camera never sends your data off somewhere else?

Thankfully, there’s a better way. One of the major features of surveillance software like Zoneminder is that it aggregates the feeds from the cameras. This process also has the effect of proxying the video feeds: We don’t connect directly to the cameras in order to view them, we connect to the surveillance software. If you don’t completely trust those cameras, then don’t give them internet access. You can make the cameras a physically separate network, only connected to the surveillance machine, or just set their IP addresses manually, and don’t fill in the default route or DNS. Whichever way you set it up, the goal is the same: let your surveillance software talk to the cameras, but don’t let the cameras talk to the outside world.

Edit: As has been pointed out in the comments, leaving off a default route is significantly less effective than separate networks. A truly malicious peice of hardware could easily probe for the gateway.

This idea applies to more than cameras. Any device that doesn’t need internet access to function, can be isolated in this way. While this could be considered paranoia, I consider it simple good practice. Join me after the break to discuss port forwarding vs. VPNs.

Continue reading “Hack My House: Opening Raspberry Pi To The Internet, But Not The Whole World”

Memory Mapping Methods In The Super Nintendo

Not only is the Super Nintendo an all-around great platform, both during its prime in the 90s and now during the nostalgia craze, but its relative simplicity compared to modern systems makes it a lot more accessible from a computer science point-of-view. That means that we can get some in-depth discussion on how the Super Nintendo actually does what it does, and understand most of it, like this video from [Retro Game Mechanics Explained] which goes into an incredible amount of detail on the mechanics of the SNES’s memory system.

Two of the interesting memory systems the SNES uses are called DMA and HDMA. DMA stands for direct memory access, and is a way for the Super Nintendo to access memory independently of the CPU. The advantages to this are that it’s incredibly fast compared to more typical methods of accessing memory. This isn’t particulalry unique, but the HDMA system is. It allows the SNES to do all kinds of interesting tricks with its video output display like changing color gradients and doing all kinds of masking effects.

If you’re interested in the inner workings of classic consoles like the SNES, this video gets way down in the weeds in the system itself. It’s interesting to see how programmers were able to squeeze more capability from these limited (by modern standards) systems by manipulating memory like the DMA and HDMA systems do.  [Retro Game Mechanics Explained] is a great resource for exploring in-depth aspects of lots of classic games, like how speedrunners can execute arbitrary code in old Mario games.

Continue reading “Memory Mapping Methods In The Super Nintendo”

Backyard Planetarium With Magnets

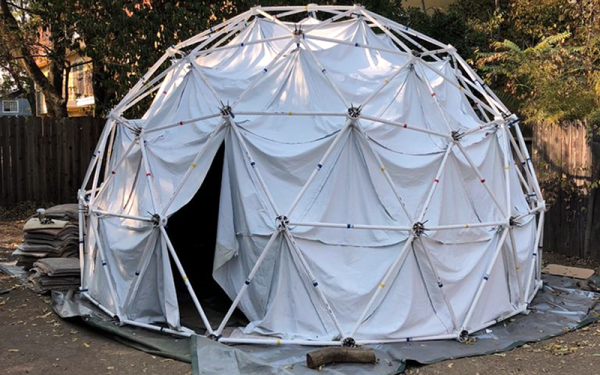
If you are a Hackaday reader, you probably like space in real life, fiction, or both. A trip to a planetarium is a great treat, but what if you could have a planetarium in your backyard? [Ecasill] thought so and used a Zip Tie domes kit to create just such a thing. It takes some sewing and a projector, but there’s a problem. The dome needs to come down if there is going to be bad weather. The answer? Magnetic dowel rods.

Because the magnets are brittle, plastic dip covers them after epoxy sticks them in place. The cloth has steel bolts to adhere, too. All in, the setup cost about $2,000. That includes a projector, a mirror ball, a sound system, and all the construction.

Continue reading “Backyard Planetarium With Magnets”