The History Of The World’s First Planetarium

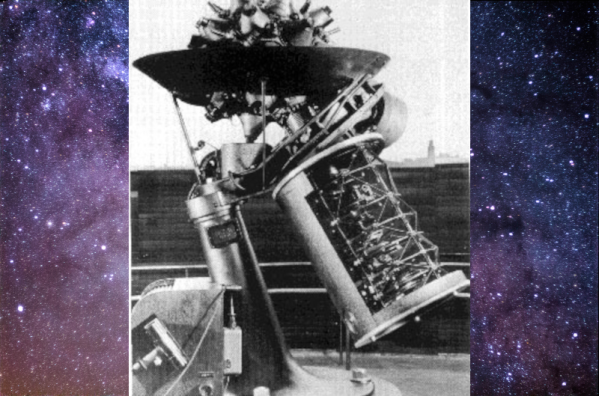
It shouldn’t be a surprise that the idea of a planetarium originated with an electrical engineer, [Oskar von Miller] from the Deutsches Museum in Munich. According to [Allison Marsh] in IEEE Spectrum, he thought about the invention in 1912 as a way to demonstrate astronomical principles to the general public. While it seems obvious today that you can project the night sky onto a dome, it was a novel thought in 1912. So novel that the Carl Zeiss company first told [von Miller] to take a hike. But they eventually reconsidered and built the first planetarium, the Model I.

The engineer for Zeiss was a mechanical engineer by the name of [Walther Bauersfeld]. He was familiar with mechanical devices — orreries — that tracked the motion of the stars and planets. The goal was to translate those movements into a moving projection of light.

Continue reading “The History Of The World’s First Planetarium”

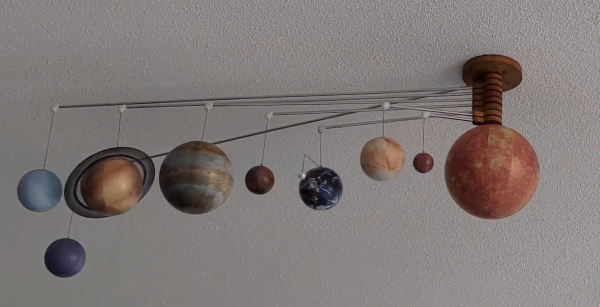
A ceiling-mounted model of the Solar System

Ceiling-Mounted Orrery Is An Excercise In Simplicity

Ever since humans figured out that planets move along predetermined paths in the heavens, they have tried to make models that can accurately predict their motion. Watchmakers and astronomers worked together to create orreries: mechanical contraptions that illustrate the positions of all planets and the way they move over time through complex gear systems. [Illusionmanager] continues the orrery tradition but uses a different approach: he built a beautiful ceiling-mounted model of our Solar System without a gearing system.

The mechanism that makes his Solar System tick is deceptively simple. All planets can move freely along their orbit’s axis except Mercury, which is moved along its orbit by a motor hidden inside the Sun. Once Mercury has completed a full revolution, a pin attached to its arm will begin pushing Venus along with it. After Venus has completed a full circle, its own pin will pick up Earth, and so on all the way to Neptune. Neptune is then advanced to its correct location as reported by NASA, after which Mercury’s motion is reversed and the whole procedure is repeated in the opposite direction to position Uranus.

Cycling through the entire Solar System in this way takes a long time, which is why the planets’ positions are only updated once a day at midnight. An ESP32, also hidden inside the Sun, connects to the internet to retrieve the correct positions for the day and drives the motor. The planet models, sourced from a museum shop, are hanging from thin aluminium tubes attached to wooden mounts made with a desktop CNC machine.

[Illusionmanager] made a detailed Instructables page showing the process of making a miniature version of the mechanism using just laser-cut wooden parts, as an update to a version we featured earlier. We really like the simplicity of this design, which stands in stark contrast to the huge gear trains used in more traditional orreries.

Continue reading “Ceiling-Mounted Orrery Is An Excercise In Simplicity”

Tiny Orrery Keeps The Planets In Their Places

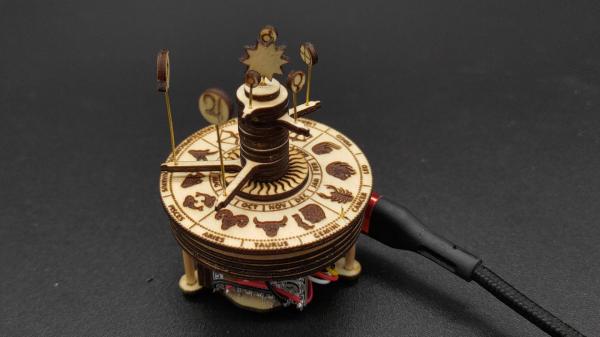
[Frans] claims to have made the world’s smallest wooden orrery. We won’t take a position on that — such things are best left up to the good folks at Guinness. But given that the whole thing is seriously in danger of being dwarfed by a USB-C connector, we’d say he’s got a pretty good shot at that record.

The key to keeping this planetarium so petite while making it largely out of wood is to eschew the complex gear trains that usually bring the Music of the Spheres to life in such devices. The layered base of the orrery, with pieces cut from a sheet of basswood using a laser cutter, contains a single tiny stepper motor and just two gears. A zodiac disc sits atop the base and is the only driven element in the orrery; every other celestial body moves thanks to a pin set into the zodiac disc. An ESP32 C3 contacts a NASA feed once a day to get the relative positions of the planets and uses the zodiac disk to arrange everything nicely for the day. The video below shows the “Planet Spinner” in action.

We love the look of this project; the burnt edges and lightly smoked surface of the laser-cut wooden parts look fantastic, and the contrast with the brass wires is striking. We’ve seen an orrery or two around here, executed in everything from solid brass to Lego, but this one really tickled our fancy. Continue reading “Tiny Orrery Keeps The Planets In Their Places”

Backyard Planetarium With Magnets

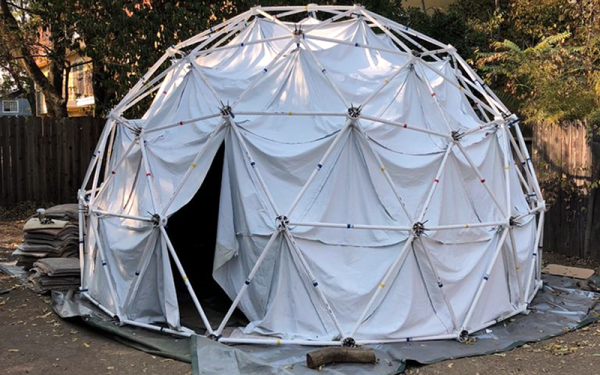
If you are a Hackaday reader, you probably like space in real life, fiction, or both. A trip to a planetarium is a great treat, but what if you could have a planetarium in your backyard? [Ecasill] thought so and used a Zip Tie domes kit to create just such a thing. It takes some sewing and a projector, but there’s a problem. The dome needs to come down if there is going to be bad weather. The answer? Magnetic dowel rods.

Because the magnets are brittle, plastic dip covers them after epoxy sticks them in place. The cloth has steel bolts to adhere, too. All in, the setup cost about $2,000. That includes a projector, a mirror ball, a sound system, and all the construction.

Continue reading “Backyard Planetarium With Magnets”

DIY Planetarium Built From PVC Pipes And Cardboard

When you think about DIY projects, you probably don’t consider building your own planetarium. Why would you? Building the thing is surely outside the capabilities of the individual, and even if you could figure it out, the materials would be far too expensive. There’s a limit to DIY projects, and obviously building a planetarium is on the wrong side of the line. Right?

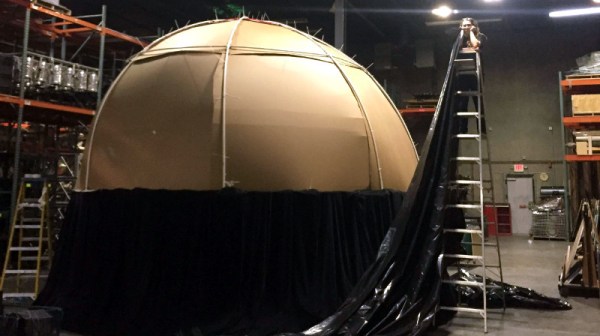
Well, apparently not. [Gabby LeBeau] has documented the planetarium she built as her senior project, and if you’ll forgive the pun, it’s absolutely out of this world. Using readily available parts and the help of family and friends, she built a fully functional planetarium big enough to seat the Physics Department. No word on what grade she got, but it’s a safe bet she screwed the curve up for the rest of the class.

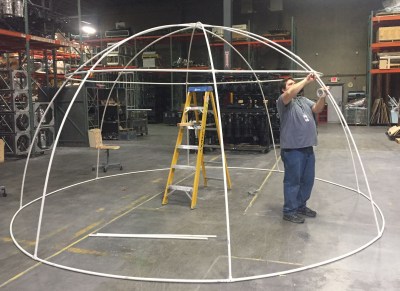
After two months of research and a couple of smaller proof of concept builds, she was able to find a business who graciously allowed her to construct the full scale planetarium in their warehouse. The frame is made of PVC pipes held together with zip ties. The big advantage to using the PVC pipes (beyond being cheap and easy to works with) is that they will automatically find a hemispherical shape when bent; saving the time and trouble it would take to create the shape with more rigid building materials.

Once the PVC frame was up, white cardboard panels were cut to shape and attached to the inside. The panels were lined up as closely as possible, but gaps were covered with white tape so the fit didn’t need to be perfect. When the dome was finished, it was lifted and placed on metal trusses to get some room underneath, and finally covered with a black tarp and stage curtain to block out all light.

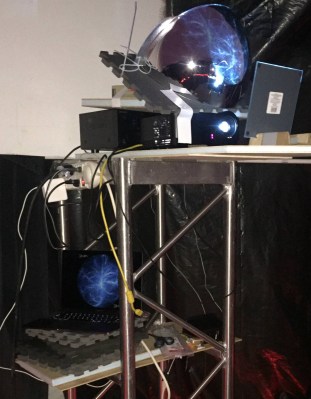
Of course, she didn’t go through all this trouble to just stick some glow in the dark stars on the inside of this thing. The image from a standard projector is directed at a flat mirror, which then bounces off of a convex mirror. Driving the projector is a laptop running Stellarium. While there were some imperfections she couldn’t get polished or cleaned off of the mirrors, the end result was still very impressive.

Unfortunately, you can’t really do a planetarium justice with a camera, so we aren’t able to see what the final image looked like. But judging by the slack-jawed faces of those who are pictured inside of it, we’re going to go out on a limb and say it was awesome.

We might suggest trying to quiet down the projector or adding some lasers to the mix, but overall this is a truly exceptional project, and we’re jealous of everyone who got to experience it first hand.

Hackaday Links: October 27, 2013

hackaday-links-chain

[Kyle] came across a project which he thinks is “simply elegant”. If you don’t already have a PCB vice, here’s an easy way to build one of your own.

This one’s so good but alas it’s not a hack. Check out the slideshow tour at UC Boulder’s Fiske Planetarium. You get a really cool look at the hardware that makes the dome and projector such a great experience. [via Reddit]

Here’s a schematic and a couple of snapshots of [Trax’s] CAN bus hacking rig. He plans on doing a tutorial but decided to share this link after reading the first part of our own CAN hacking series.

These strings of LEDs bump to the tunes. [Alex] is using GrooveShark as a frequency analyzer, then pushing commands via Node.js to the Arduino controlling the lights. It’s all planned for the back porch during his Halloween party.

We remember drilling holes in the 3.5″ floppy discs (we even made a wood jig for this) to double their capacity. A similar blast from the past was to punch a notch in the larger 5.25″ versions to make them double-sided.

If you’re trying to learn about FFT [Ronald] highly recommends this website. We didn’t do too much poking around because it’s kind of strange. But if you do get sucked in and have fun with it leave a comment to let others know it’s worth their attention.

We suppose that using 39 Raspberry Pi boards and their camera modules isn’t the worst way to build a huge 3D model capture rig. The results certainly are impressive. [Thanks Wouter]